SuperCollider日記(3)
長嶋 洋一
(一部 Processing日記かも)
Part 1 Part 2 Part 4 Part 5 Part 6 Part 7
2011年3月25日(金)
いよいよ SuperCollider Osaka Meetup の前日となってしまった(^_^;)。 とりあえず、参加者の皆さんに付いていくためにも、行けるところまで頑張ってみよう。Workshop materials for Computer Music (G6002) の 5. Interaction の 5.1 Interaction.html からである。 いきなり「Interaction via Mouse, Keyboard, MIDI, SoundIn...」と、お馴染みの「MIDI」が出て来てホッとした(^_^)。 最近の若い人はMIDIを知らなくてもComputer Musicが出来るので、これは「年寄りの証明」でもあるが、年寄りなので仕方ない。
まずはいつものようにlocalhost Serverをbootしておき、最初はこれまでに出て来ている「MouseX/Y」である。 マウスカーソルの座標は当然ながらリニアスケールであるが、音楽/サウンドの多くは指数関数特性であるので、以下の書式のように、カーソル値に対する特性として「linear」と「exponential」を指定できる。
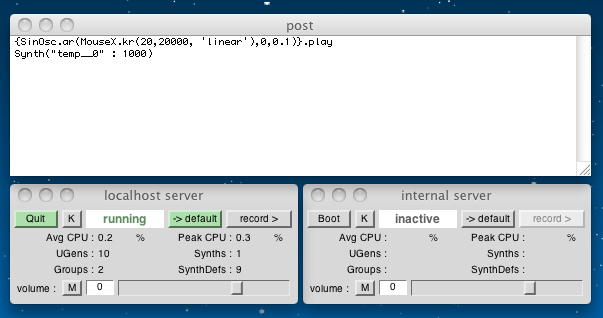
2つの特性を聞き比べてみた。まず最初は以下のように「linear」を指定して、画面内を左右に動かしてみた。 こんな音がした。MouseX.kr(leftval, rightval, warp) MouseY.kr(topscreenval, bottomscreenval, warp) //warp can be 'linear' or 'exponential' depending //on the way the parameter {SinOsc.ar(MouseX.kr(20,20000, 'linear'),0,0.1)}.play
次に、以下のように「exponential」を指定して、テキストではY座標だったのを同じX座標に替えて、上とほぼ同じように画面内を左右に動かしてみた。 こんな音がした。
{SinOsc.ar(MouseX.kr(20,20000, 'exponential'),0,0.1)}.play

コントロールパラメータを自在にスケーリングする、というのは、Max/MSPでもProcessingでもGainerでもArduinoでも常に直面する課題であり、もちろんSuperColliderでも用意されている。 「Index UGen」というものである。 Indexの定義・書式は以下のようになる。 特性カーブは配列として定義することになる。
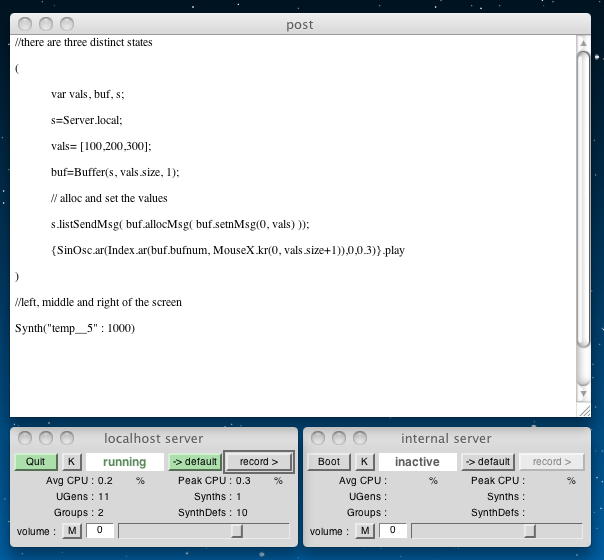
コントローラの値(ここではマウスのX座標)を、離散的にいくつかの領域に分割したい場合には、具体的には以下のように、localhost serverにBufferを定義して、ここに設定された配列のインデックスとして、マウス座標をメッセージとして送る、ということらしい。 実行させてみると、[100,200,300]の領域に対応して、 こんな音がした。Index.kr(array, indexing signal) //the indexing signal is clipped to keep it in range //array must be a FloatArray, //so you can build it as [0,1,2].asSignal //there are three distinct states ( var vals, buf, s; s=Server.local; vals= [100,200,300]; buf=Buffer(s, vals.size, 1); // alloc and set the values s.listSendMsg( buf.allocMsg( buf.setnMsg(0, vals) )); {SinOsc.ar(Index.ar(buf.bufnum, MouseX.kr(0, vals.size+1)),0,0.3)}.play ) //left, middle and right of the screen
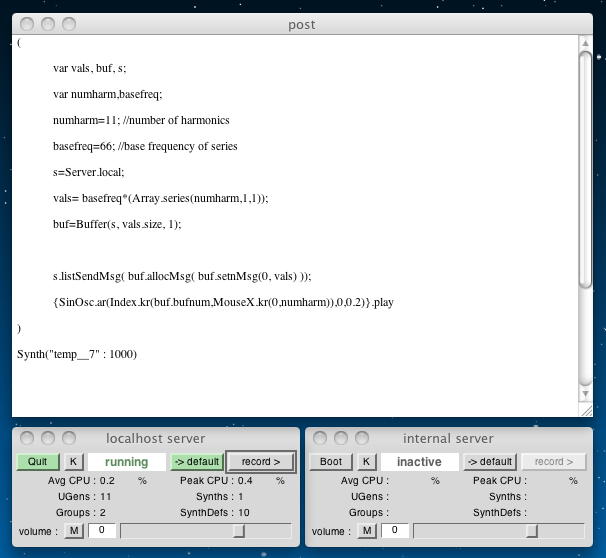
以下の例では、画面の左右(X)方向を11分割して、n番目の領域では66Hzサインの純正n倍音が鳴る。 マウスを左右に動かすと、 こんな音がした。
(
	var vals, buf, s;
	var numharm,basefreq;
	numharm=11; //number of harmonics
	basefreq=66; //base frequency of series
	s=Server.local;
	vals= basefreq*(Array.series(numharm,1,1));
	buf=Buffer(s, vals.size, 1);

	s.listSendMsg( buf.allocMsg( buf.setnMsg(0, vals) ));
	{SinOsc.ar(Index.kr(buf.bufnum,MouseX.kr(0,numharm)),0,0.2)}.play
)
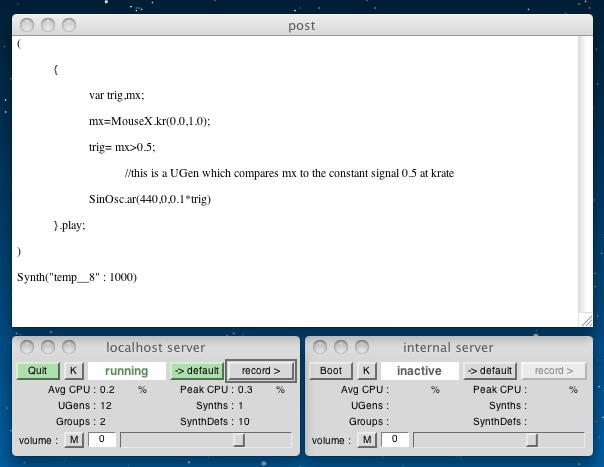
マウスにはボタンがあるが、ここまで登場していない。 以下の例は、X座標の中央を境界として、オシレータのサウンドをON/OFFするトリガとして出す、というものである。 これは本当ならマウスボタンで行う方が自然だと思うけど(^_^;)。 こんな音がした。
(
	{
		var trig,mx;
		mx=MouseX.kr(0.0,1.0);
		trig= mx>0.5;
			//this is a UGen which compares mx to the constant signal 0.5 at krate
		SinOsc.ar(440,0,0.1*trig)
	}.play;
)
もはやサウンドも画像も省略するが、以下の例では、画面内のある矩形領域にマウスカーソルがある時だけサウンドが鳴る。
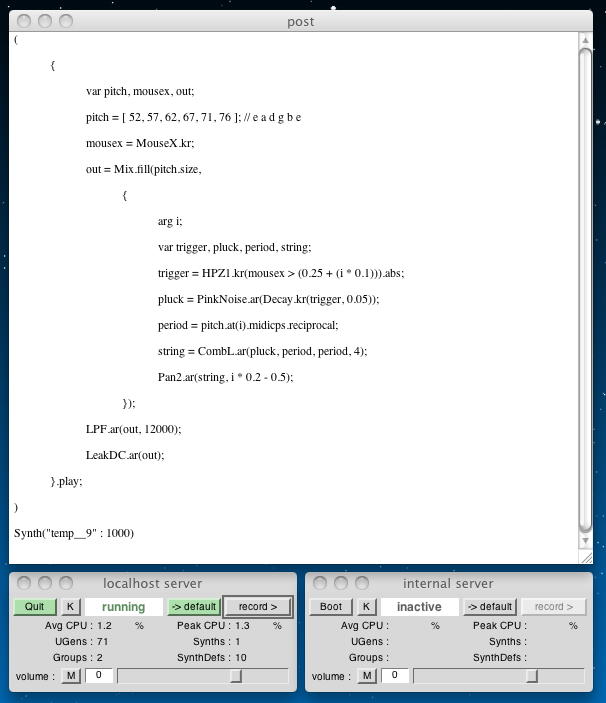
以下の例は、SuperColliderの作者、James McCartneyが作ったというサンプルである。 マウスでギターの弦を弾いているイメージらしい。 確かに、マウスを色々と動かすと、 こんな音がした。( //trigger in a given region { var trig,mx,my; mx=MouseX.kr(0.0,1.0); my=MouseY.kr(0.0,1.0); trig= if((mx>0.3) * (mx<0.5) * (my>0.3) * (my<0.7),1,0); //if is a UGen here, * is equivalent to logical AND SinOsc.ar(440,0,0.1*trig) }.play; ) ( // strummable guitar // use mouse to strum strings { var pitch, mousex, out; pitch = [ 52, 57, 62, 67, 71, 76 ]; // e a d g b e mousex = MouseX.kr; out = Mix.fill(pitch.size, { arg i; var trigger, pluck, period, string; // place trigger points from 0.25 to 0.75 trigger = HPZ1.kr(mousex > (0.25 + (i * 0.1))).abs; pluck = PinkNoise.ar(Decay.kr(trigger, 0.05)); period = pitch.at(i).midicps.reciprocal; string = CombL.ar(pluck, period, period, 4); Pan2.ar(string, i * 0.2 - 0.5); }); LPF.ar(out, 12000); LeakDC.ar(out); }.play; )
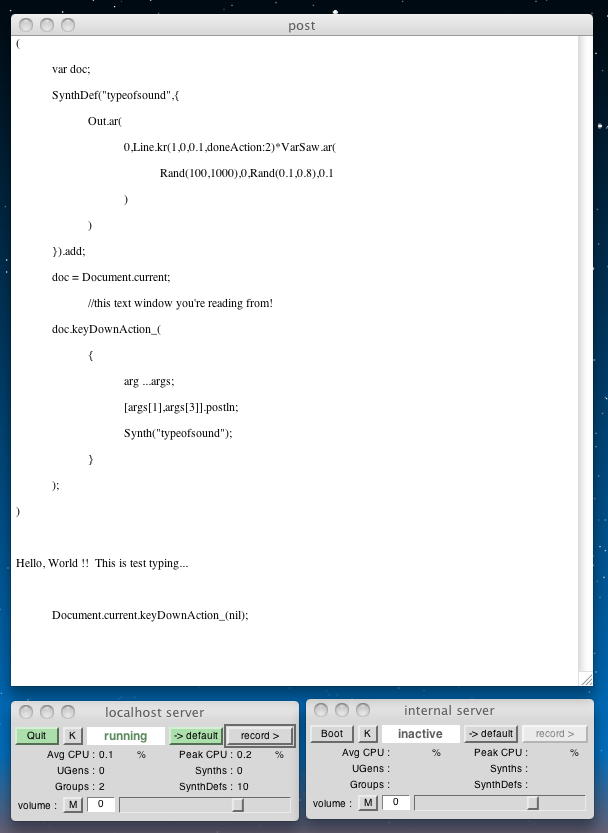
次のインターフェースは「キーボード」である。ここでは音楽鍵盤ではなくて、パソコンのキーボードだろう。 「action」関数を設定することでキーボード入力をトリガに使える。 以下のサンプルを実行すると、タイピングのたびにランダムピッチのサウンドが鳴るとともに、キーボードで打った文字が表示される。 発音動作をOFFにする場合には最後の「Document.current.keyDownAction_(nil);」を実行する。 こんな音がした。
(
	var doc;
	SynthDef(
		"typeofsound",
		{
			Out.ar(
				0,Line.kr(1,0,0.1,doneAction:2)
				*VarSaw.ar(
					Rand(100,1000),
					0,
					Rand(0.1,0.8),
					0.1
				)
			)
		}
	).add;
	doc = Document.current;
		//this text window you're reading from!
	doc.keyDownAction_(
		{
			arg ...args;
			[args[1],args[3]].postln;
			Synth("typeofsound");
		}
	);
)

//turn this off
(
	Document.current.keyDownAction_(nil);
)
「Document」のヘルプはとんでもなく長いので別ファイルにした。 これである。
さて、遂に、いよいよ、「MIDI」である(^o^)。 とりあえずMIDIを使うには、まず以下のように初期化が必要だ、とある。これを実行しても何も起きない。(^_^;)
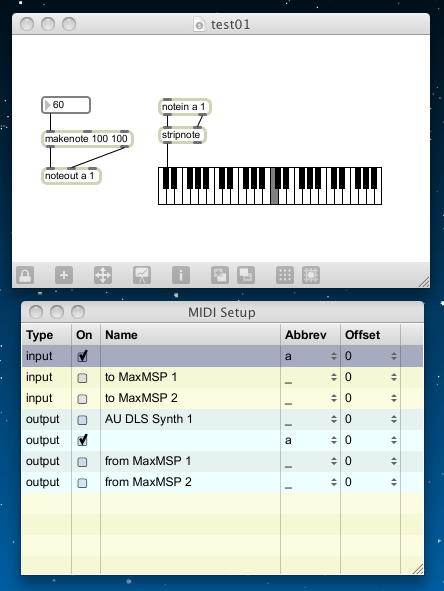
次に、MIDI入力メッセージに反応するためには、以下のようにコールバック関数をセットアップする必要がある、という。 これを実行しても何も起きない。(^_^;)MIDIClient.init //should post a list of available devices そして、以下のように、あとはMIDI入力があれば表示されるという。 これは、 MIDI規約 そのものである。これらを実行しても、まだ何も起きない。(^_^;)MIDIIn.connect(0,MIDIClient.sources[0]) //first number is port number, //second is device from sources list //MIDIIn.connect would work on its own //but defaults to first port of first device ここで、ちょっと長いが、まずは「MIDIIn」のヘルプを以下に置いて、眺めてみる。MIDIIn.noteOn= { arg src, chan, num, vel; [chan,num,vel / 127].postln; }; MIDIIn.control = { arg src, chan, num, val; [chan,num,val/127].postln; }; MIDIIn.bend = { arg src, chan, bend; [chan,bend/8192].postln; }; とりあえず、単独のMacで、外部にMIDIインターフェースを接続しないで内部MIDIバスで何か出来ないか、試してみることにした。 MacOSXのユーティリティの「Audio MIDI 設定」のMIDIは以下のようになっている。MIDIIn { var <>port; classvar <>action, <> noteOn, <> noteOff, <> polytouch, <> control, <> program, <> touch, <> bend, <> sysex, sysexPacket, <> sysrt, <> smpte, <> invalid; classvar <> noteOnList, <> noteOffList, <> polyList, <> controlList, <> programList, <> touchList, <> bendList; *waitNoteOn { arg port, chan, note, veloc; var event; event = MIDIEvent(\noteOn, port, chan, note, veloc, thisThread); noteOnList = noteOnList.add(event); // add to waiting list nil.yield; // pause the thread. ^event } *waitNoteOff { arg port, chan, note, veloc; var event; event = MIDIEvent(\noteOff, port, chan, note, veloc, thisThread); noteOffList = noteOffList.add(event); // add to waiting list nil.yield; // pause the thread. ^event } *waitPoly { arg port, chan, note, veloc; var event; event = MIDIEvent(\poly, port, chan, note, veloc, thisThread); polyList = polyList.add(event); // add to waiting list nil.yield; // pause the thread. ^event } *waitTouch { arg port, chan, val; var event; event = MIDIEvent(\touch, port, chan, val, nil, thisThread); touchList = touchList.add(event); // add to waiting list nil.yield; // pause the thread. ^event } *waitControl { arg port, chan, num, val; var event; event = MIDIEvent(\control, port, chan, num, val, thisThread); controlList = controlList.add(event); // add to waiting list nil.yield; // pause the thread. ^event } *waitBend { arg port, chan, val; var event; event = MIDIEvent(\bend, port, chan, val, nil, thisThread); bendList = bendList.add(event); // add to waiting list nil.yield; // pause the thread. ^event } *waitProgram { arg port, chan, num; var event; event = MIDIEvent(\program, port, chan, num, nil, thisThread); programList = programList.add(event); // add to waiting list nil.yield; // pause the thread. ^event } *doAction { arg src, status, a, b, c; action.value(src, status, a, b, c); } *doNoteOnAction { arg src, chan, num, veloc; noteOn.value(src, chan, num, veloc); this.prDispatchEvent(noteOnList, \noteOn, src, chan, num, veloc); } *doNoteOffAction { arg src, chan, num, veloc; noteOff.value(src, chan, num, veloc); this.prDispatchEvent(noteOffList, \noteOff, src, chan, num, veloc); } *doPolyTouchAction { arg src, chan, num, val; polytouch.value(src, chan, num, val); this.prDispatchEvent(polyList, \poly, src, chan, num, val); } *doControlAction { arg src, chan, num, val; control.value(src, chan, num, val); this.prDispatchEvent(controlList, \control, src, chan, num, val); } *doProgramAction { arg src, chan, val; program.value(src, chan, val); this.prDispatchEvent(programList, \program, src, chan, val); } *doTouchAction { arg src, chan, val; touch.value(src, chan, val); this.prDispatchEvent(touchList, \touch, src, chan, val); } *doBendAction { arg src, chan, val; bend.value(src, chan, val); this.prDispatchEvent(bendList, \bend, src, chan, val); } *doSysexAction { arg src, packet; sysexPacket = sysexPacket ++ packet; if (packet.last == -9, { sysex.value(src, sysexPacket); sysexPacket = nil }); } *doInvalidSysexAction { arg src, packet; invalid.value(src, packet); } *doSysrtAction { arg src, index, val; sysrt.value(src, index, val); } *doSMPTEaction { arg src, frameRate, timecode; smpte.value(src, frameRate, timecode); } *findPort { arg deviceName,portName; ^MIDIClient.sources.detect({ |endPoint| endPoint.device == deviceName and: {endPoint.name == portName}}); } *connectAll { if(MIDIClient.initialized.not,{ MIDIClient.init }); MIDIClient.sources.do({ |src,i| MIDIIn.connect(i,src); }); } *connect { arg inport=0, device=0; var uid,source; if(MIDIClient.initialized.not,{ MIDIClient.init }); if(device.isNumber, { if(device >= 0, { if ( device > MIDIClient.sources.size,{ // on linux the uid's are very large numbers source = MIDIClient.sources.detect{ |it| it.uid == device }; if(source.isNil,{ ("MIDI device with uid"+device+ "not found").warn; },{ uid = source.uid; }) },{ source = MIDIClient.sources.at(device); if(source.isNil,{ "MIDIClient failed to init".warn; },{ uid = MIDIClient.sources.at(device).uid; }); }); },{ // elsewhere they tend to be negative uid = device; }); },{ if(device.isKindOf(MIDIEndPoint), {uid = device.uid}); // else error }); this.connectByUID(inport,uid); } *disconnect { arg inport=0, device=0; var uid, source; if(device.isKindOf(MIDIEndPoint), {uid = device.uid}); if(device.isNumber, { if(device.isPositive, { if ( device > MIDIClient.sources.size, { source = MIDIClient.sources.select{ |it| it.uid == device }.first; if(source.isNil,{ ("MIDI device with uid"+device+ "not found").warn; },{ uid = source.uid; }) }, { source = MIDIClient.sources.at(device); if(source.isNil,{ "MIDIClient failed to init".warn; },{ uid = MIDIClient.sources.at(device).uid; }); }); },{ uid = device; }); }); this.disconnectByUID(inport,uid); } *connectByUID {arg inport, uid; _ConnectMIDIIn } *disconnectByUID {arg inport, uid; _DisconnectMIDIIn } *new { arg port; ^super.new.port_(port) } *prDispatchEvent { arg eventList, status, port, chan, b, c; var selectedEvents; eventList ?? {^this}; eventList.takeThese {| event | if (event.match(port, chan, b, c)) { selectedEvents = selectedEvents.add(event); true } { false }; }; selectedEvents.do{ |event| event.set(status, port, chan, b, c); event.thread.next; } } }

この状態で、Max5を起動して、内部バスの「IAC」を設定してみると、確かにパッチ内でぐりぐりした数値がMIDI出力され、これをMIDI入力して鍵盤が表示されているので、これは動いている。
ただ問題は、Max5のように「MIDI設定」というようなものがSuperColliderでは見当たらない(^_^;)。 この状態では外部MIDIインターフェースを繋いでいないので、表示されているIACドライバがdefaultとして指定されてくれれば嬉しいのであるが・・・。 ここが謎のまま、以下のサンプルを走らせてみた。
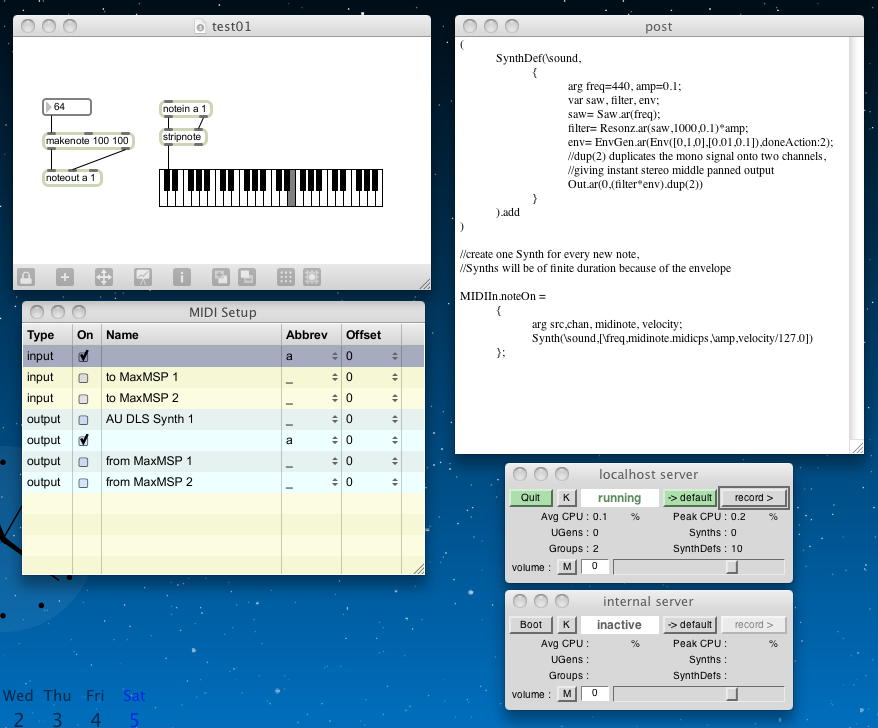
すると、ちゃんとMax5から送られた内部MIDIバスの情報で、SuperColliderから音が出てくれた。 さすが、サーバ方式になったので、ここらは自在なのだった(^_^)。 ただし、localhost serverウインドウの「record」ボタンでこれまでのように録音すると、なんと こんな音がした。 これは、Max5でもサウンドリソースを掴んでいるための現象と思われる。 録音しなければ、ちゃんと鍵盤(MIDIノート)に対応した音がしているのに。(^_^;)
//creating Synths with each new note on
(
	SynthDef(
		\sound,
		{
			arg freq=440, amp=0.1;
			var saw, filter, env;
			saw= Saw.ar(freq);
			filter= Resonz.ar(saw,1000,0.1)*amp;
			env= EnvGen.ar(
				Env([0,1,0],[0.01,0.1]),doneAction:2
			);
			//dup(2) duplicates the mono
			//signal onto two channels,
			//giving instant stereo middle panned output
			Out.ar(0,(filter*env).dup(2))
		}
	).add
)

//create one Synth for every new note,
//Synths will be of finite duration because of the envelope

MIDIIn.noteOn =
	{
		arg src,chan, midinote, velocity;
		Synth(
			\sound,
			[
				\freq,
				midinote.midicps,
				\amp,
				velocity/127.0
			]
		)
	};
まず、後々の実験のために、上のサンプルのためのMax5パッチ「test01.maxpat」をフォルダに入れてzip圧縮して、 ここに置いた。 サウンドの録音は別に不要なので、引き続き、以下のMIDIコントロールチェンジのサンプルを実験してみた。
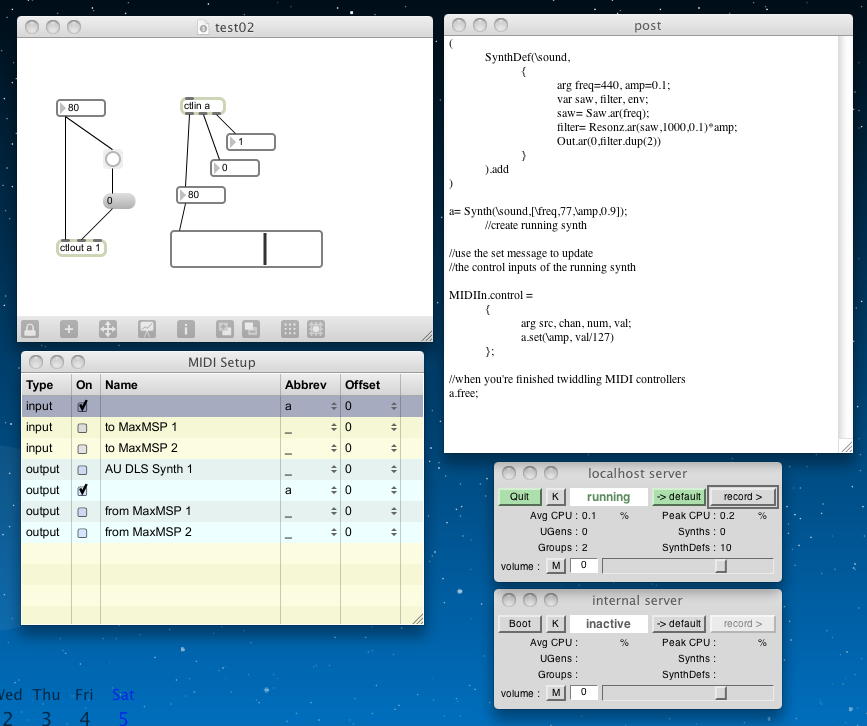
すると、ちゃんとMax5から送られた(Max5内でもスライダーで情報のやりとりをモニタ)、MIDInコントロールチェンジ情報で、鳴り続けるサウンドの音量が変化した(^_^)。 ノートイベントではないためか、今度は「record」で録音しても、鳴っている音には異常がなかった。 しかしやっぱり、録音されたファイルの中のサウンドは異常だった(^_^;)。 Max5の画面内の変数ぐりぐりに対応して、パソコンで鳴っている音とは違って、 こんな音が録音された。 このサンプルのために、コントロールチェンジを送るように改訂したMax5パッチ「test02.maxpat」をフォルダに入れてzip圧縮した。 ここである。
//using control change for continuous variation;
//run one block/line at a time here
//no envelope this time, permanent sound
(
	SynthDef(
		\sound,
		{
			arg freq=440, amp=0.1;
			var saw, filter, env;
			saw= Saw.ar(freq);
			filter= Resonz.ar(saw,1000,0.1)*amp;
			Out.ar(0,filter.dup(2))
		}
	).add
)

a= Synth(\sound,[\freq,77,\amp,0.9]);
	//create running synth

//use the set message to update
//the control inputs of the running synth

MIDIIn.control =
	{
		arg src, chan, num, val;
		a.set(\amp, val/127)
	};

//when you're finished twiddling MIDI controllers
a.free;
これでMIDI内部バスからの入力を受けられることは確認できたので、次の「MIDI出力」に進むことにした。 テキストには、まずは「MIDIOut」のヘルプを見ろ、とある。 ちょっと長いが、以下である。
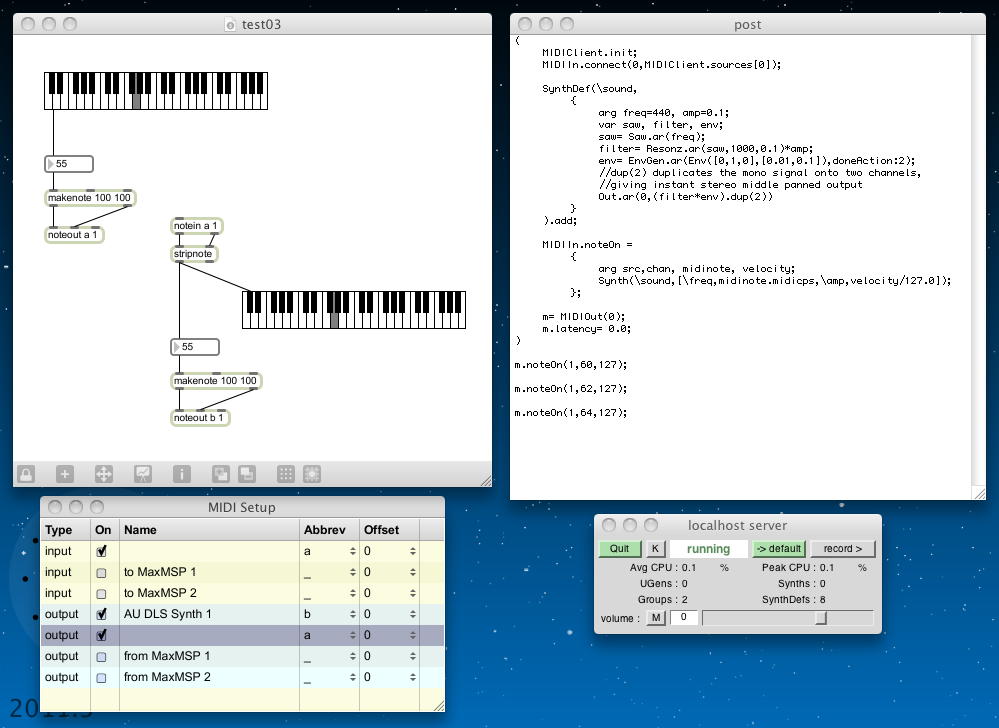
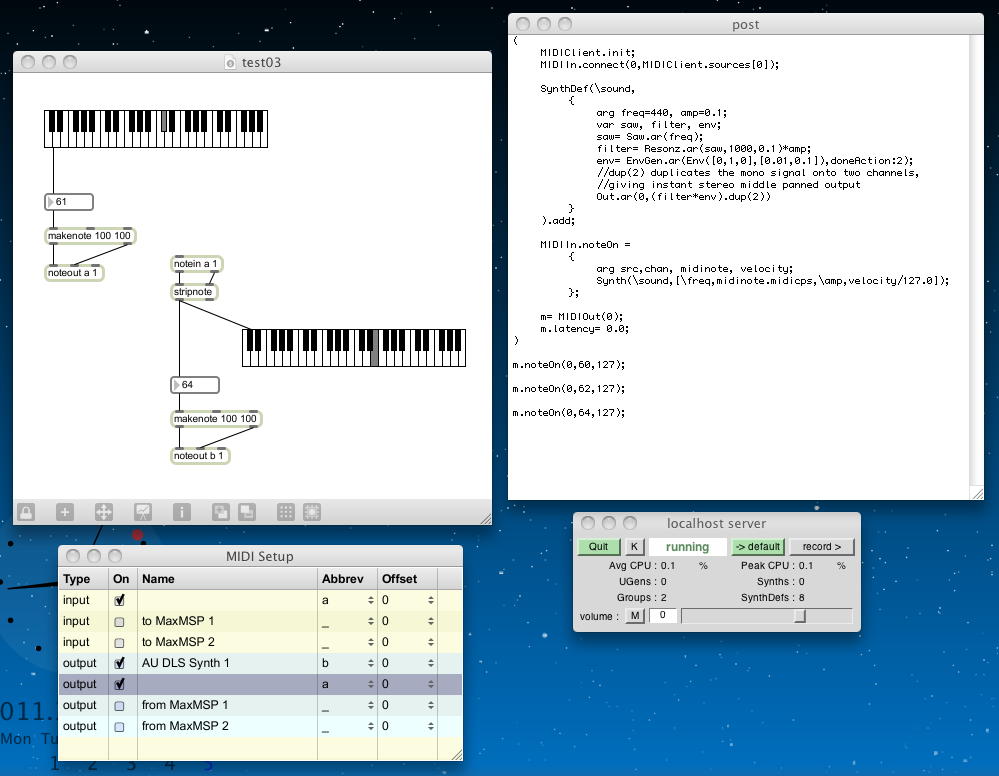
ここでは「WARNING」として、デフォルトではlatencyが非常に長くしてあるので、システムに合わせて変更するように、とのことである。 また、「MIDIResponder」のヘルプも見ろ、とある。 以下である。MIDIOut { var <>port, <>uid, <>latency=0.2; *new { arg port, uid; if(thisProcess.platform.name != \linux) { ^super.newCopyArgs(port, uid ?? { MIDIClient.destinations[port].uid }); } { ^super.newCopyArgs(port, uid ?? 0 ); } } *newByName { arg deviceName,portName,dieIfNotFound=true; var endPoint,index; endPoint = MIDIClient.destinations.detect({ |ep,epi| index = epi; ep.device == deviceName and: {ep.name == portName} }); if(endPoint.isNil,{ if(dieIfNotFound,{ Error("Failed to find MIDIOut port " + deviceName + portName).throw; },{ ("Failed to find MIDIOut port " + deviceName + portName).warn; }); }); ^this.new(index,endPoint.uid) } *findPort { arg deviceName,portName; ^MIDIClient.destinations.detect({ |endPoint| endPoint.device == deviceName and: {endPoint.name == portName}}); } write { arg len, hiStatus, loStatus, a=0, b=0; this.send(port, uid, len, hiStatus, loStatus, a, b, latency); } noteOn { arg chan, note=60, veloc=64; this.write(3, 16r90, chan.asInteger, note.asInteger, veloc.asInteger); } noteOff { arg chan, note=60, veloc=64; this.write(3, 16r80, chan.asInteger, note.asInteger, veloc.asInteger); } polyTouch { arg chan, note=60, val=64; this.write(3, 16rA0, chan.asInteger, note.asInteger, val.asInteger); } control { arg chan, ctlNum=7, val=64; this.write(3, 16rB0, chan.asInteger, ctlNum.asInteger, val.asInteger); } program { arg chan, num=1; this.write(2, 16rC0, chan.asInteger, num.asInteger); } touch { arg chan, val=64; this.write(2, 16rD0, chan.asInteger, val.asInteger); } bend { arg chan, val=8192; val = val.asInteger; this.write(3, 16rE0, chan, val bitAnd: 127, val >> 7); } allNotesOff { arg chan; this.control(chan, 123, 0); } smpte { arg frames=0, seconds=0, minutes=0, hours=0, frameRate = 3; var packet; packet = [frames, seconds, minutes, hours] .asInteger .collect({ arg v, i; [(i * 2 << 4) | (v & 16rF), (i * 2 + 1 << 4) | (v >> 4) ] }); packet = packet.flat; packet.put(7, packet.at(7) | ( frameRate << 1 ) ); packet.do({ arg v; this.write(2, 16rF0, 16r01, v); }); } songPtr { arg songPtr; songPtr = songPtr.asInteger; this.write(4, 16rF0, 16r02, songPtr & 16r7f, songPtr >> 7 & 16r7f); } songSelect { arg song; this.write(3, 16rF0, 16r03, song.asInteger); } midiClock { this.write(1, 16rF0, 16r08); } start { this.write(1, 16rF0, 16r0A); } continue { this.write(1, 16rF0, 16r0B); } stop { this.write(1, 16rF0, 16r0C); } reset { this.write(1, 16rF0, 16r0F); } sysex { arg packet; ^this.prSysex( uid, packet ); } send { arg outport, uid, len, hiStatus, loStatus, a=0, b=0, late; _SendMIDIOut } prSysex { arg uid, packet; _SendSysex ^this.primitiveFailed; } } ここで、こちらも MIDI規約 そのものなので、まず、SuperCollider内部でMIDI outしてMIDI inすることの確認に、以下のサンプルを実行してみた。MIDIResponder { var <>function,<>swallowEvent=false, <>matchEvent; // for matching ports, channels, and parameters init { arg install; if(this.class.initialized.not,{ this.class.init }); matchEvent.port = matchEvent.port.asMIDIInPortUID; if(install,{this.class.add(this);}); } respond { arg src,chan,num,value; if(this.match(src,chan,num,value),{ this.value(src,chan,num,value) ^swallowEvent }); ^false; } match { arg src,chan,num,value; ^matchEvent.match(src,chan,num,value); } value { arg src,chan,a,b; function.value(src, chan, a, b) } remove { this.class.remove(this) } *removeAll { if(this == MIDIResponder,{ this.allSubclasses.do({ |responderClass| responderClass.removeAll }) },{ this.init }) } } すると、最後の3行をそれぞれ実行するたびに音が出た。ここまではOKである。 そこで勢いに乗って、こちらもMax5と併設することにしてみた。 つまり、内部MIDIバスを使って、Max5の内蔵QuickTime音源を鳴らす、という構想である(^_^)。( MIDIClient.init; MIDIIn.connect(0,MIDIClient.sources[0]); SynthDef(\sound, { arg freq=440, amp=0.1; var saw, filter, env; saw= Saw.ar(freq); filter= Resonz.ar(saw,1000,0.1)*amp; env= EnvGen.ar(Env([0,1,0],[0.01,0.1]),doneAction:2); //dup(2) duplicates the mono signal onto two channels, //giving instant stereo middle panned output Out.ar(0,(filter*env).dup(2)) } ).add; MIDIIn.noteOn = { arg src,chan, midinote, velocity; Synth(\sound,[\freq,midinote.midicps,\amp,velocity/127.0]); }; m= MIDIOut(0); m.latency= 0.0; ) m.noteOn(1,60,127); m.noteOn(1,62,127); m.noteOn(1,64,127); このサンプルのために、内部MIDIバスからのノート情報で内蔵QuickTime音源が鳴るMax5パッチ「test03.maxpat」をフォルダに入れてzip圧縮した。 ここである。 これはMax5内部では、確かに左側の鍵盤を弾くと内部MIDIバス経由で内蔵QuickTime音源のピアノが鳴り、同時にSuperColliderの上のサウンドも鳴った。
・・・しかし、SuperColliderのpost画面からのMIDI送信では、SuperColliderの音源しか鳴らない。Max5の内部MIDI入力が来ないように見える(^_^;)。これには困った。
そしていろいろ試してみて、ようやく原因が判明した。 Max5のパッチのMIDIノート入力を、デバッグの定番、「midiin + midiparse」にしてみたところ、なんとSuperColliderからのMIDI情報が「MIDI 2チャンネル」となっていた。仕方ないので、他にMIDI情報も来ないので、ダイレクトにMIDIメッセージのノートナンバを繋いだところ、ちゃんとSuperColliderと一緒にMax5側のQuickTime音源のピアノも鳴った(^_^)。 このMax5パッチ「test04.maxpat」をフォルダに入れてzip圧縮したのが これである。
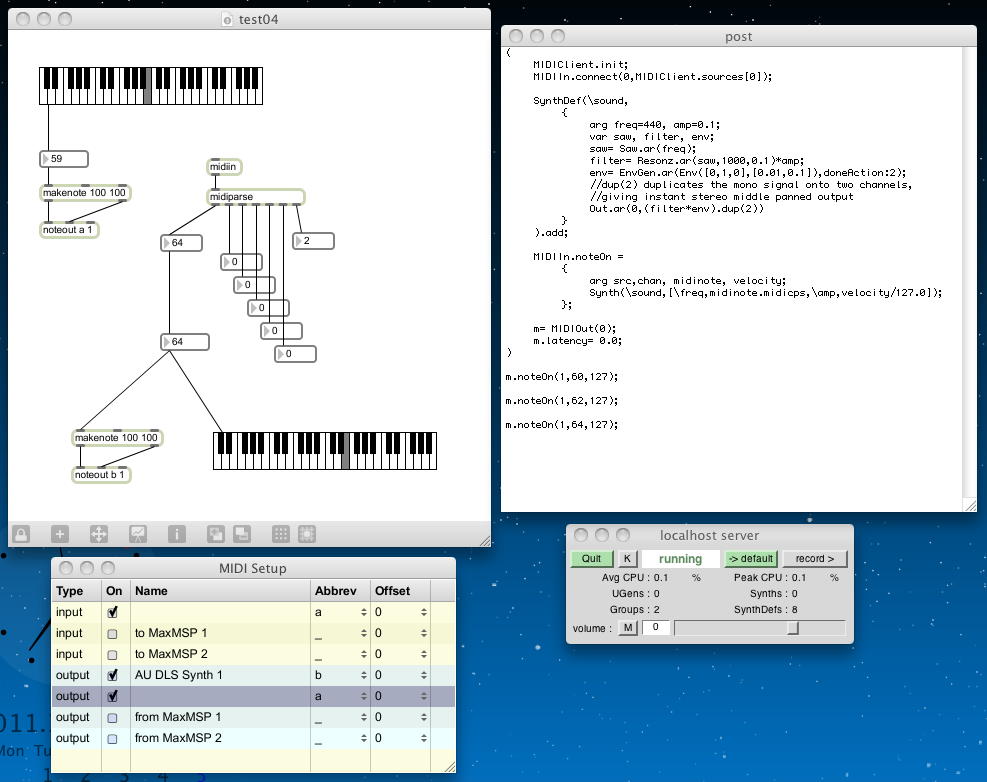
つまりこれは、過去にもMIDIの歴史において、累々たるトラブルとミスの原因になった、
という、「1だけズレてる」というMIDI規格の問題点である。 当然のことながら、MIDIチャンネルが異なる情報は無視する。なので鳴らない。
- MIDIには16個の「発音チャンネル」がある
- その最初の発音チャンネルを「1チャンネル」と呼ぶ。つまり1-16チャンネル
- MIDIの生データとしては2進数で0000から1111まで、つまり0-15チャンネル
Maxでは、ちゃんとオブジェクトのMIDIチャンネルのパラメータは「+1」したものになっていて、それが外部とやりとりされる生データでは元に戻っているので問題ない。 しかしSuperColliderの場合には、送信のMIDIチャンネルは「0000」-「1111」の生データとして定義しているのだった。これでは確かに音が出ない。 そこで上のSuperColliderの出力部分だけ、以下のように「1」でなく「0」としたら、ちゃんと一緒に鳴った。
m.noteOn(0,60,127);

m.noteOn(0,62,127);

m.noteOn(0,64,127);
・・・しかしここでまた謎が生まれた。 Max5では鳴らない、つまりSuperColliderのMIDIの入力と出力とでチャンネルの指定にズレがあるとすれば、SuperColliderの内部でも鳴らない筈なのである。 ここでようやく気付いたのは、以下のプログラム(部分)では、「MIDI入力チャンネルを見て(判定して)いなかった(^_^;)」という事である。 実際にSuperCollider内から、あるいはMax5から送ってみると、どのMIDIチャンネルでも鳴っていた。
これでようやく問題がクリアになったので、さきほどのSuperColliderプログラムを以下のように改訂してみた。 これで、送信チャンネルと受信チャンネルを指定して、そのチャンネルだけで鳴る、というMIDI本来の機能となった。 相方のMax5パッチまで含めて、ようやく「本当のMIDI」である。 なお、相方のMax5パッチ「test05.maxpat」をフォルダに入れてzip圧縮したのが これである。MIDIIn.noteOn = { arg src,chan, midinote, velocity; Synth(\sound,[\freq,midinote.midicps,\amp,velocity/127.0]); }; ( var tx_channel, rx_channel; tx_channel=0; rx_channel=0; MIDIClient.init; MIDIIn.connect(0,MIDIClient.sources[0]); SynthDef(\sound, { arg freq=440, amp=0.1; var saw, filter, env; saw= Saw.ar(freq); filter= Resonz.ar(saw,1000,0.1)*amp; env= EnvGen.ar(Env([0,1,0],[0.01,0.1]),doneAction:2); //dup(2) duplicates the mono signal onto two channels, //giving instant stereo middle panned output Out.ar(0,(filter*env).dup(2)) } ).add; MIDIIn.noteOn = { arg src,chan, midinote, velocity; if (chan == rx_channel, { Synth(\sound,[\freq,midinote.midicps,\amp,velocity/127.0]); }, { } ) }; m= MIDIOut(0); m.latency= 0.0; m.noteOn(tx_channel,60,127); m.noteOn(tx_channel,64,127); m.noteOn(tx_channel,67,127); )

・・・この後、前にFM音源で出て来た、SuperColliderのスライダーウインドウを使って、逆にSuperColliderのGUIからMIDIバスに出力して、それでMax5内のスライダーを動かせないか・・・としばし挑戦したが、時間切れでうまく出来なかった。 これはまたいずれ、挑戦することにしよう。 ちょっと次回はキリが悪いが、この続きで「SoundIn」、サウンド入力から、となる。
2011年3月26日(土)
遂に、 SuperCollider Osaka Meetup の当日となってしまった(^_^;)。 新幹線・新大阪から地下鉄・中之島南方へ。そして阪急を経由して大阪・十三へ。ちょっとドキドキしながら、レンタルスペースのビルに行ったが、少し前から待っていても時間になっても誰も現れず(^_^;)、やがて管理人らしいおっさんが迎えに来てくれて、ようやく合流できた。会場はもっと上のフロアの部屋だったのだ(^_^;)。そして直後にタケコさんと、なんと(旦那さんの)赤松御大まで現れて、一気に現場はゴージャスになった。この日集まったのは、プロのブログラマーとして活躍している2-3人に、学生さんが2人、そして大学教員も複数、という、よく分からないメンバーであると判明した。 また、既にこの日記を読んでくれている人がいた、と判明したので、「日記(1)」「日記(2)」で、SuperColliderのソースが奇麗にインデントされていないものをいくつも見つけて、浜松に帰ったら全て改訂しよう、と心に誓った。
メインでバリバリにSupercolliderしている人が少ない、という状況を受けて、とりあえず相互に自己紹介から始まったこのワークショップ、結果としては僕にとっては「とっっっっっっっっっても収穫のある」イベントとなった。 最新のSuperColliderスペシャリストの作品例を紹介してもらい、また自分で解決できていなかった問題が奇麗に解決した。 その場で備忘録メモとして打ち込んでいた「■Supercolliderワークショップのメモ■」は、まさに宝庫である。 素晴らしく収穫のあるミーティング参加で、自腹で浜松から大阪まで遠征した甲斐があった(^_^)。
2011年3月27日(日)
この日はまだ大阪だったのでほとんど時間が無かったが、それでも朝、ホテルの部屋で2時間ほどかけて、大きな進展が2つあった。一つは、茨城県日立市の親戚で、震災とは関係なく長寿を全うしての大往生だったおばさんが、震災の直後ということで通夜も葬儀もなく火葬だけ、と延期されていた葬儀の日程が4月2日と決まったのを受けて、親戚がなかなか駆け付けられない交通状況の中で、ネットをあれこれ検索し倒して、なんとか駆け付けるルートを調べ上げ、ホテルとレンタカーの予約を完了したこと。
そしてもう一つの収穫は、前日の十三のワークショップ会場で、最後まで解決していなかった「SuperColliderのスライダー情報を内部MIDIバスでMaxに送ってMaxのスライダーを動かす」という宿題をスッキリと解決した。 そして、気持ちよく大阪で遊んで晩に浜松に帰った。
2011年3月28日(月)
いよいよ新学期の直前、準備と仕込みの週に突入した。 まずは 研究室のページを新年度用にちょっと改訂した。 まだ新学期までに作らないといけないページがあるが、忘れないうちに、 SuperCollider Osaka Meetup で得られた収穫について、まずここで整理しておこう。
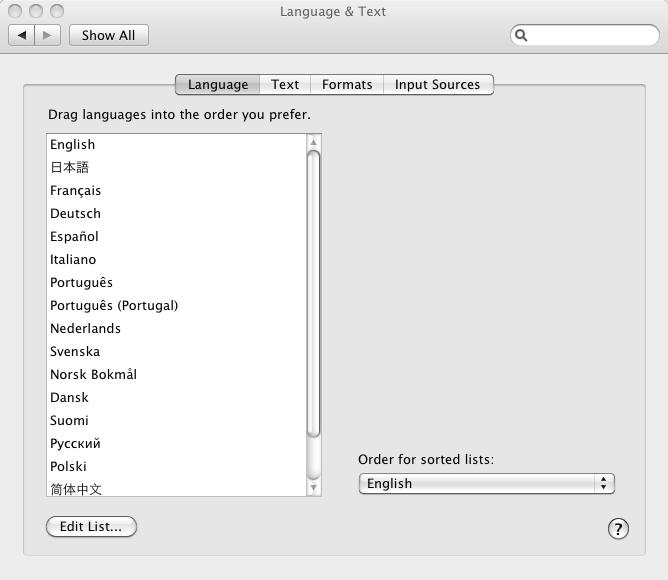
■Supercolliderワークショップのメモ■

(1)
internal serverはMacOSXを英語モードにすれば起動できる。
いきなりこれは大きな収穫だった。 これまで、localhost serverは起動するのに、internal serverは何故か起動せず、「plot」系について仕方ないので全て無視してきた。 しかし、これはMacOSXの「言語設定」で以下のように、日本語よりもEnglishが上になるようにしてログアウトし再びログインすれば、その後は英語が優先の環境となる。 これで、SuperColliderでもMaxでも多くの「文字化け」に起因するトラブルが解消される。
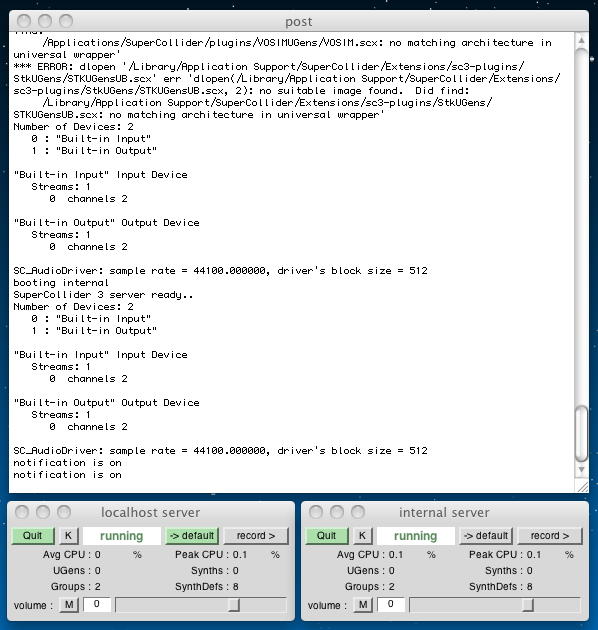
大阪に持参したMacBookAirでこれを確認していたが、研究室に戻ってさっそくお仕事用のmac miniでも言語環境を変えてみると、アッサリとlocalhost serverとinternal serverが起動した。 これで完璧である。
そういえば、メモしていなかったが、ちょっと気になった情報があったのでここで書き残しておこう。 僕が使っているSuperColliderのバージョンは以下のように最新の「3.4」なのだが、どうもこれはバグがあって好まれていないらしい(^_^;)。 SuperColliderの達人たちは皆んな、「3.31」とかを使っているらしい。 とりあえず問題にぶち当たるほど高度な事をやっていないので、このまま進めることにした。

それから、 SuperCollider Help のページにヘルプの引き方があったので、これもここに書いておこう。 SuperColliderのヘルプは専用のブラウザとともに「Help directory in the SuperCollider application folder」にある。 これは、以下のように「Help.gui;」をpost windowで実行すると出てくる。 今後は、これはいつも起動してメニューバーに格納しておき、逐次、参照することにしたい。
Help.gui;
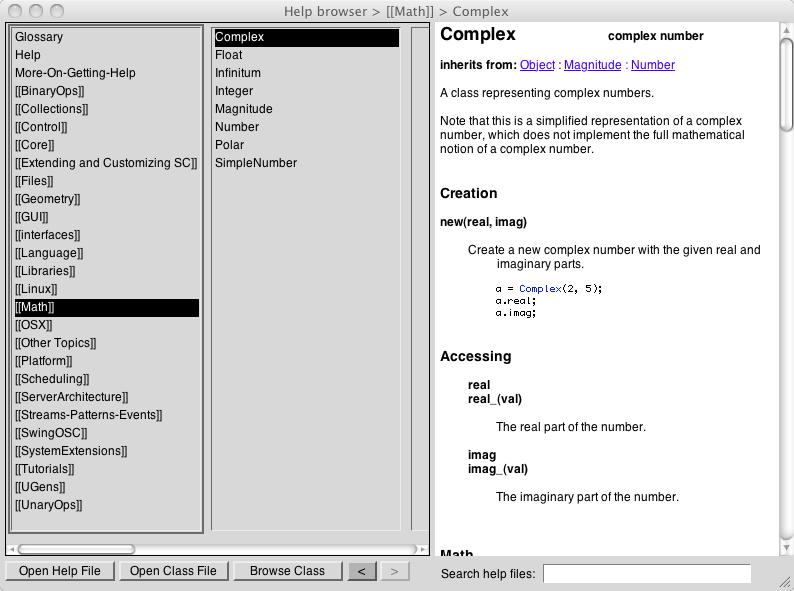
また、SuperColliderのオブジェクトのクラスのヘルプは以下のように「Object.browse;」をpost windowで実行すると出てくる。 今後は、これもいつも起動してメニューバーに格納しておき、逐次、参照することにしたい。
Object.browse;

さて、「■Supercolliderワークショップのメモ■」の続きである。
(2)
aphex_flim.zip イタダキ(^_^)
https://github.com/rukano/scprivatepool/tree/master/projects/aphex_flim/
http://www.youtube.com/watch?v=4tiEfHaRszU
http://www.youtube.com/watch?v=N7CYbJkVBo8
これは、SuperColliderコミュニティで最近、話題になっている新しいSuperColliderプログラムだという。 タケコさんがさっそくメイルでそのSuperColliderソースを送ってくれた。 これである。 オリジナルのサイトは ここである。 これを解凍すると、「README.txt」と「aphex_flim_(1)_gui.scd」と「aphex_flim_(0)_synths_and_paterns.scd」という3つのファイルがある。 「README.txt」の中身は以下である。あっさり淡白なのはたぶん、SuperColliderの文化である。One of my first SuperCollider tests execute in this Order: 1. Synths and Patterns 2. GUI You'll be able to start from the GUI Comments: Long code a lot of errors... but might give you an impression of handling patterns from a GUI. Still, not everything works... so use it under your own risk. Nowadays I wold do everythong dfferent, maybe more code-efficient ;-) but don't have time to correct all that. Enjoy 「.scd」というのはSuperColliderのソースを保存するファイルである。 それぞれダブルクリックすると、以下のように別ウインドウでそのソースが現れる。
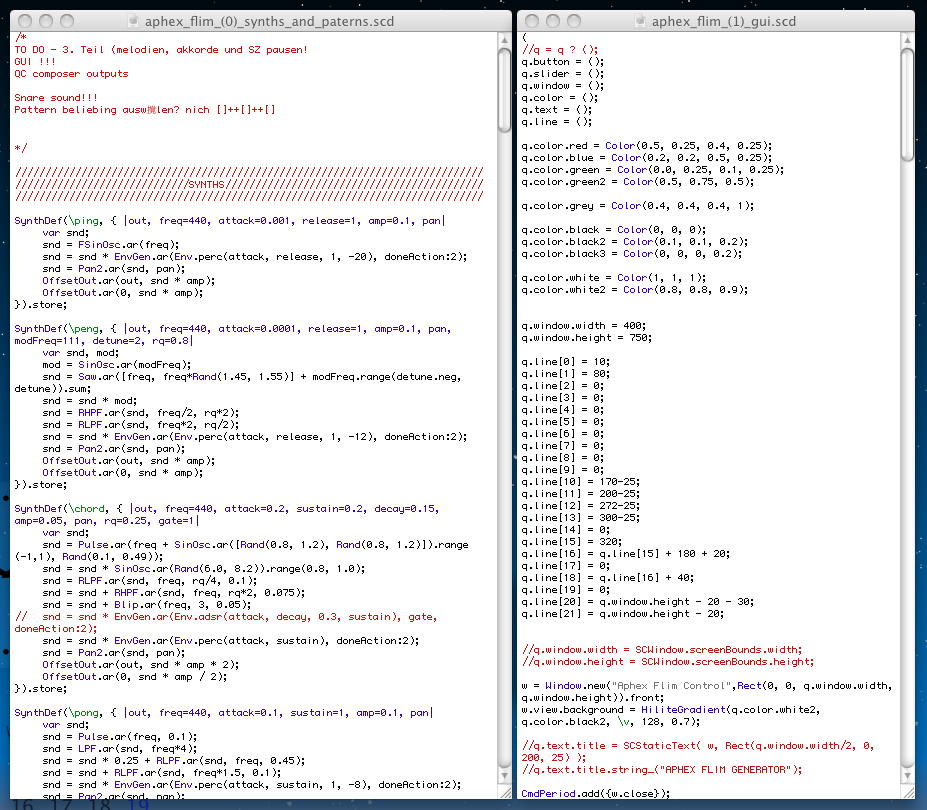
これを「README.txt」に従って、まず「(0)」の方をpost windowにコピペし、続いてその下に「(1)」の方をpost windowにコピペし、その全体をselect(ハイライト)した状態でenterで実行させると、以下のようにGUIウインドウが現れて、インタラクティブにパラメータを操作する「M」のようなプログラムである、と判明した。 こんな音がした。
このプログラムの操作方法がYoutubeに上げてある。 これである。 また、そのアイデアの元となった演奏が これであるらしい。
(3)
command + .
発音停止、okな筈
command + k
サーバクリア
次のメモはこれだけである。 これまで、postウインドウで「command + .」をしてきたが、MIDI関係ではどうもバグで奇妙な状態になるたびに、SuperCollider自体をquitして再起動していた。 これが、「command + k」をすると、起動していたlocalhost serverやinternal serverをいったん停止させウインドウが消えた後に、改めてサーバウインドウが「起動前」のdefaultとして現れる、というものである。 いちいちSuperColliderを再起動(ライブラリの再コンパイル)をしなくて良い、という技であり、これも使えそうだ。(4) twitterの140文字制限でSCのプログラミング http://supercollider.sourceforge.net/sc140/ アルバム sc140_vbr_mp3.zipこのメモも、SuperColliderコミュニティで最近、話題になっている新しいSuperColliderプログラム群だという。 SuperColliderはテキストで記述でき、さらに数行のシンプルなブログラムでも複雑なサウンドを生成できる。 そこで、 このサイト では、twitterの140文字制限を逆手にとって、「140文字以内のSuperColliderプログラムで書かれた音楽」だけを22曲、集めている。22曲のmp3をzipにまとめたアルバムは、 これ(79MB) である。 お互いにソースを公開し合い、アイデアを刺激し合うという、Javaでもccでも見られた、オープンソースの美しい交流である。 これほど勉強になるサンプル集は、(c)とかのclosedな世界では得られそうもない。
せっかくなので、 ここ にある22曲のソースを、改行とタブを入れて見やすく配置して、SuperColliderで実際に実行させてみることにした。 まだ勉強中なので、どうしてこんな簡単なプログラムでこんな面白い音楽が生成できてしまうのか不思議で、詳細はまたいずれ検討してみたいが、ひたすら驚嘆である。
{ LocalOut.ar( a=CombN.ar( BPF.ar( LocalIn.ar(2)*7.5+Saw.ar( [32,33],0.2 ), 2**LFNoise0.kr(4/3,4)*300, 0.1 ).distort,2,2,40 ) ); a }.play { Splay.ar( Ringz.ar( Impulse.ar( [2, 1, 4], [0.1, 0.11, 0.12] ), [0.1, 0.1, 0.5] ) ) * EnvGen.kr( Env( [1, 1, 0], [120, 10] ), doneAction: 2 ) }.play play{ ( { |k|( { |i|y=SinOsc;y.ar( i*k*k,y.ar( i*k**i/[4,5] ) * Decay.kr( Dust.kr(1/4**i), y.ar(0.1)+1*k+i, k*999 ) ) }!8 ).product }!16 ).sum } b=Buffer.read(s,"sounds/a11wlk01.wav"); play{ t=Impulse.kr(5); PlayBuf.ar( 1,b,1,t,Demand.kr( t,0,Dseq( 1e3*[103,41,162,15,141,52,124,190],4 ) ) )!2 } play{ f=LocalIn.ar(2).tanh; k=Latch.kr( f[0].abs, Impulse.kr(1/4) ); LocalOut.ar( f +CombC.ar( Blip.ar([4,6],100*k+50,0.9), 1, k*0.3, 50*f ) ); f } 06 Batuhan Bozkurt (refactored by Charles Celeste Hutchins)
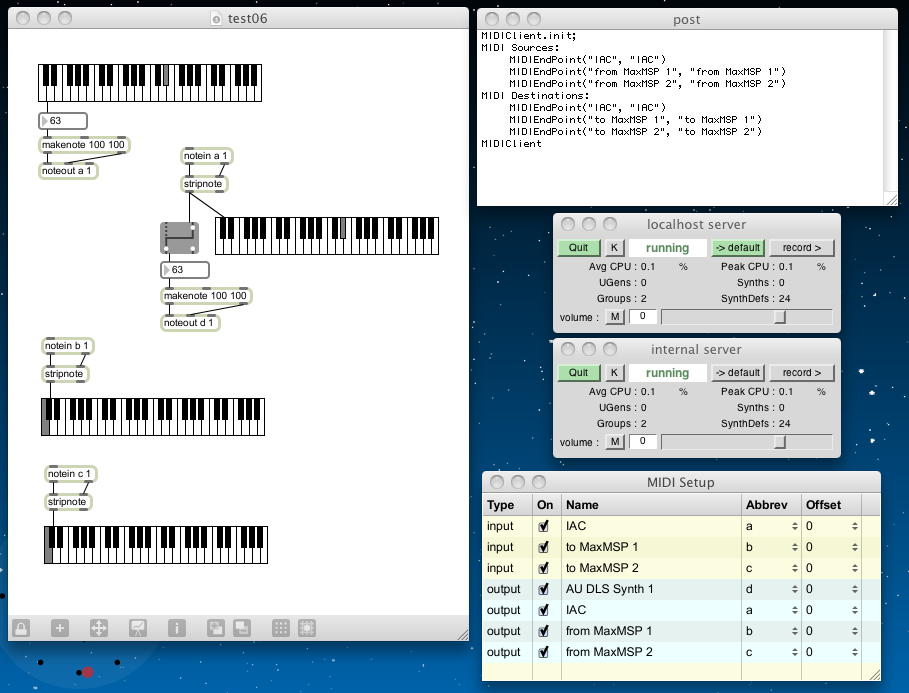
f= { |t|Pbind( \note, Pseq( [-1,1,6,8,9,1,-1,8,6,1,9,8]+5, 319 ), \dur, t ) }; Ptpar( [0,f.(1/6),12,f.(0.1672)],1 ).play play{ x=SinOsc; y=LFNoise0; a=y.ar(8); ( x.ar(Pulse.ar(1)*24) +x.ar(90+(a*90)) +MoogFF.ar( Saw.ar(y.ar(4,333,666)), a*XLine.ar(1,39,99,99,0,2) ) )!2/3 } Ptpar( ( { |i| [ i*8, Pbind( \scale, [0,2,4,7,9], \degree, Pseq( 32.fib.fold(0,10), 4 ) +(2*i+i)-10, \dur, 1+2**i%2/6 ) ] }!4 ).flat ).play { LocalOut.ar( a=DynKlank.ar( `[ LocalIn.ar.clip2( LFPulse.kr( [1,2,1/8] ) .sum/2 ) **100 *100 ], Impulse.ar(10) ) ); HPF.ar(a).clip2 }.play /*eclecticity*/ Ndef( \x, { SinOsc.ar( BrownNoise.ar(30!2, 200), Ndef(\x).ar * LFNoise1.kr(1!2,1,1) ) } ).play; play{ VarSaw.ar( ( Hasher.ar( Latch.ar( SinOsc.ar((1..4)!2), Impulse.ar([5/2,5]) ) ) *300 +300 ).round(60), 0, LFNoise2.ar(2,1/3,1/2) )/5 } play{ x=165; b=SinOsc; p=Trig.ar(Saw.ar(x),1); y=b.ar(p*x); z=b.ar(p); ( GVerb.ar( GrainIn.ar(2,y,y/2,z,p*z,-1) ,9 ) )/9 } play{ LeakDC.ar( BRF.ar( Saw.ar( 8, Decay2.kr( x=Duty.kr( 1/8, 0, Drand( [ 0, Drand((0.4,0.5..1)) ], inf ) ), 0.01, 0.3 ) ) **1.5, x*20+[45.1,45] ,0.1 ) ).tanh } Ndef( 'x', { x=Ndef('x').ar+0.01; a=BPF.ar( x, 6**Latch.ar( x,Dust.ar(x) )*200 ,0.1 ).sin; 9.do { a=AllpassN.ar( a, 0.2, { 0.2.rand }!2, 9 ) }; a+a.mean } ).play; { x=Array.fill( 5, { [0.00001,0.03].asSpec.map( LFNoise2.kr(3) ) } ); Splay.ar( Friction.ar( LFTri.ar(50), friction:x, mass:x*30000 ) ) }.play play{ AllpassC.ar( SinOsc.ar(55).tanh, 0.4, TExpRand.ar( 2e-4, 0.4, Impulse.ar(8) ).round( [2e-3,4e-3] ), 2 ) }; { RHPF.ar( GbmanN.ar( [2300,1150]), LFSaw.ar( Pulse.ar( 4, [1,2]/8, 1, LFPulse.ar(1/8)/5+1 ) ) +2 ) }.play //punk (loud!) play{ p=PinkNoise.ar(1!2); BRF.ar( p+Blip.ar(p+2,400), 150, 2, 0.1 ) +LPF.ar( FreeVerb2.ar( *LPF.ar( p+0.2*Dust.ar(0.1), 60 ) ++[1,1,0.2,1e4] ).tanh, 2000 ) } { a=[0.02,0.1,1,2,3,4]; k=LFPar.kr(a+0.5).sum; f=Latch.kr(k,Impulse.kr(a)); Splay.ar( SinOsc.ar(f*100+300)/5 ) }.play play{ 2.collect{ RecordBuf.ar( Limiter.ar( HPF.ar( Convolution2.ar( k=Crackle.ar( l=Line.kr(1,2,90) ), b=LocalBuf(2048), Dust.kr(4) ) ,8 ) +k ) *(2-l) ,b ) } } { 13.do{ |i|k="SuperCollider"[i].ascii;20.do { |u| { MoogFF.ar( Saw.ar((k/4).midicps) *EnvGen.ar(Env.perc), u+k*9,k/30 ) }.play; (k*0.001).wait } } }.fork さて、「■Supercolliderワークショップのメモ■」の続きである。play{ a=Duty.kr( 0.1, 0, Dseq( fib(32).wrap(20,55).midicps, inf ) ); HPF.ar( LeakDC.ar( Splay.ar( LFCub.ar([-1,a,a/3,-2]) ) )*9 ).clip2/9 }; (5) 出力系のレイテンシの違いを考慮してプログラミングする (takeko談)これはお話として出て来たものだが、ライブパフォーマンスをする者は誰でも直面しているお話である。 タケコさんも、プロジェクタの機種ごとにレイテンシが違うところまで考慮してやっているとの事であった。 さすがである。(^_^)(6) MIDIレイテンシの問題は解決 !! (^_^) test06.maxpat これでは一時的にインスタンス設定するだけで消える ↓ MIDIOut(0).latency = 0.0; これだとオプジェクトが残るのでインスタンスが消えない ↓ m0 = MIDIOut(0); m0.latency= 0.0;これは、ワークショップの場で、それぞれの参加者は自分のパソコンであれこれ内職をしつついろいろと話す・・・という展開の中で、僕が解決していなかった部分をあれこれやっていて、遂にスッキリと解決した、というものである。 これだけで、大阪に出掛けたモトが取れた。 まずスタートラインとして、既にちゃんと動いていた(かのように思っていた)のは以下である。そして、Maxが先に起動している状態でlocalhost serverを起動することで、以下のように「MIDIClient.init;」を実行すると、SuperColliderは入力MIDIバスとして「IAC」と「from MaxMSP 1」と「from MaxMSP 2」を、出力MIDIバスとして「IAC」と「to MaxMSP 1」と「to MaxMSP 2」とをこの順で認識する。 このためのMax5の実験パッチは、これを解凍した中にある、「test06.maxpat」であり、以下のように「IAC = a」「Max 1 = b」「Max 2 = c」とMIDIポートを設定しているものとする。●初期状態 - これは動く ( var tx_channel, rx_channel; tx_channel=0; rx_channel=0; MIDIClient.init; MIDIIn.connect(0,MIDIClient.sources[0]); SynthDef(\sound, { arg freq=440, amp=0.1; var saw, filter, env; saw= Saw.ar(freq); filter= Resonz.ar(saw,1000,0.1)*amp; env= EnvGen.ar(Env([0,1,0],[0.01,0.1]),doneAction:2); //dup(2) duplicates the mono signal onto two channels, //giving instant stereo middle panned output Out.ar(0,(filter*env).dup(2)) } ).add; MIDIIn.noteOn = { arg src,chan, midinote, velocity; if (chan == rx_channel, { Synth(\sound,[\freq,midinote.midicps,\amp,velocity/127.0]); }, { } ) }; m= MIDIOut(0); m.latency= 0.0; m.noteOn(tx_channel,60,127); m.noteOn(tx_channel,64,127); m.noteOn(tx_channel,67,127); ) MIDIClient.init; MIDI Sources: MIDIEndPoint("IAC", "IAC") MIDIEndPoint("from MaxMSP 1", "from MaxMSP 1") MIDIEndPoint("from MaxMSP 2", "from MaxMSP 2") MIDI Destinations: MIDIEndPoint("IAC", "IAC") MIDIEndPoint("to MaxMSP 1", "to MaxMSP 1") MIDIEndPoint("to MaxMSP 2", "to MaxMSP 2") MIDIClient
その上で、SuperColliderが3つの内部MIDIバスで受けた情報を、そのままそれぞれ内部のMIDIバスに出力して欲しい(なんと高価なMIDIスルーbox !)と思って実験していたのが以下のプログラムである。 しかし、ウンともスンとも言わなかった。 レイテンシの設定も受け付けられていなかった。
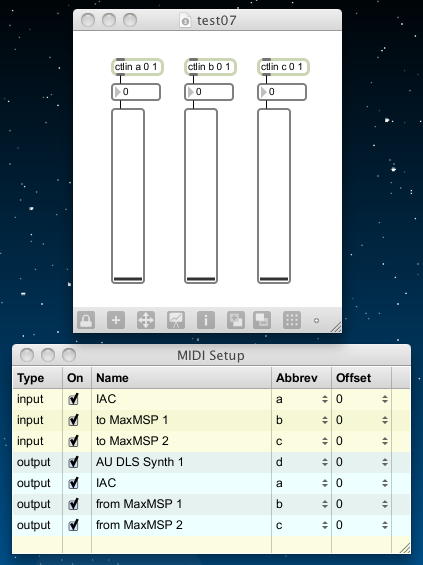
そして、あれこれ試してようやく見つけたのが、以下である。●NG版 ( MIDIClient.init; MIDIIn.connect(0,MIDIClient.sources[0]); MIDIOut(0).latency = 0.0; MIDIOut(1).latency = 1.0; MIDIOut(2).latency = 2.0; MIDIIn.noteOn = { arg src, chan, midinote, velocity; MIDIOut(1).noteOn(chan, midinote, velocity); MIDIOut(2).noteOn(chan, midinote, velocity); }; ) この違いは、変数m0/m1/m2を定義して、そこでMIDIポートを設定するようにした、という事である。 すると、横で何かやっていた赤松御大がぼそっと 「これ(NG版)では一時的にインスタンス設定するだけで消えるから駄目。 これ(OK版)だとオプジェクトが残るのでインスタンスが消えないからうまくいく」 と、スッキリと解説してくれた。 さすが、オブジェクト指向の神プログラマーである(^_^)。 これで、レイテンシ=0で、Maxから3系統(それぞれ16チャンネル)のMIDI情報が、SuperColliderできちんと受け取られて、さらに新たにSuperColliderからMIDI出力される、という動作を確認できた。●解決した ! ( var m0, m1, m2; MIDIClient.init; MIDIIn.connect(0,MIDIClient.sources[0]); m0 = MIDIOut(0); m1 = MIDIOut(1); m2 = MIDIOut(2); m0.latency= 0.0; m1.latency= 0.0; m2.latency= 0.5; MIDIIn.noteOn = { arg src, chan, midinote, velocity; m1.noteOn(chan, midinote, velocity); m2.noteOn(chan, midinote, velocity); }; ) (7) 実行ではOKでもロードだとNGになる (ifのネスティング)これは、タケコさんが提供した情報で、ライブ中に次々とSuperColliderのプログラムをロードして切り替えているところで、実行モードだと動くパッチが、ロードでは問題がある、という事らしい。 そこには、条件分岐の「if」をネスティングさせているとのこと。 まだ初心者には関係ないものの、これもメモした。(^_^)(8) いろいろサンプルあり http://en.wikibooks.org/wiki/Designing_Sound_in_SuperCollider/Print_versionこれも、その場の誰かから提供された情報のメモである。 ここ を見ると、SuperColliderのWikiページとして、色々なサンプルが置かれている。 これは、またいずれ、SuperColliderの基本的な勉強が一巡したところで再訪したいと思う。(9) スライダーをMIDIでMaxへ 解決 !!!これがメモの最後、十三の現場で思いついてトライしたものの、最後まで解決しなかったのが、日曜日の朝にホテルの部屋でちょっと集中して、ようやく解決したものである。 Max5の実験パッチは、これを解凍した中にある、「test07.maxpat」であり、以下のようにMIDIポートを設定している。 つまり、内部MIDIバスの3系統に、SuperColliderのGUIのスライダーからMIDIコントロールチェンジを受け取って表示したい、というものである。
まず、SuperColliderでGUIのスライダーを設定して、これでSuperColliderの音源を鳴らす、という以下のパッチからスタートした。
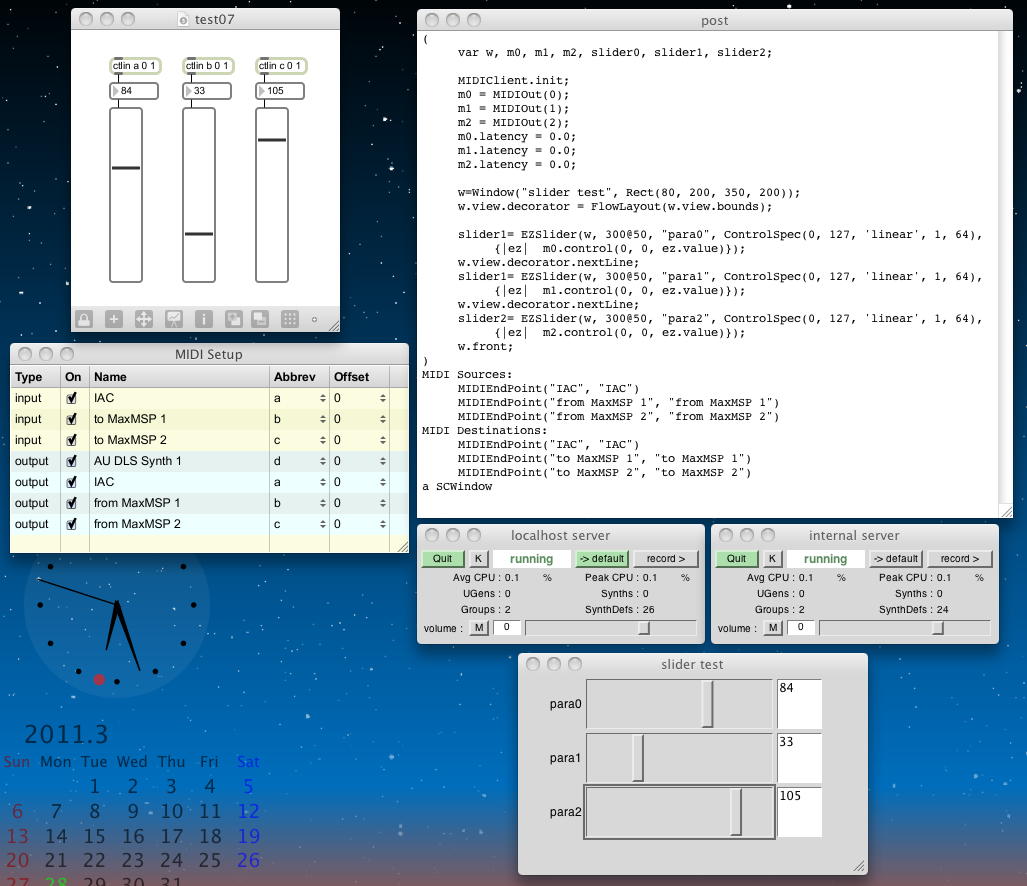
いろいろそぎ落として、以下もOKを確認していた。●初期状態 - これは動く ( var w, carrfreqslider, modfreqslider, moddepthslider, synth; w=Window("frequency modulation", Rect(100, 400, 400, 300)); w.view.decorator = FlowLayout(w.view.bounds); synth= { arg carrfreq=440, modfreq=1, moddepth=0.01; SinOsc.ar(carrfreq + (moddepth*SinOsc.ar(modfreq)),0,0.25) }.play; carrfreqslider= EZSlider(w, 300@50, "carrfreq", ControlSpec(20, 5000, 'exponential', 10, 440), {|ez| synth.set(\carrfreq, ez.value)}); w.view.decorator.nextLine; modfreqslider= EZSlider(w, 300@50, "modfreq", ControlSpec(1, 5000, 'exponential', 1, 1), {|ez| synth.set(\modfreq, ez.value)}); w.view.decorator.nextLine; moddepthslider= EZSlider(w, 300@50, "moddepth", ControlSpec(0.01, 5000, 'exponential', 0.01, 0.01), {|ez| synth.set(\moddepth, ez.value)}); w.front; ) しかし、以下のようにするとエラーが出てしまう。ここが謎だった。●これもOK ( var w, slider1, slider2, synth; w=Window("slider test", Rect(100, 400, 400, 300)); w.view.decorator = FlowLayout(w.view.bounds); synth= { arg data=440, modfreq=1, moddepth=0.01; SinOsc.ar(data + (moddepth*SinOsc.ar(modfreq)),0,0.25) }; slider1= EZSlider(w, 300@50, "para1", ControlSpec(0, 127, 'linear', 1, 64), {|ez| synth.set(\data, ez.value)}); w.view.decorator.nextLine; slider2= EZSlider(w, 300@50, "para2", ControlSpec(0, 127, 'linear', 1, 64), {|ez| synth.set(\data, ez.value)}); w.front; ) そのエラーメッセージの一部が以下である。 そこで、気合いを入れてこれを読み進めた。●エラーが出る版 ( var m0, m1, m2; var w, slider0, slider1, slider2, send0, send1, send2; MIDIClient.init; m0 = MIDIOut(0); m1 = MIDIOut(1); m2 = MIDIOut(2); m0.latency= 0.0; m1.latency= 0.0; m2.latency= 0.0; w=Window("slider test", Rect(100, 400, 400, 300)); w.view.decorator = FlowLayout(w.view.bounds); send0 = { arg chan=0, num=0, data; m0.control(chan, num, data); }; send1 = { arg chan=0, num=1, data; m0.control(chan, num, data); }; send2 = { arg chan=0, num=2, data; m0.control(chan, num, data); }; slider1= EZSlider(w, 300@50, "para0", ControlSpec(0, 127, 'linear', 1, 64), {|ez| send0.set(\data, ez.value)}); w.view.decorator.nextLine; slider1= EZSlider(w, 300@50, "para1", ControlSpec(0, 127, 'linear', 1, 64), {|ez| send1.set(\data, ez.value)}); w.view.decorator.nextLine; slider2= EZSlider(w, 300@50, "para2", ControlSpec(0, 127, 'linear', 1, 64), {|ez| send2.set(\data, ez.value)}); w.front; ) いろいろ試して、以下は出ることを確認した。●↑そのエラーメッセージ ERROR: Message 'asInteger' not understood. RECEIVER: nil ARGS: CALL STACK: DoesNotUnderstandError:reportError 1519E810 arg this = Nil:handleError 1518F090 arg this = nil arg error = Thread:handleError 15195C30 arg this = arg error = Object:throw 1514CDD0 arg this = Object:doesNotUnderstand 15190410 arg this = nil arg selector = 'asInteger' arg args = [*0] MIDIOut:control 17EADE60 arg this = arg chan = 'data' arg ctlNum = 89 arg val = nil EZSlider:doAction 1519E510 arg this = EZSlider:valueAction_ 15185130 arg this = arg val = 89 SCView:doAction 151533D0 arg this = ●これはちゃんと出る ( var m0, m1, m2; var w, slider0, slider1, slider2, send0, send1, send2; MIDIClient.init; m0 = MIDIOut(0); m1 = MIDIOut(1); m2 = MIDIOut(2); m0.latency= 0.0; m1.latency= 0.0; m2.latency= 0.0; m0.control(0, 0, 2); m1.control(0, 0, 64); m2.control(0, 0, 127); ) ●解決 ! (^_^) ( var w, m0, m1, m2, slider0, slider1, slider2; MIDIClient.init; m0 = MIDIOut(0); m1 = MIDIOut(1); m2 = MIDIOut(2); m0.latency = 0.0; m1.latency = 0.0; m2.latency = 0.0; w=Window("slider test", Rect(80, 200, 350, 200)); w.view.decorator = FlowLayout(w.view.bounds); slider1= EZSlider(w, 300@50, "para0", ControlSpec(0, 127, 'linear', 1, 64), {|ez| m0.control(0, 0, ez.value)}); w.view.decorator.nextLine; slider1= EZSlider(w, 300@50, "para1", ControlSpec(0, 127, 'linear', 1, 64), {|ez| m1.control(0, 0, ez.value)}); w.view.decorator.nextLine; slider2= EZSlider(w, 300@50, "para2", ControlSpec(0, 127, 'linear', 1, 64), {|ez| m2.control(0, 0, ez.value)}); w.front; )
今日はここまでである。 これを書いている合間にも、新しく大学院に進むゼミ生から、そして新学期からM2となる院生からもアポが入ってきた。いろいろあるのでペースは落ちるかもしれないが、Processingとともに、まだまだ頑張ってSuperColliderをしゃぶって行こう。
2011年3月31日(木)
前回は28日だったので、2日、空いてしまった。その間、 SUACインスタレーション(3) の改訂をしたり、 こんなこと や こんなこと をやりつつ、 Processing も進めていたので、これは仕方ない。 前回の「140文字以内のSuperColliderプログラム」の22作品に対して、SuperColliderスライダーでパラメータを変化させるバージョンに改訂して、様子を見つつ聞きつつ検討したい・・・というアイデアも浮かんだが、これをグッと堪えて、 ワークショップのテキストの続きとしては Workshop materials for Computer Music (G6002) の 5. Interaction の 5.2 Graphical User Interfaces.html からである。ここのタイトルは「Graphical User Interface Classes for SuperCollider」である。 昔のバージョンのSuperColliderでは、敢えて意固地になって(^_^;)、テキストだけでここまで出来る・・・という主張にこだわっていた感があるが、さすがにMaxやXwindowsなど世の中のGUIブームに押されて、GUI「も」取り揃えた、というところだろう。 SuperColliderの「GUI classes」には、以下のようなたくさんのGUIがあるという。
- forms of slider
- buttons
- dials
- drop down lists
- drag and drop facilities
- custom views
Macの場合には、「shift+cmd+N」で、SuperColliderで提供可能なGUI widgetsの一覧が出て来るという。 やってみると以下のように、Xcodeと似た「IB」インターフェースビルダーが出て来た。

GUIはOXに強く依存するために、SuperColliderでは以下のように大きく2種類のGUI体系がサポートされている。
「cocoa」とはMac OSXの開発環境のオリジナルである。 いちばん最初のインストールの時に出て来た「swing」というのは、なるほど、JavaのGUI環境をそのままイタダキ、というものらしい。 Windowsパソコンでは、defaultでSwingOSCになる。 現在のGUI libraryを問い合わせるためには
- OS X ('cocoa') specific classes (usually with prefix SC before the class names used here)
- SwingOSC ('swing') Java cross platform classes (usually with prefix JSC)
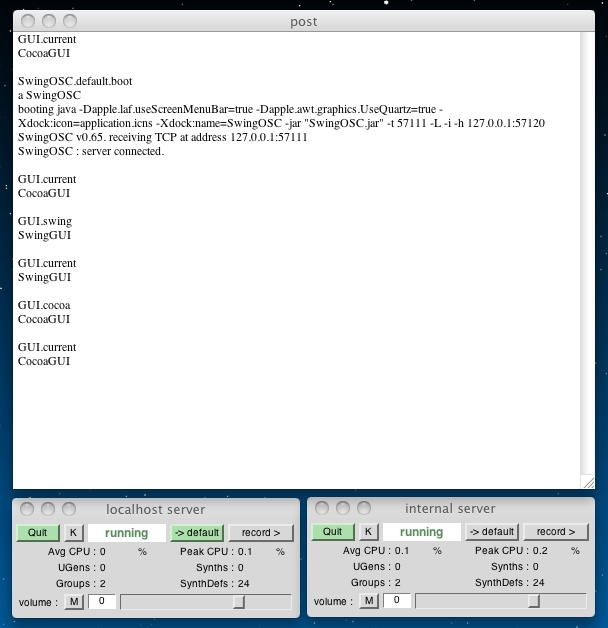
を実行する。defaultでは「CocoaGUI」と出た。 MacでSwingOSC libraryを使うには、あらかじめ以下のようにSwingOSC serverを起動しておく必要がある。GUI.current この2種類のGUI libraryを切り替えるのは以下の2つである。SwingOSC.default.boot これらを実際に順に試してみると、以下のようになった。なかなか簡単である。GUI.cocoa GUI.swing GUI.current CocoaGUI SwingOSC.default.boot a SwingOSC booting java -Dapple.laf.useScreenMenuBar=true -Dapple.awt.graphics.UseQuartz=true -Xdock:icon=application.icns -Xdock:name=SwingOSC -jar "SwingOSC.jar" -t 57111 -L -i -h 127.0.0.1:57120 SwingOSC v0.65. receiving TCP at address 127.0.0.1:57111 SwingOSC : server connected. GUI.current CocoaGUI GUI.swing SwingGUI GUI.current SwingGUI GUI.cocoa CocoaGUI GUI.current CocoaGUI
詳しく知りたい場合には、いつものようにヘルプである。postウインドウで「GUI」を「apple+j」すると、以下が出た。
さて、GUIを作るのに必要なのは、まずは「To make a window」である。 既に大阪・十三でのワークショップの場で実験していて気付いていたが、ほとんど全てのコンピュータシステムで、スクリーンの座標の原点は「画面の左上」であるのに対して、なんでこんな所で対抗するのか不明だが(^_^;)、SuperColliderでは数学と同じように「画面の左下」を原点にしていた。 つまり、他のあらゆる処理系と違って、「Y座標は上にいくほど増える」ことになる(^_^;)。/** * Factory abstraction for all GUI related core classes. * Each GUI kit is described by a scheme that maps class names * to actual classes. * * See the help file for details. The default * scheme is cocoa. * * Changelog: * - jrh added makeGUI * - sciss added add, set, get, use, useID * * @version 0.16, 10-Apr-07 */ GUI { classvar ?scheme, ?schemes, ?skin, ?skins; *new { arg key; ^scheme.perform( key )} *makeGUI { arg key, args, properties; var meth, class; class = scheme.at(key); if(properties.notNil) { meth = class.class.findMethod(\new); if(meth.notNil) { meth.argNames.drop(args.size).do { |key| args = args ++ properties[key] } } }; meth.argNames.postln; args.postln; ^class.new(*args) } *initClass { skins = ( default: ( fontSpecs: ["Helvetica", 10], fontColor: Color.black, background: Color(0.8, 0.85, 0.7, 0.5), foreground: Color.grey(0.95), onColor: Color(0.5, 1, 0.5), offColor: Color.clear, gap: 0 @ 0, margin: 2@2, buttonHeight: 16 ) ); skin = skins.default; schemes = IdentityDictionary.new; } /** * Makes Cocoa (Mac OS X GUI) the current scheme * and returns it. Subsequent GUI object calls * to GUI are delegated to cocoa. * * @return the current (cocoa) scheme */ *cocoa { ^this.fromID( \cocoa ); } /** * Makes Swing (Java GUI) the current scheme * and returns it. Subsequent GUI object calls * to GUI are delegated to swing. * * @return the current (swing) scheme */ *swing { ^this.fromID( \swing ); } /** * Changes the current scheme and returns it. * * @param id (Symbol) the identifier of the scheme to * use, such as returned by calling * aScheme.id * @return the new current scheme */ *fromID { arg id; var newScheme = schemes[ id.asSymbol ]; if( newScheme.notNil, { scheme = newScheme; }, { ("GUI.fromID : The GUI scheme '" ++ id ++ "' is not installed\n" ++ "The current scheme is still '" ++ if( scheme.notNil, { scheme.id }) ++ "'!").warn; }); ^scheme; } /** * Returns the current scheme. This * is useful for objects that, upon instantiation, * wish to store the then-current scheme, so as * to be able to consistently use the same scheme * in future method calls. * * Note: the caller shouldn't make any assumptions about * the nature (the class) of the returned object, so that * the actual implementation (an Event) may change in the future. * * @return the current scheme */ *current { ^scheme; } /** * Returns the scheme for a given identifier. * Does not switch the current scheme. * * @param id (Symbol) the identifier of the scheme to * retrieve, such as returned by calling * aScheme.id * @return the scheme for the given id or nil */ *get { arg id; ^schemes[ id.asSymbol ]; } /** * Changes the current scheme. * * @param aScheme the scheme to use as current scheme */ *set { arg aScheme; scheme = aScheme; } /** * Executes a function body, temporarily * setting the current GUI scheme. This is usefull inside * view's action functions in order to make this function * use the GUI scheme that was originally used for the * view of the action, even if the scheme has been switched meanwhile. * * @param scheme the scheme to use during the function execution * @param func (Function) a body to execute * @return the result of the function */ *use { arg aScheme, func; var recent = scheme; scheme = aScheme; ^func.protect({ scheme = recent }); } /** * Same as 'use' but using a scheme's id as first argument * * @param id the id of the scheme to use during the function execution * @param func (Function) a body to execute * @return the result of the function */ *useID { arg id, func; ^this.use( schemes[ id.asSymbol ], func ); } /** * Registers a new scheme. This is typically called * by external libraries in their startup procedure. * If a scheme with the same identifier (scheme.id) * exists, it is overwritten. * * @param aScheme the scheme to add */ *add { arg aScheme; schemes.put( aScheme.id, aScheme ); if( scheme.isNil, { // first registration = first default kit scheme = aScheme; }, { scheme = schemes[ scheme.id ]; // in case we are updating an existing scheme }); } /** * All method calls are mapped to the current * scheme, so that for example GUI.button can be used * and is delegated to the button association of the * current scheme. */ *doesNotUnderstand { arg selector ... args; ^scheme.performList( selector, args ); } /** * Add skins : GUI.skins.put(skinName,( fontSpecs: etc. ) ) * then set that as default here. * Note that if you wanted to do this in an *initClass that the scheme and GUI must be initialized * and the scheme must be created in CocoaGUI.initClass (class varies on platform) so you cannot * explicitly init that class by name since it varies across platforms. so you can't really setSkin * in an initClass. Your initClass method could do StartUp.add { GUI.setSkin(...) }; */ *setSkin { arg skinName; skin = skins[skinName]; scheme.font.new(*GUI.skin.fontSpecs).setDefault; } } //The Rect(angle) takes the initial screen position and the window size //as screenx, screeny, windowwidth, windowheight, where y is 0 at the bottom ( var w; w=Window("My Window", Rect(100,500,300,300)); //A 300 by 300 window appears at screen co-ordinates (100, 500) w.front; //this line is need to make the window actually appear )

このように定義したウインドウの中に、大きさや配置座標やパラメータの値域やその初期値などを指定しつつ、いろいろなGUI要素を定義していける、というわけである。まだここでは「IB」を使わない、ということだろう。
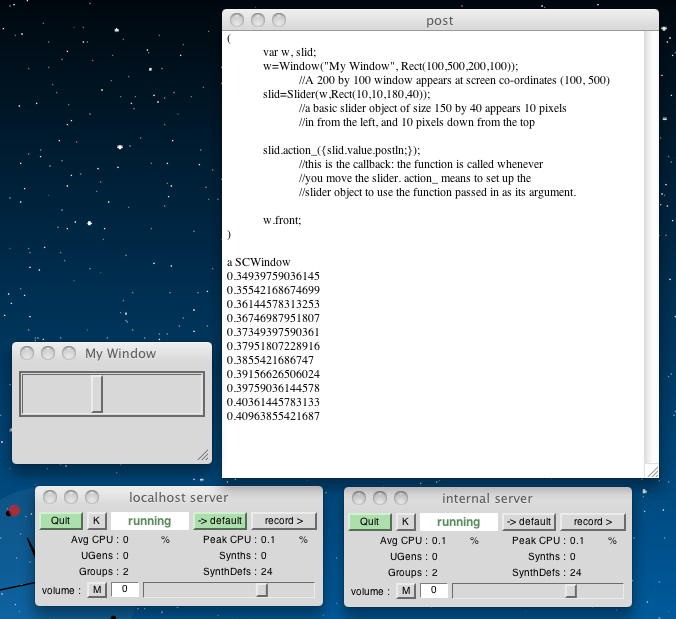
まず最初は定番の「スライダー」である。 以下のように、定義したスライダーが現れて、操作すると「action」でコールバック指定されているように「postln」でバリューが表示された。 コールバックなので、常にポーリングで同じ値を出すのでなく、(裏ではポーリングされているが)スライダーの値が変化した時にだけ、その値を返す。 defaultのスライダーの数値レンジは、「0.0から1.0」である。
(
	var w, slid;
	w=Window("My Window", Rect(100,500,200,100));
		//A 200 by 100 window appears at screen co-ordinates (100, 500)
	slid=Slider(w,Rect(10,10,180,40));
		//a basic slider object of size 150 by 40 appears 10 pixels
		//in from the left, and 10 pixels down from the top

	slid.action_({slid.value.postln;});
		//this is the callback: the function is called whenever
		//you move the slider. action_ means to set up the
		//slider object to use the function passed in as its argument.

	w.front;
)
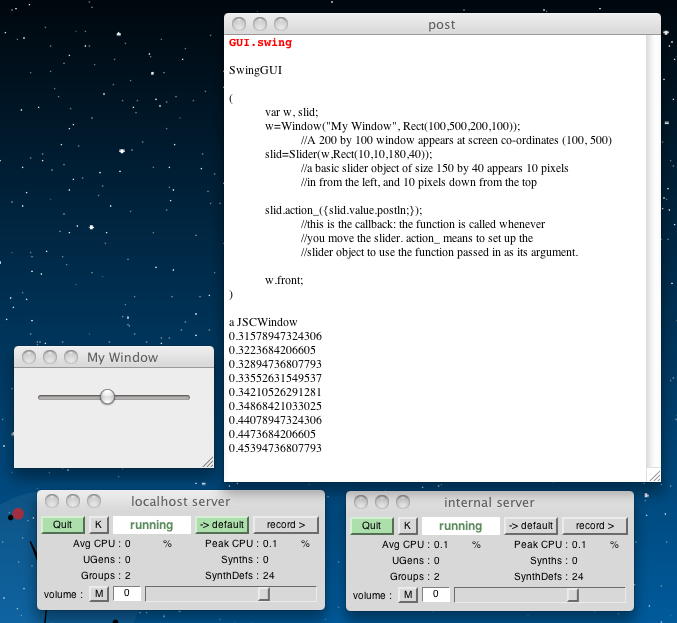
ここで、ちょっと気になったので、さきほど出て来たもう一つのGUI、SwingOSCに切り替えてみた。 すると以下のように、見た目が違うスライダーが現れて動作してくれた。 なんか、こっちの方がカッコイイ気もする(^_^;)。 どちらでも使える、という確認が重要なので、今後はその時の気分で適当に切り替えることにした。
GUI.swing
SwingGUI

(
	var w, slid;
	w=Window("My Window", Rect(100,500,200,100));
		//A 200 by 100 window appears at screen co-ordinates (100, 500)
	slid=Slider(w,Rect(10,10,180,40));
		//a basic slider object of size 150 by 40 appears 10 pixels
		//in from the left, and 10 pixels down from the top

	slid.action_({slid.value.postln;});
		//this is the callback: the function is called whenever
		//you move the slider. action_ means to set up the
		//slider object to use the function passed in as its argument.

	w.front;
)
defaultのスライダーの数値レンジは「0.0から1.0」であるが、以下のようにいろいろな「remap」によって、この値の範囲を変えることができる。 以下は、実際に3回ずつやってみた結果である。
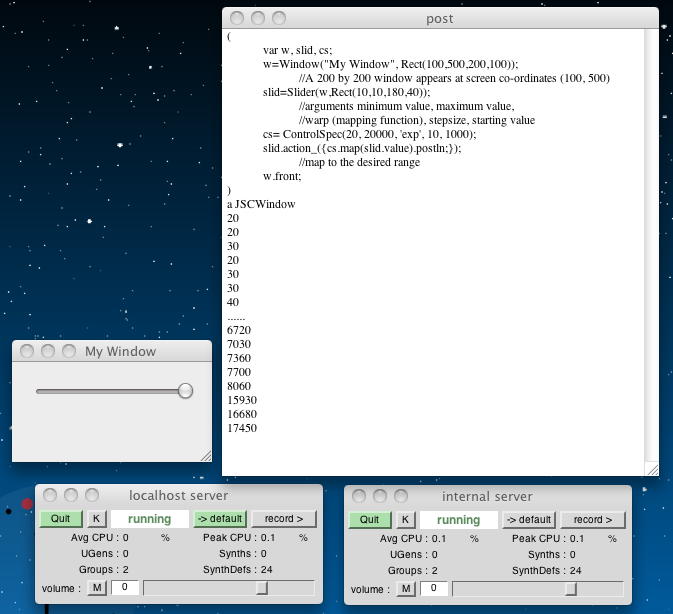
直接にこのようにremapしなくても、「ControlSpec」という便利なクラスがあり、値域、変化特性、ステップ、初期値が設定できる。 以下の例では、指数特性でちゃんとリマップしてくれた。1.0.rand //create a random number from 0.0 to 1.0 0.29842817783356 0.85167419910431 0.3637547492981 1.0.rand*50 //create a random number from 0.0 to 1.0, //and multiply it by 50 to get a new range from 0.0 to 50.0 25.144076347351 18.350422382355 33.955895900726 1.0.rand*50+14.7 //create a random number from 0.0 to 1.0, multiply it by 50, //then add 14.7, to get a new range from 14.7 to 64.7 36.737667036057 47.923527669907 63.296626520157 1.0.rand.linlin(0.0,1.0,14.7,64.71) //create a random number from 0.0 to 1.0, and use a built //in function to remap it to the output range 14.7 to 64.71 38.364914989471 27.775904052258 58.122357566357 1.0.rand.linexp(0.0,1.0,14.7,64.71) //create a random number from 0.0 to 1.0, and use a built in function to remap it to the output range 14.7 to 64.71 //with an exponential function, which tends to spend //longer over lower values 22.89170132501 17.454133680059 19.958908580153 ( var w, slid, cs; w=Window("My Window", Rect(100,500,200,100)); //A 200 by 200 window appears at screen co-ordinates (100, 500) slid=Slider(w,Rect(10,10,180,40)); //arguments minimum value, maximum value, //warp (mapping function), stepsize, starting value cs= ControlSpec(20, 20000, 'exp', 10, 1000); slid.action_({cs.map(slid.value).postln;}); //map to the desired range w.front; )
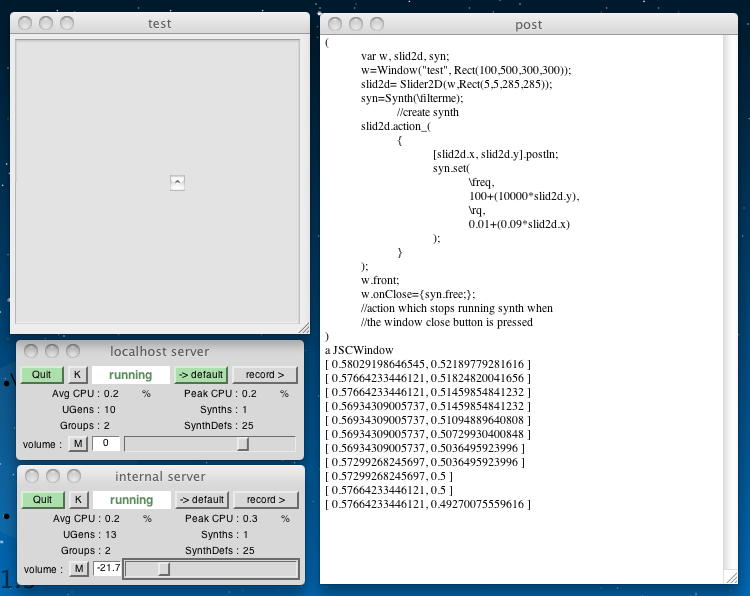
ここまでの道具立てで、GUI部品からの情報をサウンドシンセシスに接続できる。 以下の例では、SynthDefで走っているサウンドのモジュレーションをGUIスライダーでリアルタイムに変化させられる。 まず最初に、SynthDefを以下のように定義して実行させた。
そして次に、以下のGUI定義を走らせると、サウンドが出て2次元ツマミの移動でサウンドが変化した。 こんな音である。 このサウンドは、「w.onClose」により、GUIウインドウを閉じると停止する。 ただしSynthDefは消えずに残っている。//Demo of using 2D-Slider for synthesis ( SynthDef( \filterme, { arg freq=1000, rq=0.5; //control arguments to affect! Out.ar( 0, Pan2.ar( BPF.ar( Impulse.ar( LFNoise0.kr( 15, 500, 1000 ), 0.1, WhiteNoise.ar(2) ), freq,rq ) ) ) } ).add; ) ( var w, slid2d, syn; w=Window("test", Rect(100,500,300,300)); slid2d= Slider2D(w,Rect(5,5,285,285)); syn=Synth(\filterme); //create synth slid2d.action_( { [slid2d.x, slid2d.y].postln; syn.set( \freq, 100+(10000*slid2d.y), \rq, 0.01+(0.09*slid2d.x) ); } ); w.front; w.onClose={syn.free;}; //action which stops running synth when //the window close button is pressed )
このダイヤルのバンクをさらにアレンジしたい場合には「helper class 'decorator'」を使うとよい。 これにより、以下の例のように、スクリーン上での見え方をアレンジできる。 ここではスクリーン内に10個のダイヤルを配置していて、後で特定のダイヤルの背景色プロパティをランダムに変更している。 なお「10@10」という表記の意味は、 「Point (10,10), an (x,y) co-ordinate position」 である。
(
	w= Window("decoration",Rect(200,200,400,500));

		//set up decorator. FlowLayout needs to know the size
		//of the parent window, the outer borders (10 pixels
		//in on horizontal and vertical here) and the standard
		//gap to space GUI views (20 in x, 20 in y)
	w.view.decorator= FlowLayout(w.view.bounds, 10@10, 20@20);

		//now, when GUI views are added to the main view, they
		//are automatically arranged, and you only need to say
		//how big each view is
	k= Array.fill(10,{Knob(w.view,100@100).background_(Color.rand)});

	w.front;
		//make GUI appear
)

//they were stored in an array, so we can access
//them all easily via one variable

k[3].background_(Color.rand)
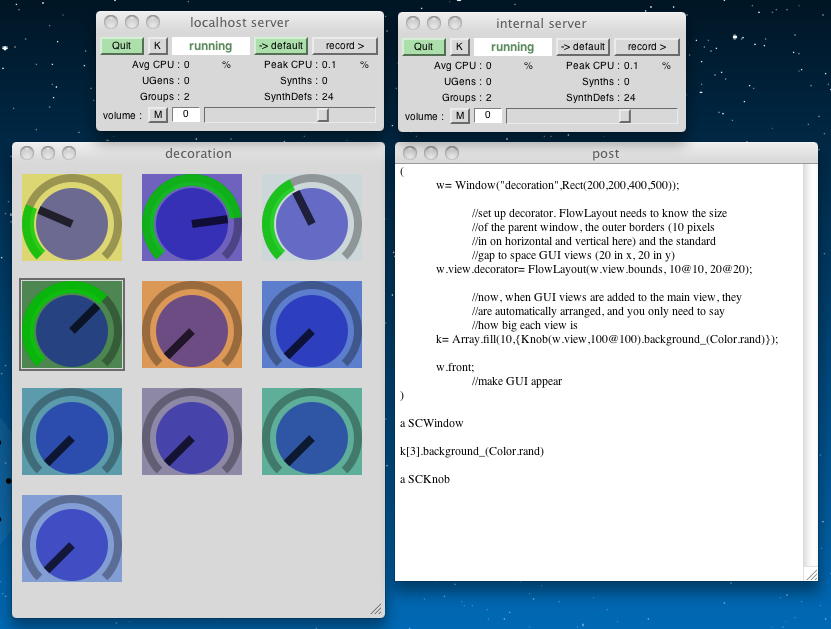
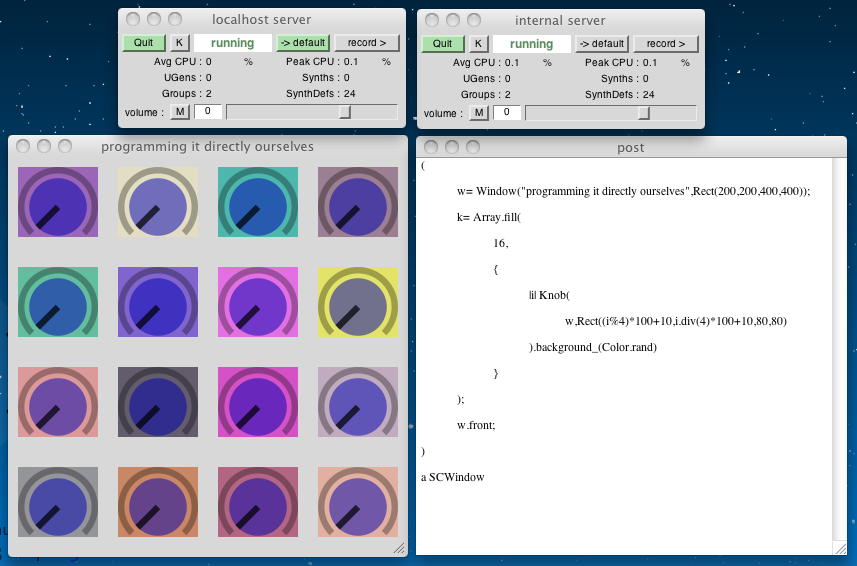
もちろん、SuperColliderはプログラミング言語なので、以下のように全てこれまでの文法だけでも、新しいウインドウ内に多数のダイヤルを並べることは簡単である。
(
	w= Window("programming it directly ourselves",Rect(200,200,400,400));
	k= Array.fill(
		16,
		{
			|i| Knob(
				w,Rect((i%4)*100+10,i.div(4)*100+10,80,80)
			).background_(Color.rand)
		}
	);
	w.front;
)
これ以外の、Drag & Dropとか色々なGUIのサンプルについては、postウインドウで以下をそれぞれ実行すると、多数のSuperColliderパッチの並んだ「scd」ファイルが開くという。 実際に開いてみると膨大にあるので、plain textファイルで別にしてみた。 そしてこの中から、いくつか実際に実験してみることにした。 これ の全部と、 これ のごく一部についてである。
以下のプログラムは、透明度の変化するウインドウが、ぶるぶる震えながら、画面内をうろうろする、というなかなか面白いものである。Document.open("examples/GUI examples/GUI_examples1.scd"); Document.open("examples/GUI examples/GUI_examples2.scd"); ( var w, r; w = Window("trem", Rect(512, 256, 360, 130)); w.front; r = Routine( { 1000.do( { arg i; 0.05.wait; w.bounds = w.bounds.moveBy(10.rand2, 10.rand2); w.alpha = cos(i*0.1pi)*0.5+0.5; } ); 1.wait; w.close; } ); AppClock.play(r); )

以下のプログラムは、32個のボタンを生成するサンプルである。 これはかなり実用的なのものだろう。
(
	var w;
	w = Window("button panel", Rect(128, 64, 340, 360));
	w.view.decorator = FlowLayout(w.view.bounds);
	32.do(
		{
			arg i;
			b = Button(w, Rect(0,0, 75, 24));
			b.states = [
				["Start "++i, Color.black, Color.rand],
				["Stop "++i, Color.white, Color.red]
			];
		}
	);
	w.view.background = Color(0.6,0.8,0.8);
	w.front;
)

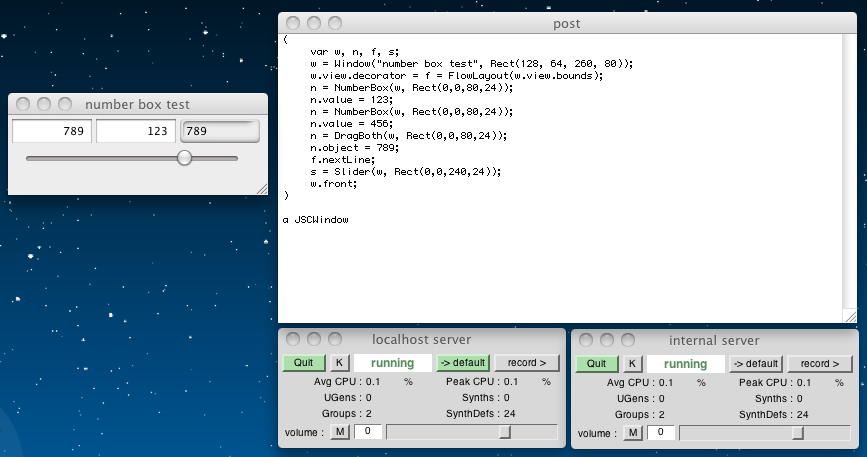
以下の例は、テキストボックスとスライダーを合体させた例だが、面白いのは、いちばん右のボタンはその左の2つのウインドウにドラッグドロップ出来ること、さらに左2つのウインドウの数値も「command click (CocoaGUI) or control click (SwingGUI)」でドラッグしてドロップ出来るところである。(^_^)
(
	var w, n, f, s;
	w = Window("number box test", Rect(128, 64, 260, 80));
	w.view.decorator = f = FlowLayout(w.view.bounds);
	n = NumberBox(w, Rect(0,0,80,24));
	n.value = 123;
	n = NumberBox(w, Rect(0,0,80,24));
	n.value = 456;
	n = DragBoth(w, Rect(0,0,80,24));
	n.object = 789;
	f.nextLine;
	s = Slider(w, Rect(0,0,240,24));
	w.front;
)
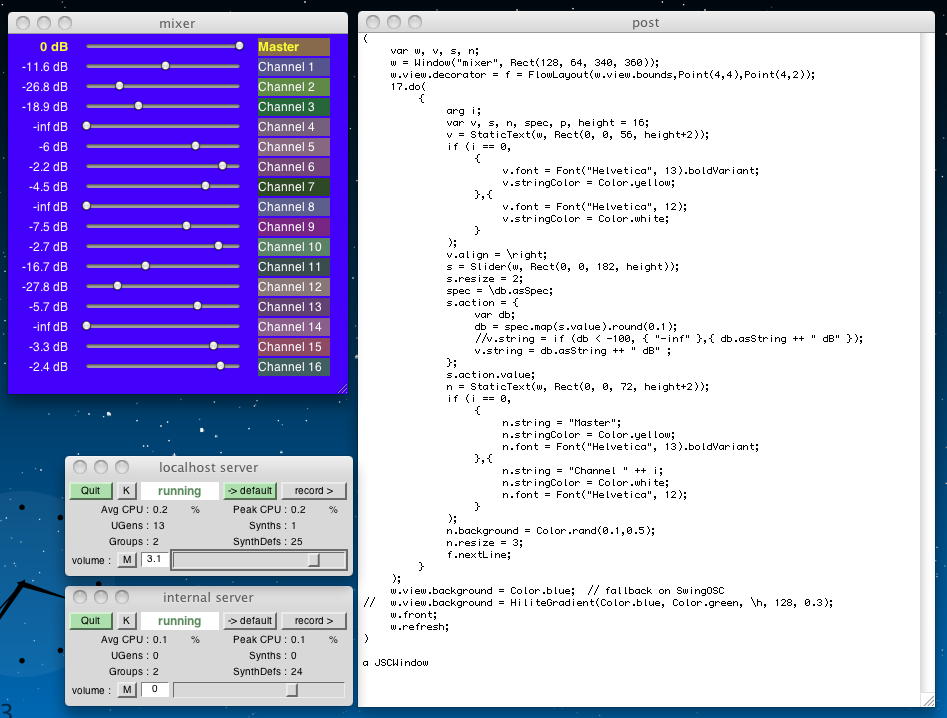
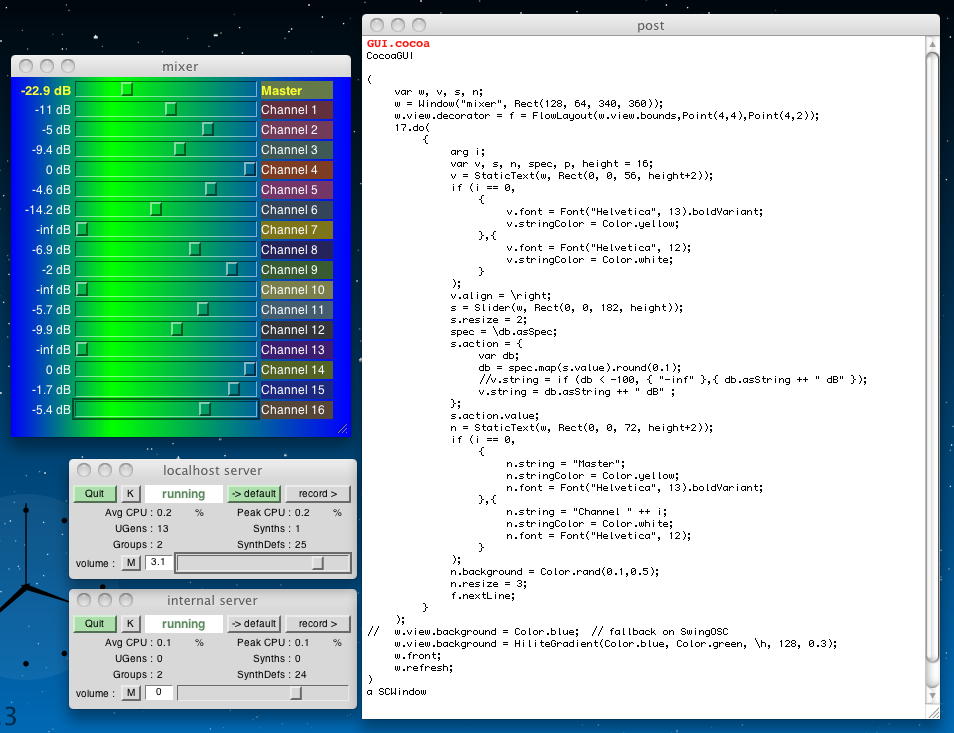
以下の例は、まさにSuperColliderのためにあるような、ミキサーの並んだウインドウである。 swingとcocoaの両方を試してみた。
(
	var w, v, s, n;
	w = Window("mixer", Rect(128, 64, 340, 360));
	w.view.decorator = f = FlowLayout(w.view.bounds,Point(4,4),Point(4,2));
	17.do(
		{
			arg i;
			var v, s, n, spec, p, height = 16;
			v = StaticText(w, Rect(0, 0, 56, height+2));
			if (i == 0,
				{
					v.font = Font("Helvetica", 13).boldVariant;
					v.stringColor = Color.yellow;
				},{
					v.font = Font("Helvetica", 12);
					v.stringColor = Color.white;
				}
			);
			v.align = \right;
			s = Slider(w, Rect(0, 0, 182, height));
			s.resize = 2;
			spec = \db.asSpec;
			s.action = {
				var db;
				db = spec.map(s.value).round(0.1);
				//v.string = if (db < -100, { "-inf" },{ db.asString ++ " dB" });
				v.string = db.asString ++ " dB" ;
			};
			s.action.value;
			n = StaticText(w, Rect(0, 0, 72, height+2));
			if (i == 0,
				{
					n.string = "Master";
					n.stringColor = Color.yellow;
					n.font = Font("Helvetica", 13).boldVariant;
				},{
					n.string = "Channel " ++ i;
					n.stringColor = Color.white;
					n.font = Font("Helvetica", 12);
				}
			);
			n.background = Color.rand(0.1,0.5);
			n.resize = 3;
			f.nextLine;
		}
	);
	w.view.background = Color.blue;	// fallback on SwingOSC
//	w.view.background = HiliteGradient(Color.blue, Color.green, \h, 128, 0.3);
	w.front;
	w.refresh;
)
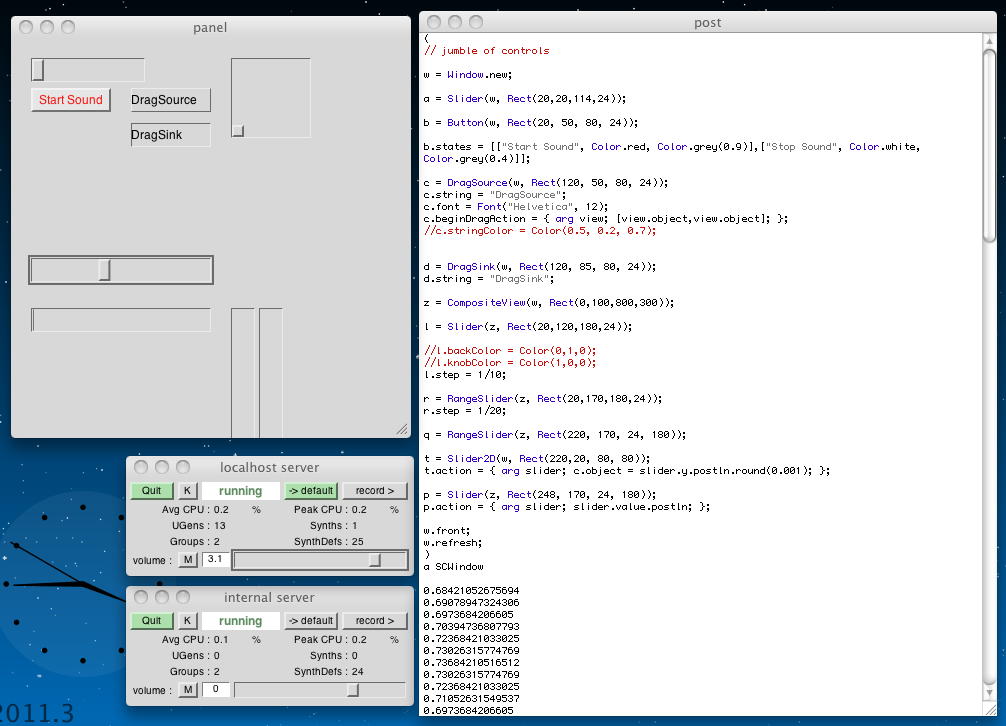
以下のプログラムは、GUIの色々なパーツのサンプルを並べ、その属性を変更している例である。 これもかなり実用的なのものだろう。
(
	w = Window.new;
	a = Slider(w, Rect(20,20,114,24));
	b = Button(w, Rect(20, 50, 80, 24));
	b.states = [
		["Start Sound", Color.red, Color.grey(0.9)],
		["Stop Sound", Color.white, Color.grey(0.4)]
	];
	c = DragSource(w, Rect(120, 50, 80, 24));
	c.string = "DragSource";
	c.font = Font("Helvetica", 12);
	c.beginDragAction = { arg view; [view.object,view.object]; };
	c.stringColor = Color(0.5, 0.2, 0.7);
	d = DragSink(w, Rect(120, 85, 80, 24));
	d.string = "DragSink";
	z = CompositeView(w, Rect(0,100,800,300));
	l = Slider(z, Rect(20,120,180,24));
	l.backColor = Color(0,1,0);
	l.knobColor = Color(1,0,0);
	l.step = 1/10;
	r = RangeSlider(z, Rect(20,170,180,24));
	r.step = 1/20;
	q = RangeSlider(z, Rect(220, 170, 24, 180));
	t = Slider2D(w, Rect(220,20, 80, 80));
	t.action =
		{
			arg slider;
			c.object = slider.y.postln.round(0.001);
		};
	p = Slider(z, Rect(248, 170, 24, 180));
	p.action =
		{
			arg slider;
			slider.value.postln;
		};
	w.front;
	w.refresh;
)

// properties you can set in the window above.
w.view.background = Color.blue;	// fallback on SwingOSC
w.view.background = HiliteGradient(Color.blue, Color.red, \v, 128, 0.2);
r.background = Color.gray; r.hi = 0.2;

z.visible = false;
z.visible = true;

z.enabled = false;	// NO EFFECT WITH SWINGOSC!
z.enabled = true;

b.visible = false;
b.visible = true;

b.enabled = false;
b.enabled = true;

c.visible = false;
c.visible = true;

b.enabled = false;
b.visible = false;
b.visible = true;
b.enabled = true;

t.enabled = false;
t.enabled = true;
t.visible = false;
t.visible = true;

r.step = 0;

t.canFocus = false;
t.canFocus = true;
t.canFocus = false;

c.object = Point(3,4);

c.object = [1, 2, 3, 4];
c.object = 123.456;
c.object = WhiteNoise.ar(1);
c.object = WhiteNoise;
c.object = true;

t.resize = 2;
t.resize = 5;
t.resize = 7;

w.alpha = 0.7;
w.close;
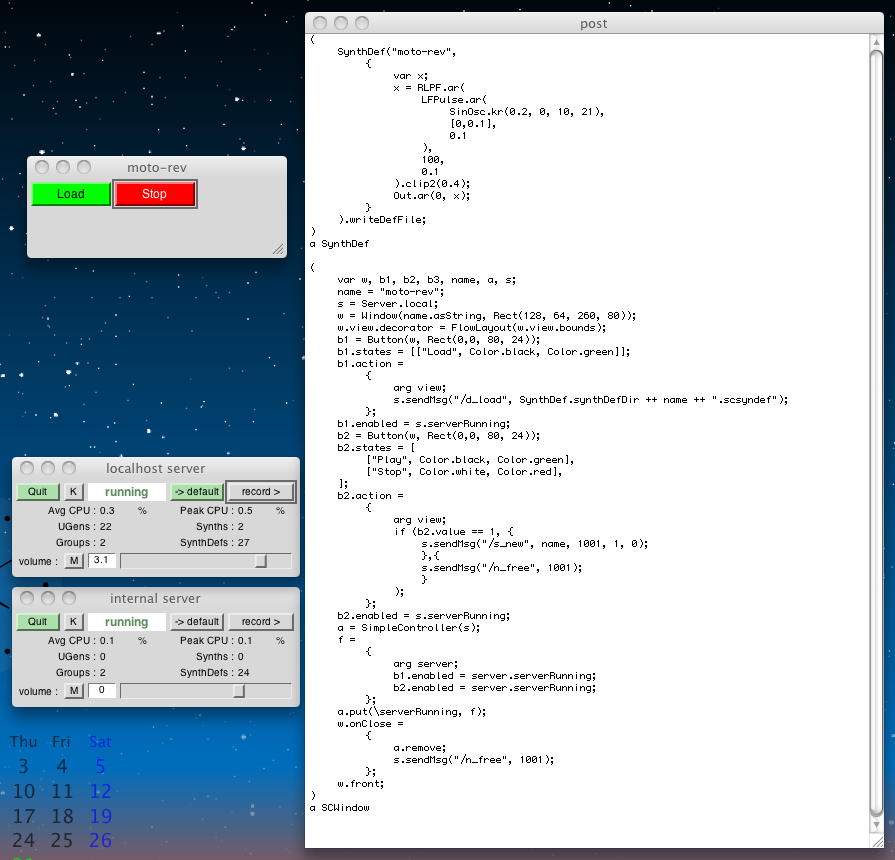
以下のプログラムは、SynthDefで音源を定義して「writeDefFile」で定義ファイルとして書き出し、GUIのボタンでそれをロードして、さらにボタンでサウンドのPlay/Stopを制御する。 ただし、検索してもHDDにはファイルは発見できなかった。どうやら内部メモリに展開しているだけらしい。
(
	SynthDef("moto-rev",
		{
			var x;
			x = RLPF.ar(
				LFPulse.ar(
					SinOsc.kr(0.2, 0, 10, 21),
					[0,0.1],
					0.1
				),
				100,
				0.1
			).clip2(0.4);
			Out.ar(0, x);
		}
	).writeDefFile;
)

(
	var w, b1, b2, b3, name, a, s;
	name = "moto-rev";
	s = Server.local;
	w = Window(name.asString, Rect(128, 64, 260, 80));
	w.view.decorator = FlowLayout(w.view.bounds);
	b1 = Button(w, Rect(0,0, 80, 24));
	b1.states = [["Load", Color.black, Color.green]];
	b1.action =
		{
			arg view;
			s.sendMsg("/d_load", SynthDef.synthDefDir ++ name ++ ".scsyndef");
		};
	b1.enabled = s.serverRunning;
	b2 = Button(w, Rect(0,0, 80, 24));
	b2.states = [
		["Play", Color.black, Color.green],
		["Stop", Color.white, Color.red],
	];
	b2.action =
		{
			arg view;
			if (b2.value == 1, {
				s.sendMsg("/s_new", name, 1001, 1, 0);
				},{
				s.sendMsg("/n_free", 1001);
				}
			);
		};
	b2.enabled = s.serverRunning;
	a = SimpleController(s);
	f =
		{
			arg server;
			b1.enabled = server.serverRunning;
			b2.enabled = server.serverRunning;
		};
	a.put(\serverRunning, f);
	w.onClose =
		{
			a.remove;
			s.sendMsg("/n_free", 1001);
		};
	w.front;
)
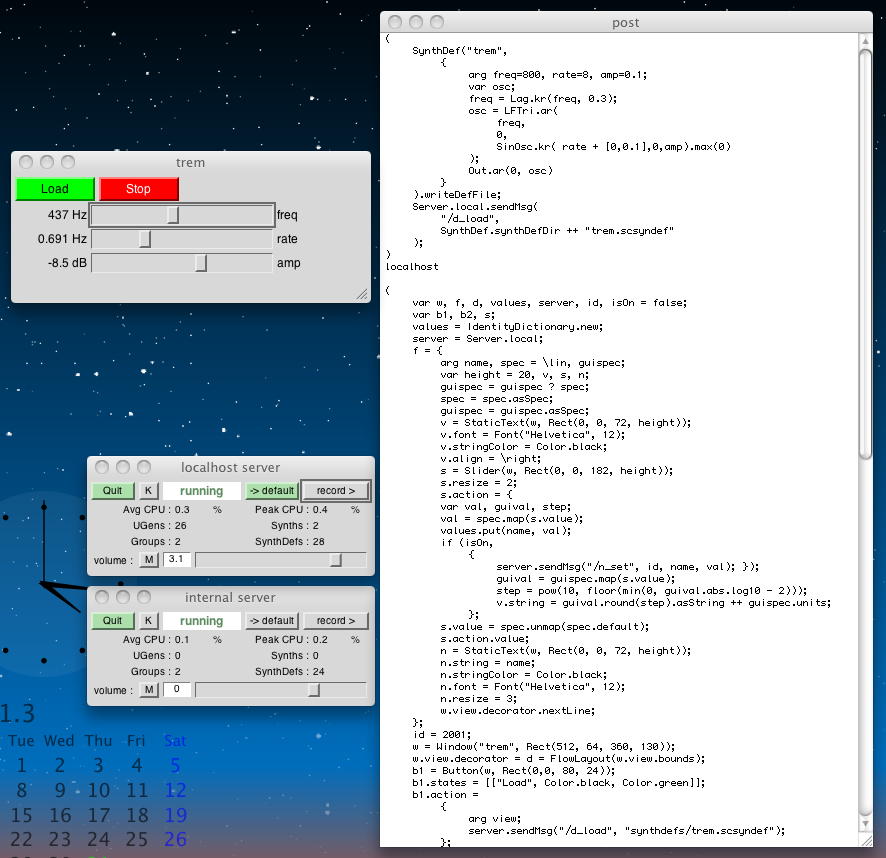
以下のプログラムは、本格的にGUIで制御するFMシンセサイザである。 こんな音がした。
(
	SynthDef("trem",
		{
			arg freq=800, rate=8, amp=0.1;
			var osc;
			freq = Lag.kr(freq, 0.3);
			osc = LFTri.ar(
				freq,
				0,
				SinOsc.kr( rate + [0,0.1],0,amp).max(0)
			);
			Out.ar(0, osc)
		}
	).writeDefFile;
	Server.local.sendMsg(
		"/d_load",
		SynthDef.synthDefDir ++ "trem.scsyndef"
	);
)

(
	var w, f, d, values, server, id, isOn = false;
	var b1, b2, s;
	values = IdentityDictionary.new;
	server = Server.local;
	f = {
		arg name, spec = \lin, guispec;
		var height = 20, v, s, n;
		guispec = guispec ? spec;
		spec = spec.asSpec;
		guispec = guispec.asSpec;
		v = StaticText(w, Rect(0, 0, 72, height));
		v.font = Font("Helvetica", 12);
		v.stringColor = Color.black;
		v.align = \right;
		s = Slider(w, Rect(0, 0, 182, height));
		s.resize = 2;
		s.action = {
		var val, guival, step;
		val = spec.map(s.value);
		values.put(name, val);
		if (isOn,
			{
				server.sendMsg("/n_set", id, name, val); });
				guival = guispec.map(s.value);
				step = pow(10, floor(min(0, guival.abs.log10 - 2)));
				v.string = guival.round(step).asString ++ guispec.units;
			};
		s.value = spec.unmap(spec.default);
		s.action.value;
		n = StaticText(w, Rect(0, 0, 72, height));
		n.string = name;
		n.stringColor = Color.black;
		n.font = Font("Helvetica", 12);
		n.resize = 3;
		w.view.decorator.nextLine;
	};
	id = 2001;
	w = Window("trem", Rect(512, 64, 360, 130));
	w.view.decorator = d = FlowLayout(w.view.bounds);
	b1 = Button(w, Rect(0,0, 80, 24));
	b1.states = [["Load", Color.black, Color.green]];
	b1.action =
		{
			arg view;
			server.sendMsg("/d_load", "synthdefs/trem.scsyndef");
		};
	b1.enabled = server.serverRunning;
	b2 = Button(w, Rect(0,0, 80, 24));
	b2.states = [
		["Play", Color.black, Color.green],
		["Stop", Color.white, Color.red],
	];
	b2.action =
		{
			arg view;
			var msg;
			if (view.value == 1,
				{
					isOn = true;
					msg = ["/s_new", "trem", 2001, 1, 0];
					values.keysValuesDo(
						{
							arg key, value;
							msg = msg.addAll([key, value]);
						}
					);
					server.performList(\sendMsg, msg);
				},{
					isOn = false;
					server.sendMsg("/n_free", 2001);
				}
			);
		};
	b2.enabled = server.serverRunning;
	d.nextLine;
	f.value(\freq, \freq);
	f.value(\rate, \lofreq);
	f.value(\amp, \amp, \db);
	a = SimpleController(server);
	f =
		{
			arg server;
			b1.enabled = server.serverRunning;
			b2.enabled = server.serverRunning;
			if (server.serverRunning.not,
				{
					b2.value = 0
				}
			);
		};
	a.put(\serverRunning, f);
	w.onClose =
		{
			if (isOn,
				{
					server.sendMsg("/n_free", 2001)
				}
			);
 			a.remove;
		};
	w.front;
)
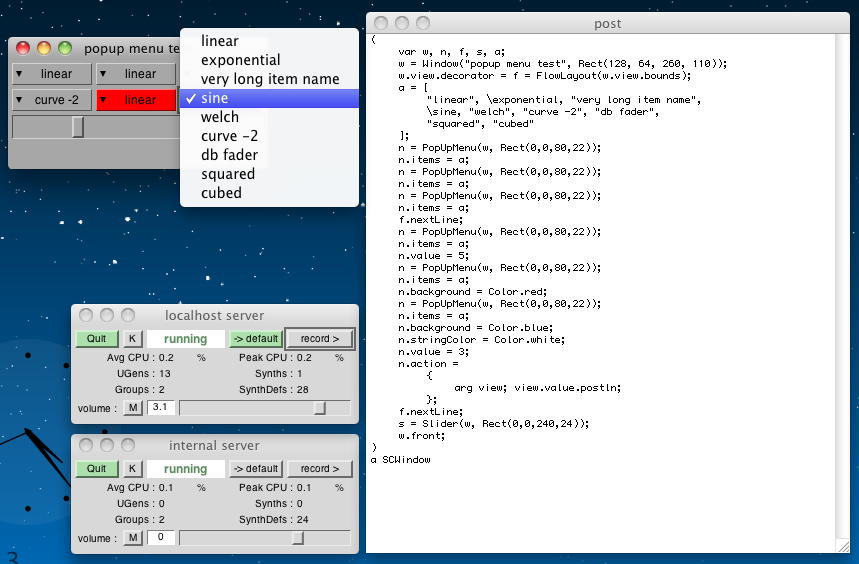
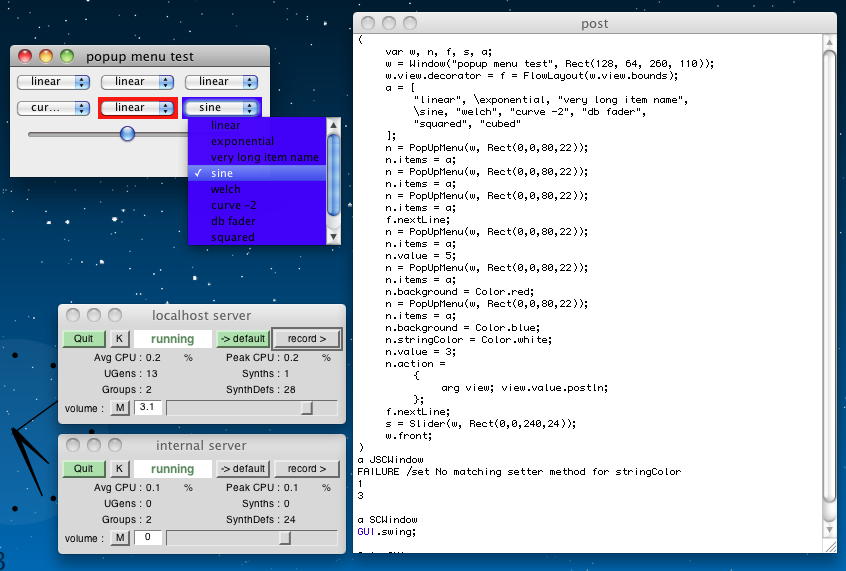
以下のプログラムは、ポップアップメニューの例である。これもcocoaとswingとを試した。 こんなところまでやってくれるとは。(^_^)
(
	var w, n, f, s, a;
	w = Window("popup menu test", Rect(128, 64, 260, 110));
	w.view.decorator = f = FlowLayout(w.view.bounds);
	a = [
		"linear", \exponential, "very long item name",
		\sine, "welch", "curve -2", "db fader",
		"squared", "cubed"
	];
	n = PopUpMenu(w, Rect(0,0,80,22));
	n.items = a;
	n = PopUpMenu(w, Rect(0,0,80,22));
	n.items = a;
	n = PopUpMenu(w, Rect(0,0,80,22));
	n.items = a;
	f.nextLine;
	n = PopUpMenu(w, Rect(0,0,80,22));
	n.items = a;
	n.value = 5;
	n = PopUpMenu(w, Rect(0,0,80,22));
	n.items = a;
	n.background = Color.red;
	n = PopUpMenu(w, Rect(0,0,80,22));
	n.items = a;
	n.background = Color.blue;
	n.stringColor = Color.white;
	n.value = 3;
	n.action =
		{
			arg view; view.value.postln;
		};
	f.nextLine;
	s = Slider(w, Rect(0,0,240,24));
	w.front;
)
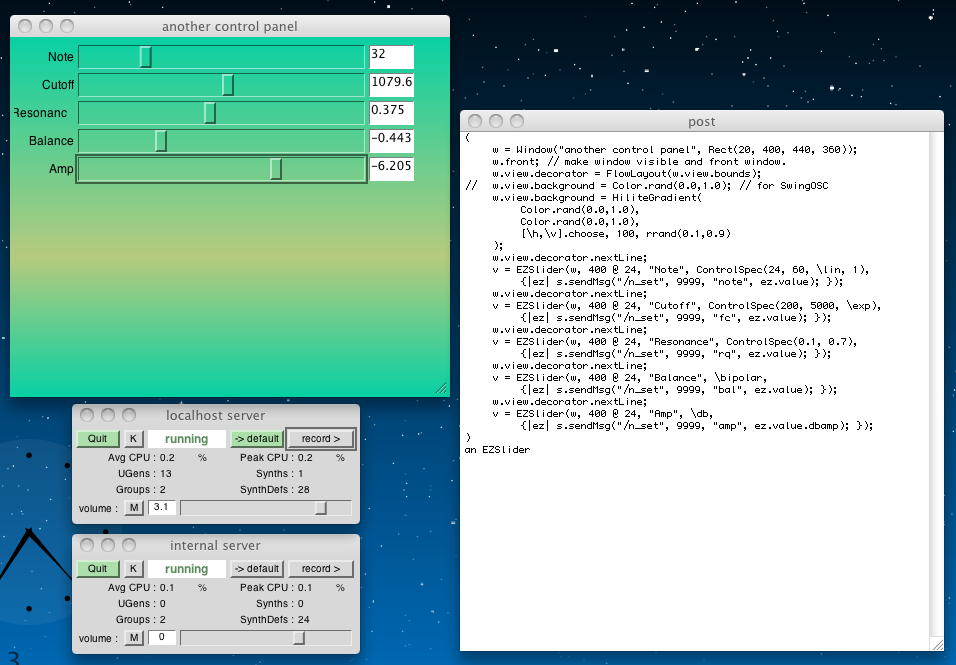
以下は、既に登場していた「EZSlider」のサンプルである。
(
	w = Window("another control panel", Rect(20, 400, 440, 360));
	w.front; // make window visible and front window.
	w.view.decorator = FlowLayout(w.view.bounds);
//	w.view.background = Color.rand(0.0,1.0); // for SwingOSC
	w.view.background = HiliteGradient(
		Color.rand(0.0,1.0),
		Color.rand(0.0,1.0),
		[\h,\v].choose, 100, rrand(0.1,0.9)
	);
	w.view.decorator.nextLine;
	v = EZSlider(w, 400 @ 24, "Note", ControlSpec(24, 60, \lin, 1),
		{|ez| s.sendMsg("/n_set", 9999, "note", ez.value); });
	w.view.decorator.nextLine;
	v = EZSlider(w, 400 @ 24, "Cutoff", ControlSpec(200, 5000, \exp),
		{|ez| s.sendMsg("/n_set", 9999, "fc", ez.value); });
	w.view.decorator.nextLine;
	v = EZSlider(w, 400 @ 24, "Resonance", ControlSpec(0.1, 0.7),
		{|ez| s.sendMsg("/n_set", 9999, "rq", ez.value); });
	w.view.decorator.nextLine;
	v = EZSlider(w, 400 @ 24, "Balance", \bipolar,
		{|ez| s.sendMsg("/n_set", 9999, "bal", ez.value); });
	w.view.decorator.nextLine;
	v = EZSlider(w, 400 @ 24, "Amp", \db,
		{|ez| s.sendMsg("/n_set", 9999, "amp", ez.value.dbamp); });
)
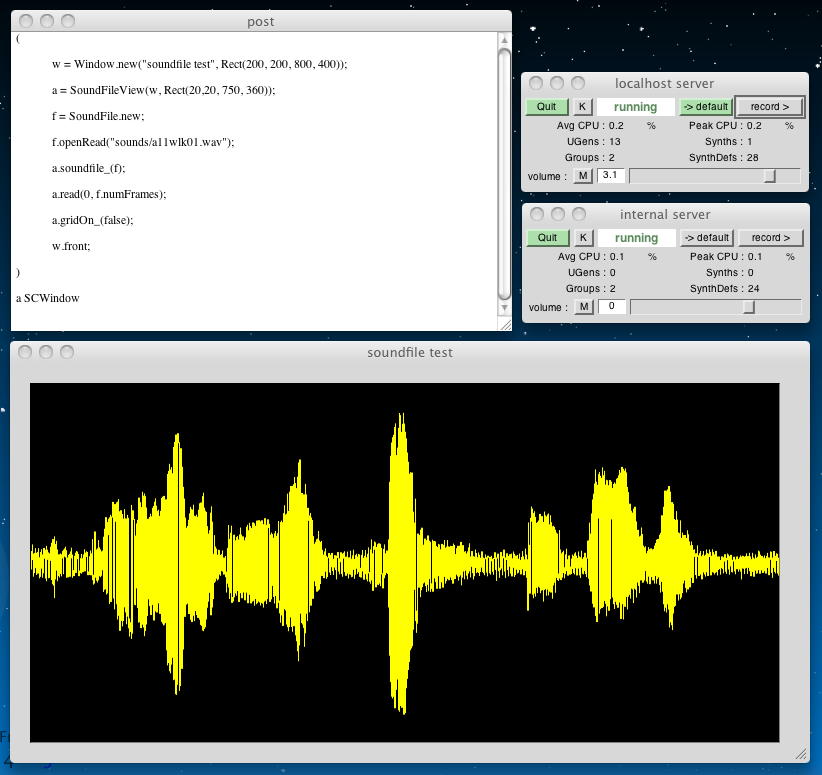
この他については、「[MultiSliderView]ヘルプを見よ」「[EnvelopeView]ヘルプを見よ」とあったが、とりあえずパス(^_^;)。 その次の「SoundFileView()」は面白い。 このサウンドを、以下のように波形表示してくれる。
(
	w = Window.new("soundfile test", Rect(200, 200, 800, 400));
	a = SoundFileView(w, Rect(20,20, 750, 360));
	f = SoundFile.new;
	f.openRead("sounds/a11wlk01.wav");
	a.soundfile_(f);
	a.read(0, f.numFrames);
	a.gridOn_(false);
	w.front;
)
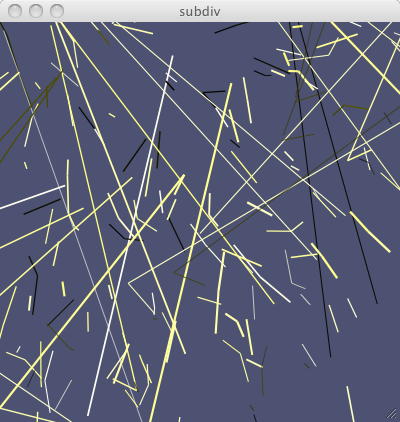
なんと「MovieViewもあるのだが・・・」と続いたが、これはまだちゃんと動いていないそうである(^_^;)。 そして次に、以下はグラフィクスのサンプルである。 SuperColliderをやっているのか、Processingをやっているのか、判らなくなってきた(^_^;)。 ラインを描画する「Pen class」を200個、呼び出すたびに、Penの色々なプロパティをランダムに変更している。 表示ウインドウの縁を越えて内部と外部とを交互にクリックすると、ランダムに描画してくれる。
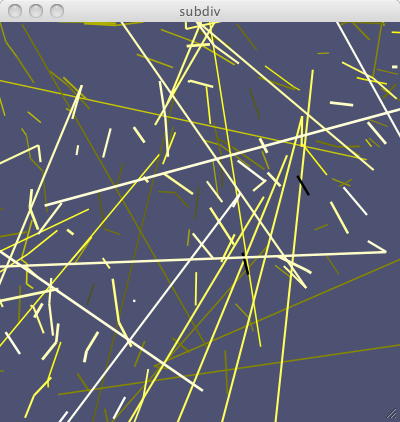
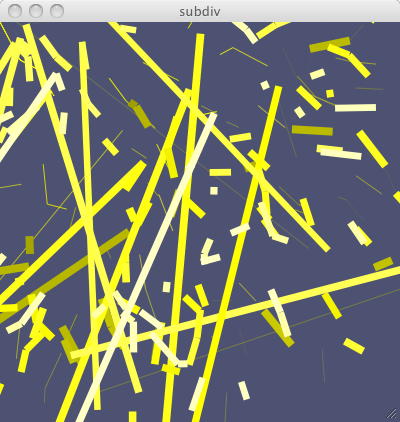
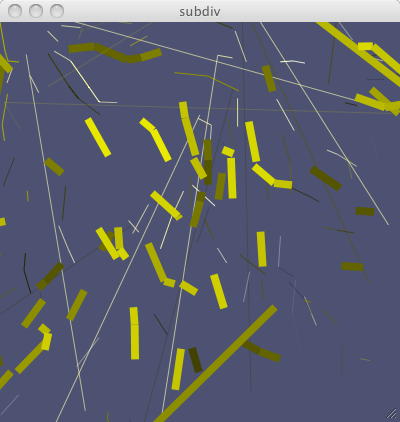
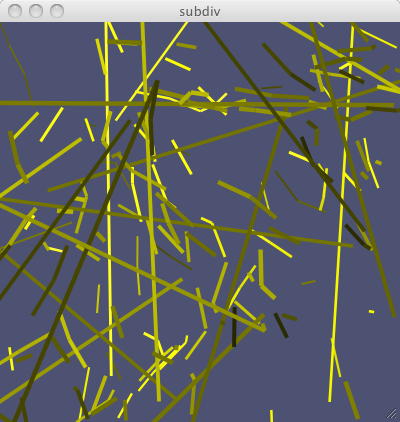
(
	var w, h = 400, v = 400, seed = Date.seed, run = true;
	w = Window("subdiv", Rect(40, 40, h, v));
	w.view.background = Color.rand;
	w.onClose = { run = false };
	w.front;
	w.drawHook = { var done, nextx, nexty, yellowness, penwidth;
	nextx=0;
	nexty=0;
	yellowness=rrand(0.0,1.0);
	penwidth=rrand(0.5,1.5);
		//done=0;
	Pen.use {
		200.do(
			{
				arg i;
				var lastx,lasty;
				lastx=nextx;
				lasty=nexty;
				nextx=nextx+rrand(1,20);
				nexty=nexty+rrand(1,40);
				if(nextx>=h,
					{
						nextx=nextx%h
					}
				);
				if(nexty>=v,
					{
						nexty=nexty%v
					}
				);
				penwidth=(penwidth+(0.2.rand2))%8.0;
				Pen.width= penwidth;
				yellowness= (yellowness+(0.1.rand2))%2.0;
				Color.yellow(yellowness).set;
				Pen.beginPath;
				Pen.line(Point(lastx,lasty),Point(nextx,nexty));
				Pen.rotate(rand(i%40));
				Pen.line(Point(lastx,lasty),Point(nextx,nexty));
				Pen.rotate(rand(i%40));
				Pen.line(Point(lastx,lasty),Point(nextx,nexty));
				Pen.rotate(rand(i%40));
				Pen.line(Point(lastx,lasty),Point(nextx,nexty));
				Pen.stroke;
				//Pen.fillRect(Rect(h.rand,v.rand,rrand(1,50),rrand(1,50)))

			}
		);
	};
};
//{ while { run } { w.refresh; 3.wait; } }.fork(AppClock)
)

そしてこの章の最後は、以下のような、テキストをグラフィックにアニメーションさせるモーショングラフィクスのサンプルである。 これまたSuperColliderをやっているのか、Processingをやっているのか、判らなくなってきた(^_^;)。
(
	var linetext, drawletter;
	var w, h = 700, v = 100, seed = Date.seed, run = true;
	var time, name, sourcestring;
	var yellowness, penwidth;
	//name=[\s,\u,\p,\e,\r,\c,\o,\l,\l,\i,\d,\e,\r];
	//sourcestring= "any lower case text";
	sourcestring= "test by yoichi nagashima";
	name=Array.fill(sourcestring.size,{arg i; sourcestring[i].asSymbol});
	time=0;
	linetext= (
		'a':[[[0,1],[0.5,0]],[[0.5,0],[1,1]],[[0.25,0.5],[0.75,0.5]]],
		'b':[[[0,1],[0,0]],[[0,1],[1,1]],[[0,0],[1,0]],[[0,0.5],
			[0.75,0.5]],[[0.75,0.5],[1,0.75]],[[0.75,0.5],
			[1,0.25]],[[1,0.75],[1,1]],[[1,0.25],[1,0]]],
		'c':[[[0,1],[0,0]],[[0,0],[1,0]],[[0,1],[1,1]]],
		'd':[[[0,1],[0,0]],[[0,0],[0.75,0]],[[0,1],[0.75,1]],
			[[0.75,1],[1,0.75]],[[0.75,0],[1,0.25]],[[1,0.25],
			[1,0.75]]],
		'e':[[[0,0],[0,1]],[[0,0],[1,0]],[[0,1],[1,1]],[[0,0.5],
			[1,0.5]]],
		'f':[[[0,0],[0,1]],[[0,0],[1,0]],[[0,0.5],[1,0.5]]],
		'g':[[[0,1],[0,0]],[[0,0],[1,0]],[[0,1],[1,1]],[[1,1],
			[1,0.5]],[[0.5,0.5],[1,0.5]]],
		'h':[[[0,1],[0,0]],[[0,0.5],[1,0.5]],[[1,1],[1,0]]],
		'i':[[[0,0],[1,0]],[[0.5,0],[0.5,1]],[[0,1],[1,1]]],
		'j':[[[0,0],[1,0]],[[0.5,0],[0.5,1]],[[0,1],[0.5,1]]],
		'k':[[[0,1],[0,0]],[[0,0.5],[1,1]],[[0,0.5],[1,0]]],
		'l':[[[0,1],[0,0]],[[0,1],[1,1]]],
		'm':[[[0,1],[0,0]],[[0,0],[0.5,0.5]],[[0.5,0.5],
			[1,0]],[[1,0],[1,1]]],
		'n':[[[0,1],[0,0]],[[0,0],[1,1]],[[1,1],[1,0]]],
		'o':[[[0,1],[0,0]],[[0,0],[1,0]],[[0,1],[1,1]],[[1,0],[1,1]]],
		'p':[[[0,0],[0,1]],[[0,0],[1,0]],[[0,0.5],[1,0.5]],[[1,0],
			[1,0.5]]],
		'q':[[[0,0],[0,0.75]],[[0,0],[0.75,0]],[[0,0.75],
			[0.75,0.75]],[[0.75,0],[0.75,0.75]],[[0.5,0.5],[1,1]]],
		'r':[[[0,0],[0,1]],[[0,0],[1,0]],[[0,0.5],[1,0.5]],[[1,0],
			[1,0.5]],[[0,0.5],[1,1]]],
		's':[[[0,0],[0,0.5]],[[0,0],[1,0]],[[0,1],[1,1]],[[0,0.5],
			[1,0.5]],[[1,0.5],[1,1]]],
		't':[[[0,0],[1,0]],[[0.5,0],[0.5,1]]],
		'u':[[[0,1],[0,0]],[[0,1],[1,1]],[[1,0],[1,1]]],
		'v':[[[0,0],[0.5,1]],[[0.5,1],[1,0]]],
		'w':[[[0,0],[0.25,1]],[[0.25,1],[0.5,0.5]],[[0.5,0.5],
			[0.75,1]],[[0.75,1],[1,0]]],
		'x':[[[0,0],[1,1]],[[0,1],[1,0]]],
		'y':[[[0,0],[0.5,0.5]],[[0.5,0.5],[1,0]],[[0.5,0.5],[0.5,1]]],
		'z':[[[0,1],[1,0]],[[0,0],[1,0]],[[0,1],[1,1]]],
		(" ".asSymbol):[[[0,1],[1,1]],[[0,0.8],[0,1]],[[1,0.8],[1,1]]]
	);
	w = Window("test", Rect(40, 500, h, v));
	w.view.background = Color.blue(0.5);
	w.onClose = { run = false };
	w.front;
	drawletter=
		{
			arg which, startx, starty, xscale=100, yscale,prop=1.0;
			var data;
			yscale= yscale ? xscale;
			data= linetext[which];
			prop=(round((data.size)*prop).asInteger).max(1);
			prop.do(
				{
					arg i;
					var val=data[i];
					Pen.beginPath;
					Pen.line(
						Point(
							startx+(xscale*val[0][0]),
							starty+(yscale*val[0][1])
						),
						Point(
							startx+(xscale*val[1][0]),
							starty+(yscale*val[1][1])
						)
					);
					Pen.stroke;
				}
			);
		};
		yellowness=rrand(0.7,0.9);
		penwidth=rrand(2,3);
		w.drawHook =
			{
				Pen.use {var xoscil, xsizoscil,yoscil, todraw, usedtime;
				Pen.width= penwidth;
				Color.yellow(yellowness).set;
				usedtime=time.min(1.0);
				todraw=(round((name.size)*usedtime).asInteger).max(1);
				todraw.do(
					{
						arg j;
						xoscil= sin(2*pi*time+(j*pi*0.13))*140/(1+(10*time));
						yoscil= sin(2*pi*time+(j*pi*0.03))*200/(1+(200*time));
						xsizoscil= time*5+5;
						drawletter.value(
							name[j],
							50+(25*j)+(xoscil),
							10+yoscil,
							xsizoscil,
							xsizoscil,
							usedtime
						);

					}
				);
			};
		};
	{
		while
			{
				time<2.0
			} {
				w.refresh;
				time=(time+0.025); //%2.0;
				0.05.wait;
			}
		}.fork(AppClock)
)


ここまでを「日記(3)」と区切りにして、次は「日記(4)」として Workshop materials for Computer Music (G6002) の 5. Interaction の 5.3 Further GUI example.html からである。 まださらに高度なGUIがあるというのだろうか。(^_^;)