Raspberry Pi 日記 (part3)
長嶋 洋一
2013年7月11日(木)
唯一、今月の予定表に何も書かれていない日である。 朝、研究室に出てみると、ウイーンでの ISPS2013のスケジュール が届いていた。 来週にはSketching2013だが、いよいよ「その次」も起動してきたようだ。 これは暫定版スケジュールで、正式版は来週にWeb公開されるというが、なんと今回のProceedingsは880ページにもなるのだという。 そんな重たいもの受け取って、ウイーンの後でブダペスト→プラハ→リンツと移動するのだろうか(^_^;)。もうSketchingに行くまで1週間となったので、ぼちぼち持参するMacBookAirでの動作確認を含めて、「何を持参するか」を確定させいく必要がある。 Raspberry Pi日記(part2) の「2013年6月17日(月)」のところで、「これが今後1-2ヶ月、夏までのメインターゲットとなる」として列記していたToDo項目のうち、いくつかは完全に到達(^_^)して、いくつかは手付かずである。 無事に完了してしまったものとしては「Pythonを走らせる」「インブレス本」「Blink(1)の稼働」「SUACboardと接続」「OSCの稼働」などがある。 そこでまず、priorityの高いものを上げて、このToDo項目を以下のように改訂してみた。
このリストの最初にある「3台のRaspberry PiとホストMac、の計4台で相互にOSC通信する環境を作る」についてちょっと考えてみると、これまでの延長で言えばホストのMacに3つのターミナルウインドウを開いて、3台のRaspberry Piにそれぞれsshでログインして、ホストMac上で作ったPython/CプログラムをrcpでそれぞれのRaspberry Piに転送して実行させる・・・という流れである。 しかしこれは、ホストMacと1台のRaspberry Piであればともかく、多数のRaspberry Piがテキスト画面のインターフェースでは、面倒でやってられないのだった。 Maxが便利なのは、マウス操作でパッチ内のスライダーとかボタンを操作して、またメッセージ表示もグラフィックなスライダーやダイヤルや動的グラフなどで、一目瞭然に「見える」のがメリットなのである。
- 3台のRaspberry PiとホストMac、の計4台で相互にOSC通信する環境を作る
- Raspberry Piと他システムとでXBee通信する
- GPIOポートに外部A/Dコンバータを接続する (ふーみん本)
- Raspberry Piと他システムとでMIDI通信する (ふーみん本)
- オーディオインターフェースを稼働させる (ふーみん本)
- Webカメラを稼働させる (ふーみん本/CQ本)
- PureDataを稼働させる (ふーみん本)
- Raspberry PiにWebサーバを稼働させてCGIを提供する
これは過去に、 Processing日記(part4) の「2011年6月12日(日)」のあたりでやった以下の実験や

SuperCollider日記(part6) の「2011年8月18日(木)」のあたりでやった以下の実験でも明らかで、MaxとProcessingとSuperColliderとの連携の実験や動作確認に、グラフィックなインターフェースは不可欠なのだ。

そこで「3台のRaspberry PiとホストMac、の計4台で相互にOSC通信する環境を作る」のための道具立てとして、せっかく既にホストMacから3台のRaspberry PiにVNCで接続できているので、VNC越しのRaspberry Piデスクトップのグラフィクスに表示したりインターフェースを置けないかどうか、調べてみる事にした。 あくまで基本方針として、Raspberry Piにそれぞれ専用のモニタやキーボード/マウスは繋がないで、VNC越しにやりとりしたいのである。
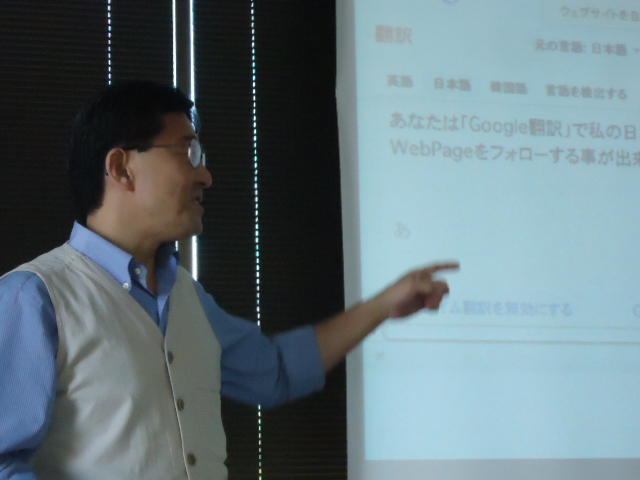
いつものようにYAHOO.COMに行って「graphic Raspberry Pi」で検索すると、 このようなページ があった。 たった35ドルのRaspberry Piではあるが、以下のような枠組みで、グラフィクスのソースコードを提供するのだという。 あくまでオープンソース文化に乗るので、いろいろなオープンソース・ライセンスを活用しまくりである。

またYAHOO.COMに行って「graphics python」で検索すると、多数のヘビの写真が並ぶ(^_^;)だけでなくて、 本命のこのページ が出て来た。 当然ながらPythonでグラフィックは完備しているのであるが、これがパソコンでなくRaspberry Piでどこまで実現されているか、を調べるのが当面の目標となる。 また、同じ「graphics python」の検索では、 こんなページ には、まさにズバリ「Simple Graphics Library: graphics.py」なんていうPythonプログラムもあった。 そして このページ のタイトルも「2D and 3D Graphics in Python」とソソラレルものだが、少なくともこのページに「Raspberry Pi」というタームは存在していなかった。 とりあえずは、この3つのページから探っていこう。
このページ はちょっと教条的で圧倒されたので(^_^;)、まずは このページ からスタートすることにした。 ページのタイトルは「Python Programming: An Introduction to Computer Science」であり、要するにこの研究者はこのタイトルの本も出版しているのだった。 肝心の graphics.py とともに、 PDF版リファレンス、 Web版リファレンス も完備していて、至れり尽くせりである(^_^)。 そこでまず、まったく中身を見ないまま(^_^;)、ゲットした graphics.py をRaspberry Pi63号機に転送して、さらにVNCでウインドウを開けて、「python ./test.py」とやってみると、ちょっと起動に時間がかかったものの、なんと以下のようにちゃんと別ウインドウが現れて、さらにそのウインドウ内をマウスクリックすると表示が変化した。さすがである。
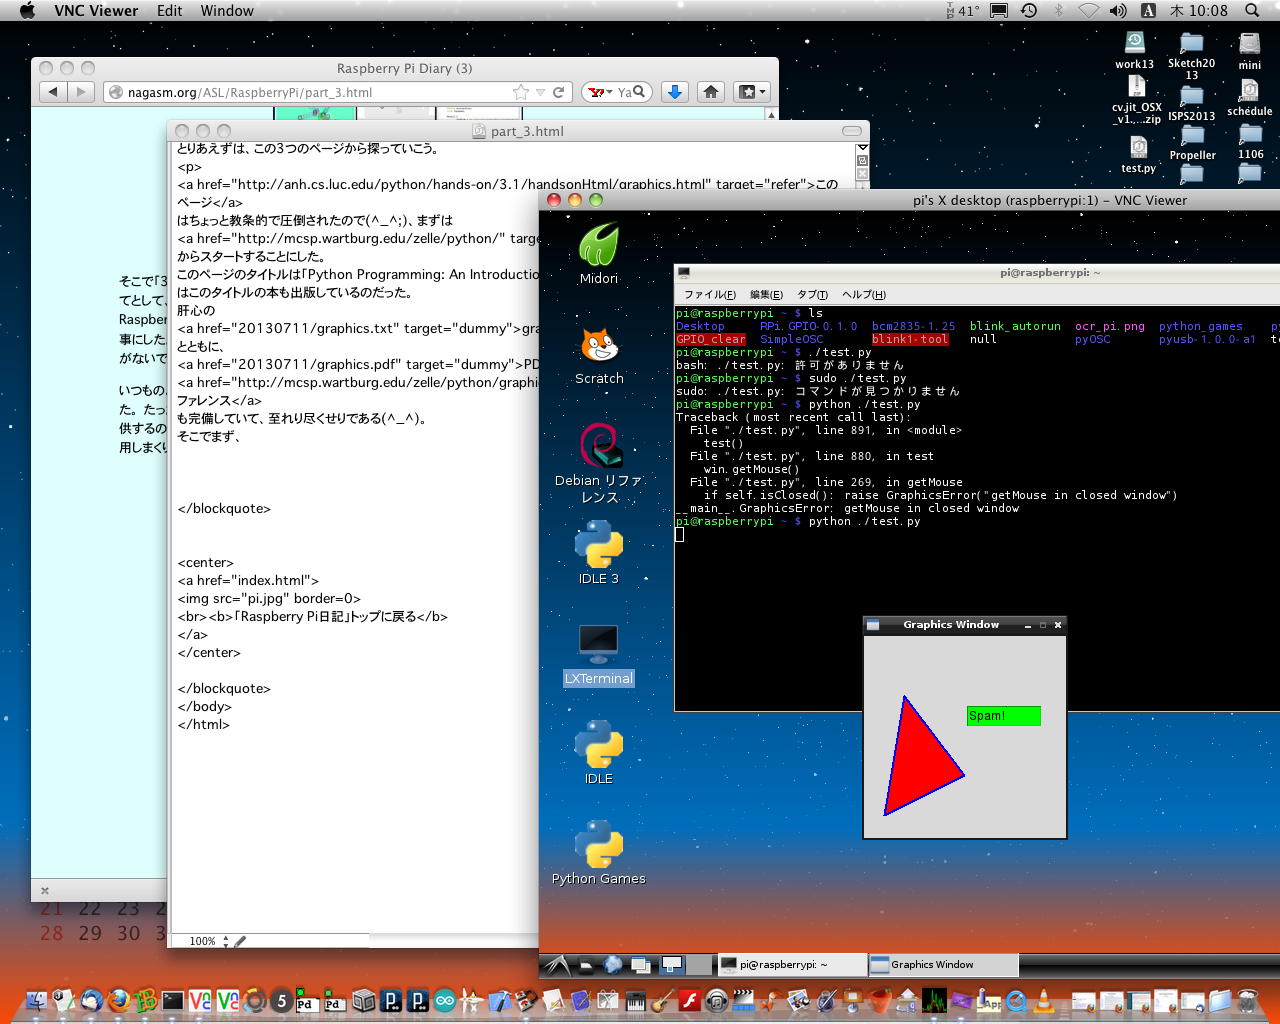
上の状況で、VNCのターミナルから「コントロール+Z」で強制終了させると、動作は止まったが開いたウインドウはそのままであった。 この残骸ウインドウはマウスでつまんで移動できるが、ターミナルウインドウと重ねてから手前に持ってくるとウインドウ内が食われて消えている、という幽霊状態だった(^_^;)。 そしてターミナルで「ps ax」でまだ残っていたプロセスIDを明示的に「kill -9」で殺すと、残骸の幽霊ウインドウも奇麗に消滅した。 また、別に開いていたMacのターミナル画面から無理矢理に起動してみると、以下のようにエラーが出た。 これは当然で、テキスト画面からグラフィックは起動できないのである。
段取りがクリアになったので、当面はこの「Simple Graphics Library: graphics.py」で遊ぶことにした。 上記の このページ の中にあった Flying High: Hobbyist OpenGL from Python というページをチラッと見たら、もの凄く勉強になりそうだったが、ここはグッと堪えていこう。 まずはいつものように、「test.py」を最少限まで簡素化して、必要な要素だけ残し、これまでに動いたものをうまく組み合わせていけば・・・という作業である。Last login: Thu Jul 11 06:59:41 on console nagasm-Mac-mini:~ nagasm$ ssh pi@172.16.65.63 pi@172.16.65.63's password: Linux raspberrypi 3.6.11+ #456 PREEMPT Mon May 20 17:42:15 BST 2013 armv6l The programs included with the Debian GNU/Linux system are free software; the exact distribution terms for each program are described in the individual files in /usr/share/doc/*/copyright. Debian GNU/Linux comes with ABSOLUTELY NO WARRANTY, to the extent permitted by applicable law. Last login: Mon Jun 24 13:28:40 2013 pi@raspberrypi ~ $ rcp nagasm@172.16.65.31:Desktop/test.py . Password: test.py 100% 27KB 27.2KB/s 00:00 pi@raspberrypi ~ $ ls Desktop SimpleOSC blink_autorun pyOSC pyusb-1.0.0a3 GPIO_clear bcm2835-1.25 null python_games test.py RPi.GPIO-0.1.0 blink1-tool ocr_pi.png pyusb-1.0.0-a1 twilight.png pi@raspberrypi ~ $ python ./test.py Traceback (most recent call last): File "./test.py", line 170, in_root = tk.Tk() File "/usr/lib/python2.7/lib-tk/Tkinter.py", line 1712, in __init__ self.tk = _tkinter.create(screenName, baseName, className, interactive, wantobjects, useTk, sync, use) _tkinter.TclError: no display name and no $DISPLAY environment variable pi@raspberrypi ~ $ そして夕方まで頑張ったが、あとわずか(体感)というところで完成せずに一日が終わった(^_^;)。 過去にはもう少し頑張ったところだが、自宅で餌やりを待っているハムスターのための帰宅は日課なのである。 マル一日、あれこれ試行錯誤でほぼプログラミングだけ数時間、というのはなかなかに幸せな時間となった。
2013年7月12日(金)
もう週末である。 ゼミの予定はあるが、まずは昨日、体感としては「もう少し」というところだった部分の続きである。 ぶち当たっていた壁は、OSCメッセージの受信処理は割り込みハンドラとなるので、受け取ったパラメータをいったん、global変数として定義した配列に格納しておいて、これをグラフィック描画処理の無限ループで適宜、参照して改訂描画したい、という部分であった。 上記の言い方はC言語の発想であり、Pythonではこれは出来ないようで、あれこれ出続けるエラーと戦っていたのである。 GPIOとOSCを結びつけるのには、C言語のGPIOとPythonのOSCとでRAMディスクを介在させたが、さすがにOSCもグラフィクスもPythonなので、それぞれ別に作ってRAMディスクを介在する、というのはあまりにダサいので避けたいのだ。そして「一晩寝れば解決」というルールの通りに、目覚めて思いついていたアイデアで、「Python グローバル 配列」などでネット検索してみた。 これまで情報検索はもっぱらYAHOO.COMで英語で調べていたが、目先を変えてYAHOO.CO.JPで日本語で調べてみたのが幸いしたのか、 このページ とか このページ とかにヒントを得て、 このページ の中にあった、
という説明で遂に壁を突破した。 以下はまだ朝イチ(07:30)、コーヒーを飲む前の、とりあえず実験中の画面でメタメタ(^_^;)であるが、これはPython描画の部分で改良は容易である。 無事にMaxからのOSCを受けて個別の値が更新されて、「見えた(^o^)」という瞬間なのである。 なんかPythonの言語仕様の間隙を突いた裏技っぽいが、これは気にしない。関数に引数として渡される値は、関数内のローカル変数となります。しかし、 例外として、関数に引数としてリストを渡された場合は、関数内で変更された リスト要素の値が、グローバルスコープでも有効となります。ローカル変数の ルールと違い、リストの場合は、参照渡しとなっているからです。リストではない 変数の場合、値渡しとなり、関数内には、引数の値のコピーが渡されます。

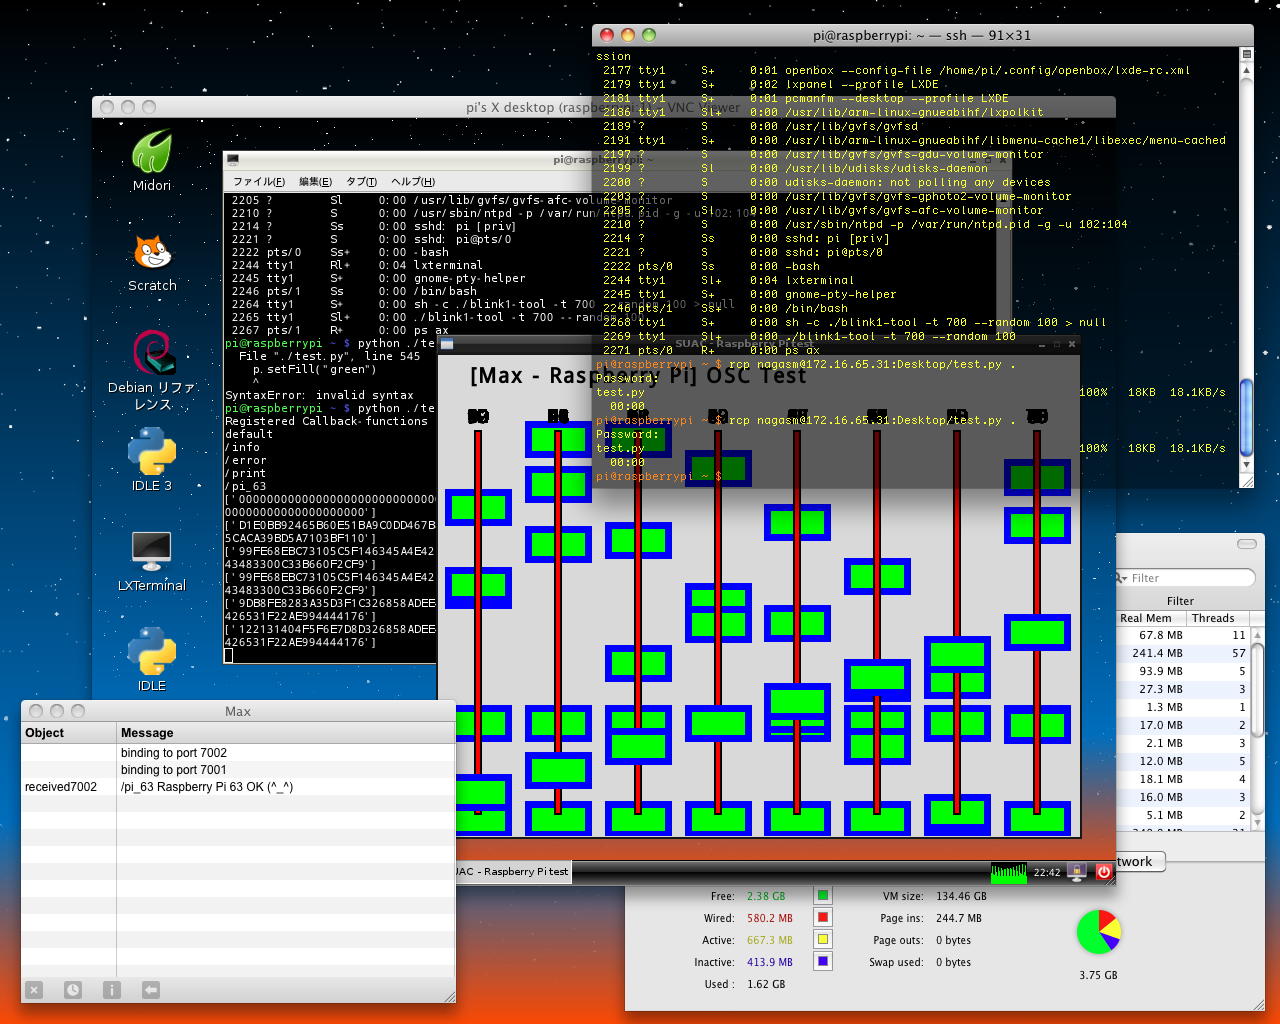
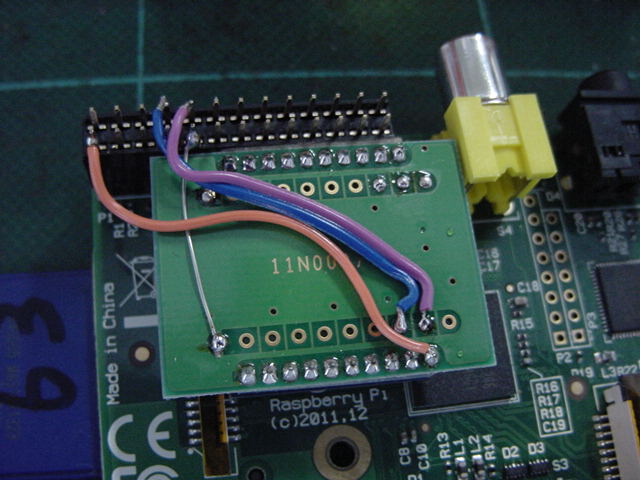
ここが突破できれば、あとはゼミの2限までの時間は、ゆっくりコーヒーを淹れて(「煎れる」でなく「淹れる」)、ぼちぼち楽しいプログラミングタイムとなった。 ホストのMaxのパッチを「UDP_test_04.maxpat」と改訂して、Raspberry Pi63号機で「test.py」となっていたPythonプログラムも、Raspberry PiのそれぞれのIPアドレスとポートで区別するために別モノとして「OSC_disp61.py」と「OSC_disp62.py」と「OSC_disp63.py」とした。 プログラムは これ である。 そして1限の終わりには、なんとか以下のように、ホストMacの2画面の中に、Maxパッチのウインドウ、3つのsshウインドウ、さらに3つのVNCウインドウが開いた騒然とした世界が稼働した。
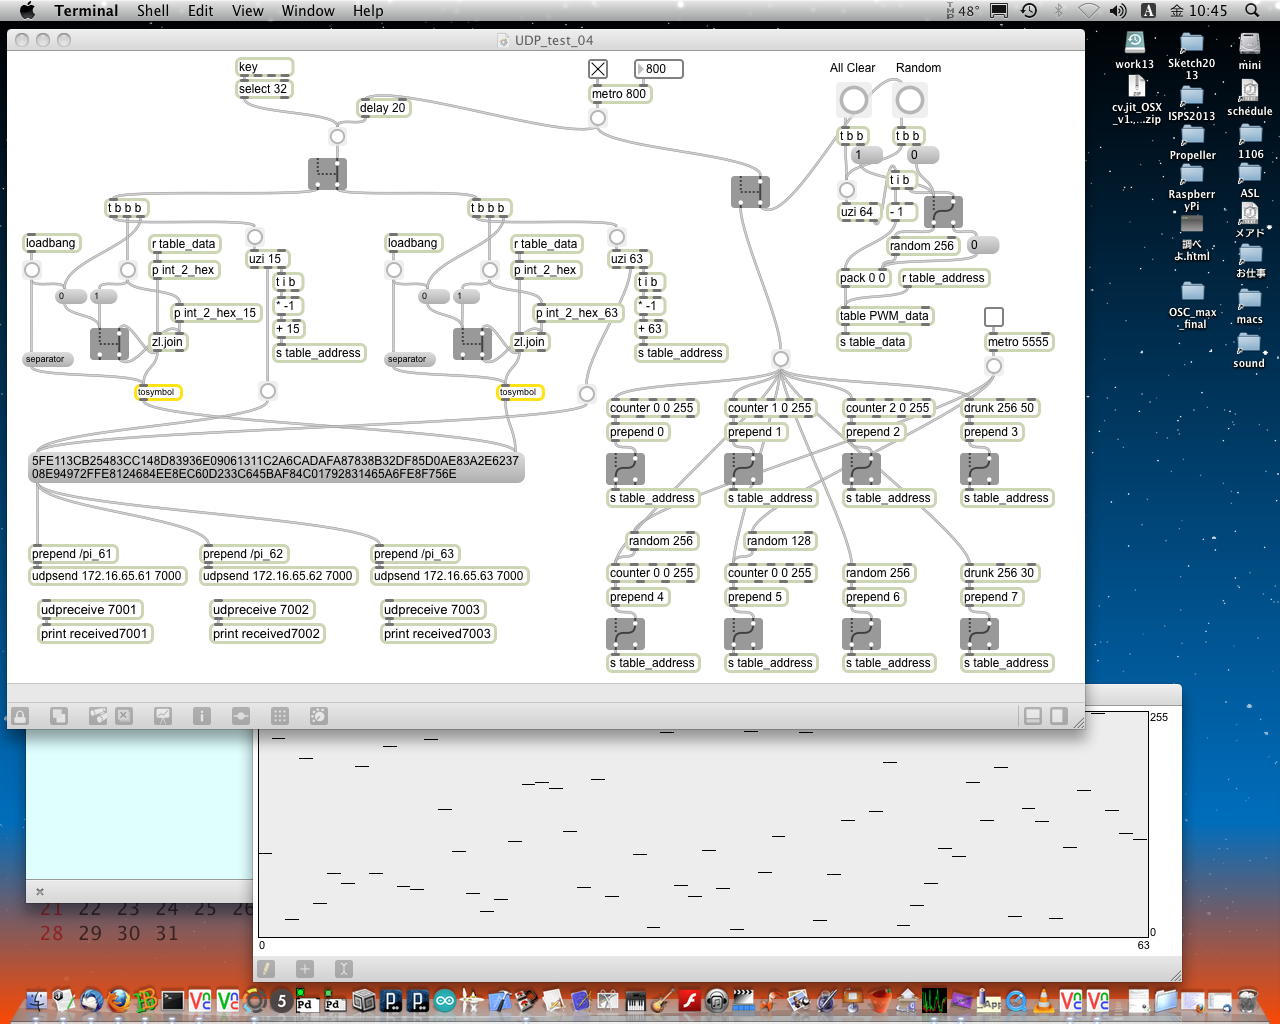

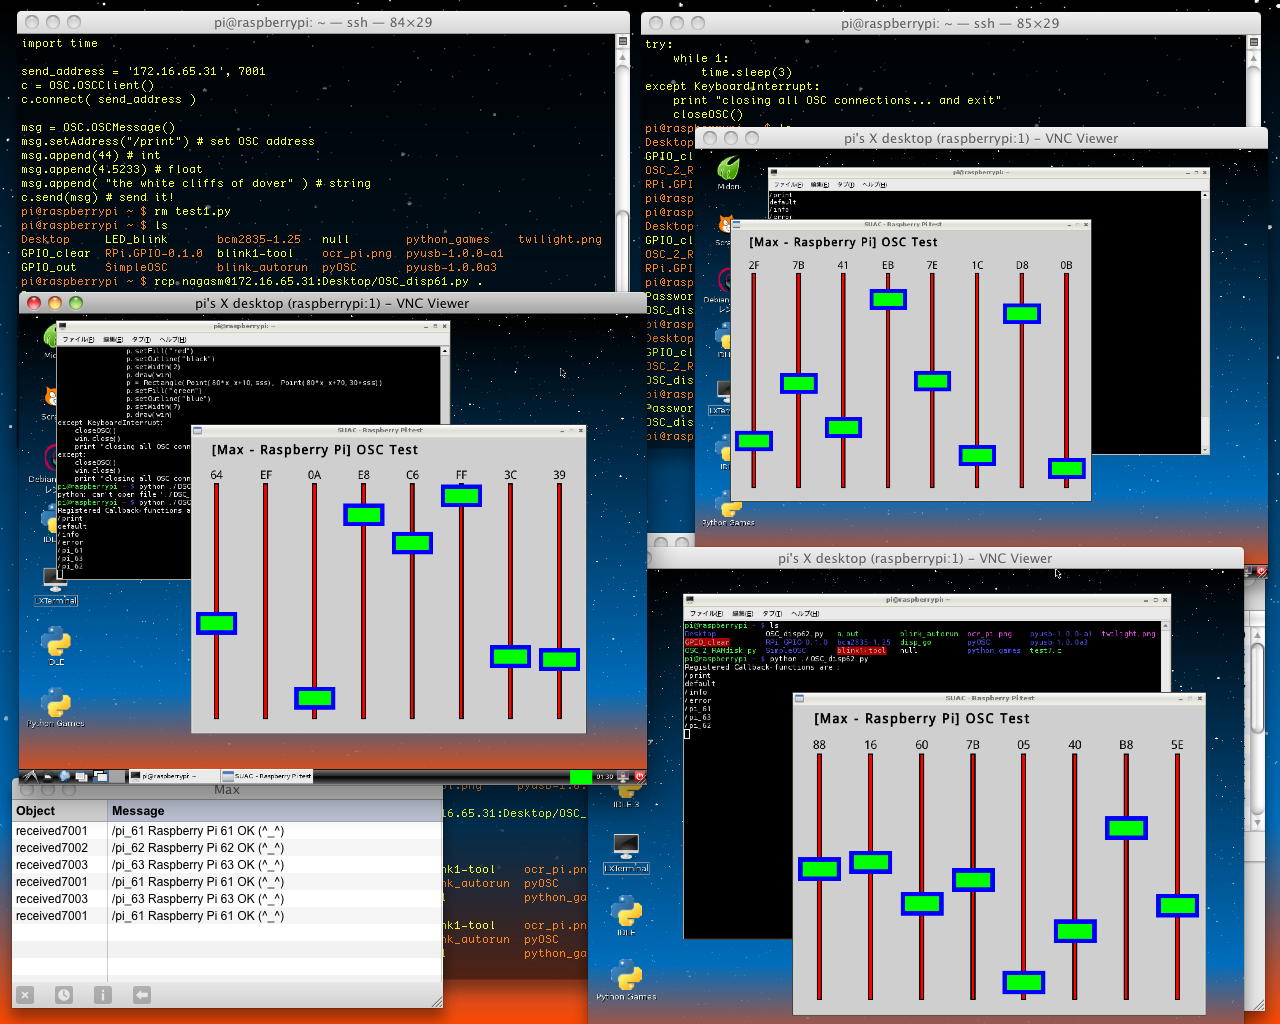
YouTube ここでは、「UDP_test_04.maxpat」に対して、3台のRaspberry Piの「OSC_disp61.py」と「OSC_disp62.py」と「OSC_disp63.py」は起動時にOSCで生存証明のメッセージを送り、あとは64データをパックしたOSCメッセージをモニタしていて、自分に対して送られたメッセージ(それぞれ異なる8バイトのデータ)を受信して、それぞれ起動したグラフィックウインドウ内の8つのスライダーとして描画し、さらに16進数として表示している。 ホストの「UDP_test_04.maxpat」で、毎回送信するOSCメッセージを64データでなく16データとしてみてもあまり表示速度に変化はなく、主としてPythonのグラフィック処理が律速段階となっている、と確認できた。 以下は、ほぼ同じ「OSC_disp61.py」と「OSC_disp62.py」と「OSC_disp63.py」のうち「OSC_disp61.py」の全部と、「OSC_disp62.py」と「OSC_disp63.py」についてはプログラム最後の個別設定となっている部分である。
「OSC_disp61.py」 全体
#!/usr/bin/env python

from simpleOSC import initOSCClient, initOSCServer, setOSCHandler, sendOSCMsg, closeOSC, \
     createOSCBundle, sendOSCBundle, startOSCServer
import time, os, sys, threading, OSC
try:
     import tkinter as tk
except:
     import Tkinter as tk

class GraphicsError(Exception):
     pass

OBJ_ALREADY_DRAWN = "Object currently drawn"
UNSUPPORTED_METHOD = "Object doesn't support operation"
BAD_OPTION = "Illegal option value"
DEAD_THREAD = "Graphics thread quit unexpectedly"

DEFAULT_CONFIG = {
      "fill":"",
      "outline":"black",
      "width":"1",
      "arrow":"none",
      "text":"",
      "justify":"center",
      "font": ("Ariel", 18, "normal")
}

_root = tk.Tk()
_root.withdraw()

def update():
    _root.update()

def color_rgb(r,g,b):
    return "#%02x%02x%02x" % (r,g,b)

class GraphWin(tk.Canvas):
    def __init__(self, title="SUAC - Raspberry Pi test",
                 width=640, height=480, autoflush=True):
        master = tk.Toplevel(_root)
        master.protocol("WM_DELETE_WINDOW", self.close)
        tk.Canvas.__init__(self, master, width=width, height=height)
        self.master.title(title)
        self.pack()
        master.resizable(0,0)
        self.foreground = "black"
        self.items = []
        self.mouseX = None
        self.mouseY = None
        self.bind("", self._onClick)
        self.height = height
        self.width = width
        self.autoflush = autoflush
        self._mouseCallback = None
        self.trans = None
        self.closed = False
        master.lift()
        if autoflush: _root.update()
    def __checkOpen(self):
        if self.closed:
            raise GraphicsError("window is closed")
    def setBackground(self, color):
        self.__checkOpen()
        self.config(bg=color)
        self.__autoflush()
    def setCoords(self, x1, y1, x2, y2):
        self.trans = Transform(self.width, self.height, x1, y1, x2, y2)
    def close(self):
        if self.closed: return
        self.closed = True
        self.master.destroy()
        self.__autoflush()
    def isClosed(self):
        return self.closed
    def isOpen(self):
        return not self.closed
    def __autoflush(self):
        if self.autoflush:
            _root.update()
    def plot(self, x, y, color="black"):
        self.__checkOpen()
        xs,ys = self.toScreen(x,y)
        self.create_line(xs,ys,xs+1,ys, fill=color)
        self.__autoflush()
    def plotPixel(self, x, y, color="black"):
        self.__checkOpen()
        self.create_line(x,y,x+1,y, fill=color)
        self.__autoflush()
    def flush(self):
        self.__checkOpen()
        self.update_idletasks()
    def getMouse(self):
        self.update()      # flush any prior clicks
        self.mouseX = None
        self.mouseY = None
        while self.mouseX == None or self.mouseY == None:
            self.update()
            if self.isClosed(): raise GraphicsError("getMouse in closed window")
            time.sleep(.1) # give up thread
        x,y = self.toWorld(self.mouseX, self.mouseY)
        self.mouseX = None
        self.mouseY = None
        return Point(x,y)
    def checkMouse(self):
        if self.isClosed():
            raise GraphicsError("checkMouse in closed window")
        self.update()
        if self.mouseX != None and self.mouseY != None:
            x,y = self.toWorld(self.mouseX, self.mouseY)
            self.mouseX = None
            self.mouseY = None
            return Point(x,y)
        else:
            return None
    def getHeight(self):
        return self.height
    def getWidth(self):
        return self.width
    def toScreen(self, x, y):
        trans = self.trans
        if trans:
            return self.trans.screen(x,y)
        else:
            return x,y
    def toWorld(self, x, y):
        trans = self.trans
        if trans:
            return self.trans.world(x,y)
        else:
            return x,y
    def setMouseHandler(self, func):
        self._mouseCallback = func
    def _onClick(self, e):
        self.mouseX = e.x
        self.mouseY = e.y
        if self._mouseCallback:
            self._mouseCallback(Point(e.x, e.y))

class Transform:
    def __init__(self, w, h, xlow, ylow, xhigh, yhigh):
        xspan = (xhigh-xlow)
        yspan = (yhigh-ylow)
        self.xbase = xlow
        self.ybase = yhigh
        self.xscale = xspan/float(w-1)
        self.yscale = yspan/float(h-1)
    def screen(self,x,y):
        xs = (x-self.xbase) / self.xscale
        ys = (self.ybase-y) / self.yscale
        return int(xs+0.5),int(ys+0.5)
    def world(self,xs,ys):
        x = xs*self.xscale + self.xbase
        y = self.ybase - ys*self.yscale
        return x,y

class GraphicsObject:
    def __init__(self, options):
        self.canvas = None
        self.id = None
        config = {}
        for option in options:
            config[option] = DEFAULT_CONFIG[option]
        self.config = config
    def setFill(self, color):
        self._reconfig("fill", color)
    def setOutline(self, color):
        self._reconfig("outline", color)
    def setWidth(self, width):
        self._reconfig("width", width)
    def draw(self, graphwin):
        if self.canvas and not self.canvas.isClosed(): raise GraphicsError(OBJ_ALREADY_DRAWN)
        if graphwin.isClosed(): raise GraphicsError("Can't draw to closed window")
        self.canvas = graphwin
        self.id = self._draw(graphwin, self.config)
        if graphwin.autoflush:
            _root.update()
    def undraw(self):
        if not self.canvas: return
        if not self.canvas.isClosed():
            self.canvas.delete(self.id)
            if self.canvas.autoflush:
                _root.update()
        self.canvas = None
        self.id = None
    def move(self, dx, dy):
        self._move(dx,dy)
        canvas = self.canvas
        if canvas and not canvas.isClosed():
            trans = canvas.trans
            if trans:
                x = dx/ trans.xscale
                y = -dy / trans.yscale
            else:
                x = dx
                y = dy
            self.canvas.move(self.id, x, y)
            if canvas.autoflush:
                _root.update()
    def _reconfig(self, option, setting):
        if option not in self.config:
            raise GraphicsError(UNSUPPORTED_METHOD)
        options = self.config
        options[option] = setting
        if self.canvas and not self.canvas.isClosed():
            self.canvas.itemconfig(self.id, options)
            if self.canvas.autoflush:
                _root.update()
    def _draw(self, canvas, options):
         pass
    def _move(self, dx, dy):
        pass

class Point(GraphicsObject):
    def __init__(self, x, y):
        GraphicsObject.__init__(self, ["outline", "fill"])
        self.setFill = self.setOutline
        self.x = x
        self.y = y
    def _draw(self, canvas, options):
        x,y = canvas.toScreen(self.x,self.y)
        return canvas.create_rectangle(x,y,x+1,y+1,options)
    def _move(self, dx, dy):
        self.x = self.x + dx
        self.y = self.y + dy
    def clone(self):
        other = Point(self.x,self.y)
        other.config = self.config.copy()
        return other
    def getX(self): return self.x
    def getY(self): return self.y

class _BBox(GraphicsObject):
    def __init__(self, p1, p2, options=["outline","width","fill"]):
        GraphicsObject.__init__(self, options)
        self.p1 = p1.clone()
        self.p2 = p2.clone()
    def _move(self, dx, dy):
        self.p1.x = self.p1.x + dx
        self.p1.y = self.p1.y + dy
        self.p2.x = self.p2.x + dx
        self.p2.y = self.p2.y  + dy
    def getP1(self): return self.p1.clone()
    def getP2(self): return self.p2.clone()
    def getCenter(self):
        p1 = self.p1
        p2 = self.p2
        return Point((p1.x+p2.x)/2.0, (p1.y+p2.y)/2.0)

class Rectangle(_BBox):
    def __init__(self, p1, p2):
        _BBox.__init__(self, p1, p2)
    def _draw(self, canvas, options):
        p1 = self.p1
        p2 = self.p2
        x1,y1 = canvas.toScreen(p1.x,p1.y)
        x2,y2 = canvas.toScreen(p2.x,p2.y)
        return canvas.create_rectangle(x1,y1,x2,y2,options)
    def clone(self):
        other = Rectangle(self.p1, self.p2)
        other.config = self.config.copy()
        return other

class Oval(_BBox):
    def __init__(self, p1, p2):
        _BBox.__init__(self, p1, p2)
    def clone(self):
        other = Oval(self.p1, self.p2)
        other.config = self.config.copy()
        return other
    def _draw(self, canvas, options):
        p1 = self.p1
        p2 = self.p2
        x1,y1 = canvas.toScreen(p1.x,p1.y)
        x2,y2 = canvas.toScreen(p2.x,p2.y)
        return canvas.create_oval(x1,y1,x2,y2,options)

class Circle(Oval):
    def __init__(self, center, radius):
        p1 = Point(center.x-radius, center.y-radius)
        p2 = Point(center.x+radius, center.y+radius)
        Oval.__init__(self, p1, p2)
        self.radius = radius
    def clone(self):
        other = Circle(self.getCenter(), self.radius)
        other.config = self.config.copy()
        return other
    def getRadius(self):
        return self.radius

class Line(_BBox):
    def __init__(self, p1, p2):
        _BBox.__init__(self, p1, p2, ["arrow","fill","width"])
        self.setFill(DEFAULT_CONFIG['outline'])
        self.setOutline = self.setFill
    def clone(self):
        other = Line(self.p1, self.p2)
        other.config = self.config.copy()
        return other
    def _draw(self, canvas, options):
        p1 = self.p1
        p2 = self.p2
        x1,y1 = canvas.toScreen(p1.x,p1.y)
        x2,y2 = canvas.toScreen(p2.x,p2.y)
        return canvas.create_line(x1,y1,x2,y2,options)
    def setArrow(self, option):
        if not option in ["first","last","both","none"]:
            raise GraphicsError(BAD_OPTION)
        self._reconfig("arrow", option)

class Polygon(GraphicsObject):
    def __init__(self, *points):
        if len(points) == 1 and type(points[0]) == type([]):
            points = points[0]
        self.points = list(map(Point.clone, points))
        GraphicsObject.__init__(self, ["outline", "width", "fill"])
    def clone(self):
        other = Polygon(*self.points)
        other.config = self.config.copy()
        return other
    def getPoints(self):
        return list(map(Point.clone, self.points))
    def _move(self, dx, dy):
        for p in self.points:
            p.move(dx,dy)
    def _draw(self, canvas, options):
        args = [canvas]
        for p in self.points:
            x,y = canvas.toScreen(p.x,p.y)
            args.append(x)
            args.append(y)
        args.append(options)
        return GraphWin.create_polygon(*args)

class Text(GraphicsObject):
    def __init__(self, p, text):
        GraphicsObject.__init__(self, ["justify","fill","text","font"])
        self.setText(text)
        self.anchor = p.clone()
        self.setFill(DEFAULT_CONFIG['outline'])
        self.setOutline = self.setFill
    def _draw(self, canvas, options):
        p = self.anchor
        x,y = canvas.toScreen(p.x,p.y)
        return canvas.create_text(x,y,options)
    def _move(self, dx, dy):
        self.anchor.move(dx,dy)
    def clone(self):
        other = Text(self.anchor, self.config['text'])
        other.config = self.config.copy()
        return other
    def setText(self,text):
        self._reconfig("text", text)
    def getText(self):
        return self.config["text"]
    def getAnchor(self):
        return self.anchor.clone()
    def setFace(self, face):
        if face in ['helvetica','arial','courier','times roman']:
            f,s,b = self.config['font']
            self._reconfig("font",(face,s,b))
        else:
            raise GraphicsError(BAD_OPTION)
    def setSize(self, size):
        if 5 <= size <= 36:
            f,s,b = self.config['font']
            self._reconfig("font", (f,size,b))
        else:
            raise GraphicsError(BAD_OPTION)
    def setStyle(self, style):
        if style in ['bold','normal','italic', 'bold italic']:
            f,s,b = self.config['font']
            self._reconfig("font", (f,s,style))
        else:
            raise GraphicsError(BAD_OPTION)
    def setTextColor(self, color):
        self.setFill(color)

class Entry(GraphicsObject):
    def __init__(self, p, width):
        GraphicsObject.__init__(self, [])
        self.anchor = p.clone()
        #print self.anchor
        self.width = width
        self.text = tk.StringVar(_root)
        self.text.set("")
        self.fill = "gray"
        self.color = "black"
        self.font = DEFAULT_CONFIG['font']
        self.entry = None
    def _draw(self, canvas, options):
        p = self.anchor
        x,y = canvas.toScreen(p.x,p.y)
        frm = tk.Frame(canvas.master)
        self.entry = tk.Entry(frm,
                              width=self.width,
                              textvariable=self.text,
                              bg = self.fill,
                              fg = self.color,
                              font=self.font)
        self.entry.pack()
        #self.setFill(self.fill)
        return canvas.create_window(x,y,window=frm)
    def getText(self):
        return self.text.get()
    def _move(self, dx, dy):
        self.anchor.move(dx,dy)
    def getAnchor(self):
        return self.anchor.clone()
    def clone(self):
        other = Entry(self.anchor, self.width)
        other.config = self.config.copy()
        other.text = tk.StringVar()
        other.text.set(self.text.get())
        other.fill = self.fill
        return other
    def setText(self, t):
        self.text.set(t)
    def setFill(self, color):
        self.fill = color
        if self.entry:
            self.entry.config(bg=color)
    def _setFontComponent(self, which, value):
        font = list(self.font)
        font[which] = value
        self.font = tuple(font)
        if self.entry:
            self.entry.config(font=self.font)
    def setFace(self, face):
        if face in ['helvetica','arial','courier','times roman']:
            self._setFontComponent(0, face)
        else:
            raise GraphicsError(BAD_OPTION)
    def setSize(self, size):
        if 5 <= size <= 36:
            self._setFontComponent(1,size)
        else:
            raise GraphicsError(BAD_OPTION)
    def setStyle(self, style):
        if style in ['bold','normal','italic', 'bold italic']:
            self._setFontComponent(2,style)
        else:
            raise GraphicsError(BAD_OPTION)
    def setTextColor(self, color):
        self.color=color
        if self.entry:
            self.entry.config(fg=color)

class Image(GraphicsObject):
    idCount = 0
    imageCache = {} # tk photoimages go here to avoid GC while drawn
    def __init__(self, p, *pixmap):
        GraphicsObject.__init__(self, [])
        self.anchor = p.clone()
        self.imageId = Image.idCount
        Image.idCount = Image.idCount + 1
        if len(pixmap) == 1: # file name provided
            self.img = tk.PhotoImage(file=pixmap[0], master=_root)
        else: # width and height provided
            width, height = pixmap
            self.img = tk.PhotoImage(master=_root, width=width, height=height)
    def _draw(self, canvas, options):
        p = self.anchor
        x,y = canvas.toScreen(p.x,p.y)
        self.imageCache[self.imageId] = self.img # save a reference
        return canvas.create_image(x,y,image=self.img)
    def _move(self, dx, dy):
        self.anchor.move(dx,dy)
    def undraw(self):
        try:
            del self.imageCache[self.imageId]  # allow gc of tk photoimage
        except KeyError:
            pass
        GraphicsObject.undraw(self)
    def getAnchor(self):
        return self.anchor.clone()
    def clone(self):
        other = Image(Point(0,0), 0, 0)
        other.img = self.img.copy()
        other.anchor = self.anchor.clone()
        other.config = self.config.copy()
        return other
    def getWidth(self):
        return self.img.width()
    def getHeight(self):
        return self.img.height()
    def getPixel(self, x, y):
        value = self.img.get(x,y)
        if type(value) ==  type(0):
            return [value, value, value]
        else:
            return list(map(int, value.split()))
    def setPixel(self, x, y, color):
        self.img.put("{" + color +"}", (x, y))
    def save(self, filename):
        path, name = os.path.split(filename)
        ext = name.split(".")[-1]
        self.img.write( filename, format=ext)

def value_change(list, num, data):
    list[num] = data

new_value = [0,0,0,0,0,0,0,0]
old_value = [0,0,0,0,0,0,0,0]
event_flag = [0,0,0,0,0,0,0,0]
for i in range(8):
    value_change(new_value, i, 0)
    value_change(old_value, i, 0)
    value_change(event_flag, i, 1)

def nothing(addr, tags, data, source):
    return

def pi_61_test(addr, tags, data, source):
    global_s = "%s" % data
    for i in range(8):
        value_change(new_value, i, int(global_s[2+2*i+32:4+2*i+32], base=16))
        if new_value[i] != old_value[i]:
            event_flag[i] = 1
            old_value[i] = new_value[i]

initOSCServer(ip='172.16.65.61', port=7000, mode=0)
setOSCHandler('/pi_62', nothing)
setOSCHandler('/pi_63', nothing)
setOSCHandler('/pi_61', pi_61_test)
startOSCServer()
send_address = '172.16.65.31', 7001
c = OSC.OSCClient()
c.connect( send_address )
msg = OSC.OSCMessage()
msg.setAddress("/pi_61")
msg.append( "Raspberry Pi 61 OK (^_^)")
c.send(msg)
win = GraphWin()
win.setCoords(0,0,640,480)
win.setBackground("#CFCFCF")
ss = Text(Point(200,460), "[Max - Raspberry Pi] OSC Test")
ss.setStyle("bold")
ss.setFace("arial")
ss.setSize(20)
ss.draw(win)

try:
    while 1:
        for x_x in range(8):
            if event_flag[x_x] == 1:
                event_flag[x_x] = 0
                p = Rectangle(Point(80*x_x+25,405), Point(80*x_x+55,430))
                p.setFill("#CFCFCF")
                p.setOutline("")
                p.draw(win)
                s_d = "%02X" % new_value[x_x]
                sss = 26 + int(new_value[x_x]*1.35)
                t = Text(Point(80*x_x+40,420), s_d)
                t.draw(win)
                p = Rectangle(Point(80*x_x+7,20), Point(80*x_x+74,404))
                p.setFill("#CFCFCF")
                p.setOutline("")
                p.draw(win)
                p = Rectangle(Point(80*x_x+37,20), Point(80*x_x+43,404))
                p.setFill("red")
                p.setOutline("black")
                p.setWidth(2)
                p.draw(win)
                p = Rectangle(Point(80*x_x+10,sss), Point(80*x_x+70,30+sss))
                p.setFill("green")
                p.setOutline("blue")
                p.setWidth(7)
                p.draw(win)
except KeyboardInterrupt:
    closeOSC()
    win.close()
    print "closing all OSC connections, closing Window ... and exit"
except:
    closeOSC()
    win.close()
    print "closing all OSC connections, closing Window ... and exit"
「OSC_disp62.py」 最後の部分
def value_change(list, num, data):
    list[num] = data

new_value = [0,0,0,0,0,0,0,0]
old_value = [0,0,0,0,0,0,0,0]
event_flag = [0,0,0,0,0,0,0,0]
for i in range(8):
    value_change(new_value, i, 0)
    value_change(old_value, i, 0)
    value_change(event_flag, i, 1)

def nothing(addr, tags, data, source):
    return

def pi_62_test(addr, tags, data, source):
    global_s = "%s" % data
    for i in range(8):
        value_change(new_value, i, int(global_s[2+2*i+16:4+2*i+16], base=16))
        if new_value[i] != old_value[i]:
            event_flag[i] = 1
            old_value[i] = new_value[i]

initOSCServer(ip='172.16.65.62', port=7000, mode=0)
setOSCHandler('/pi_61', nothing)
setOSCHandler('/pi_63', nothing)
setOSCHandler('/pi_62', pi_62_test)
startOSCServer()
send_address = '172.16.65.31', 7002
c = OSC.OSCClient()
c.connect( send_address )
msg = OSC.OSCMessage()
msg.setAddress("/pi_62")
msg.append( "Raspberry Pi 62 OK (^_^)")
c.send(msg)
win = GraphWin()
win.setCoords(0,0,640,480)
win.setBackground("#CFCFCF")
ss = Text(Point(200,460), "[Max - Raspberry Pi] OSC Test")
ss.setStyle("bold")
ss.setFace("arial")
ss.setSize(20)
ss.draw(win)

try:
    while 1:
        for x_x in range(8):
            if event_flag[x_x] == 1:
                event_flag[x_x] = 0
                p = Rectangle(Point(80*x_x+25,405), Point(80*x_x+55,430))
                p.setFill("#CFCFCF")
                p.setOutline("")
                p.draw(win)
                s_d = "%02X" % new_value[x_x]
                sss = 26 + int(new_value[x_x]*1.35)
                t = Text(Point(80*x_x+40,420), s_d)
                t.draw(win)
                p = Rectangle(Point(80*x_x+7,20), Point(80*x_x+74,404))
                p.setFill("#CFCFCF")
                p.setOutline("")
                p.draw(win)
                p = Rectangle(Point(80*x_x+37,20), Point(80*x_x+43,404))
                p.setFill("red")
                p.setOutline("black")
                p.setWidth(2)
                p.draw(win)
                p = Rectangle(Point(80*x_x+10,sss), Point(80*x_x+70,30+sss))
                p.setFill("green")
                p.setOutline("blue")
                p.setWidth(7)
                p.draw(win)
except KeyboardInterrupt:
    closeOSC()
    win.close()
    print "closing all OSC connections, closing Window ... and exit"
except:
    closeOSC()
    win.close()
    print "closing all OSC connections, closing Window ... and exit"
「OSC_disp63.py」 最後の部分
上のYouTubeを上げてチェックしていると、YouTube画面の右横のメニューに、「Raspberry Pi」「OSC」などのタームにひっかかった多数の動画を発見した。 そこでとりあえず、「Raspberry Pi」「OSC」「PureData」「シンセサイザー」的なものをダウンロードしてMP4化した。 以下のように計13本ほどになったが、なるほど世界にはRaspberry Piオタクが多いことが良く判った(^_^;)。 このムービーはSketching2013行きに持参して、空港などで合間に観てみることにしよう。def value_change(list, num, data): list[num] = data new_value = [0,0,0,0,0,0,0,0] old_value = [0,0,0,0,0,0,0,0] event_flag = [0,0,0,0,0,0,0,0] for i in range(8): value_change(new_value, i, 0) value_change(old_value, i, 0) value_change(event_flag, i, 1) def nothing(addr, tags, data, source): return def pi_63_test(addr, tags, data, source): global_s = "%s" % data for i in range(8): value_change(new_value, i, int(global_s[2+2*i:4+2*i], base=16)) if new_value[i] != old_value[i]: event_flag[i] = 1 old_value[i] = new_value[i] initOSCServer(ip='172.16.65.63', port=7000, mode=0) setOSCHandler('/pi_61', nothing) setOSCHandler('/pi_62', nothing) setOSCHandler('/pi_63', pi_63_test) startOSCServer() send_address = '172.16.65.31', 7003 c = OSC.OSCClient() c.connect( send_address ) msg = OSC.OSCMessage() msg.setAddress("/pi_63") msg.append( "Raspberry Pi 63 OK (^_^)") c.send(msg) win = GraphWin() win.setCoords(0,0,640,480) win.setBackground("#CFCFCF") ss = Text(Point(200,460), "[Max - Raspberry Pi] OSC Test") ss.setStyle("bold") ss.setFace("arial") ss.setSize(20) ss.draw(win) try: while 1: for x_x in range(8): if event_flag[x_x] == 1: event_flag[x_x] = 0 p = Rectangle(Point(80*x_x+25,405), Point(80*x_x+55,430)) p.setFill("#CFCFCF") p.setOutline("") p.draw(win) s_d = "%02X" % new_value[x_x] sss = 26 + int(new_value[x_x]*1.35) t = Text(Point(80*x_x+40,420), s_d) t.draw(win) p = Rectangle(Point(80*x_x+7,20), Point(80*x_x+74,404)) p.setFill("#CFCFCF") p.setOutline("") p.draw(win) p = Rectangle(Point(80*x_x+37,20), Point(80*x_x+43,404)) p.setFill("red") p.setOutline("black") p.setWidth(2) p.draw(win) p = Rectangle(Point(80*x_x+10,sss), Point(80*x_x+70,30+sss)) p.setFill("green") p.setOutline("blue") p.setWidth(7) p.draw(win) except KeyboardInterrupt: closeOSC() win.close() print "closing all OSC connections, closing Window ... and exit" except: closeOSC() win.close() print "closing all OSC connections, closing Window ... and exit"
この日の午後には、事務仕事とか米国行きの旅行保険とか欧州ツアーの列車のチケット購入とか、あれこれしているうちに過ぎた。せめてもの合間として、OSCに続くテーマ「Raspberry PiのGPIOのUARTにXBeeを繋ぐ」というために、 これ とか これ とか これ とか これ とか これ とか これ とか これ とか これ とかのページを検索してメモとして並べた、というのが唯一の成果である。 これは明日以降となるが、明日の午後にはCGクリエイター検定の直前勉強会、そして日曜日は終日、CGクリエイター検定試験の当日ということで監督をしているうちに終わりそうで、あまり進めないかもしれない。
2013年7月13日(土)
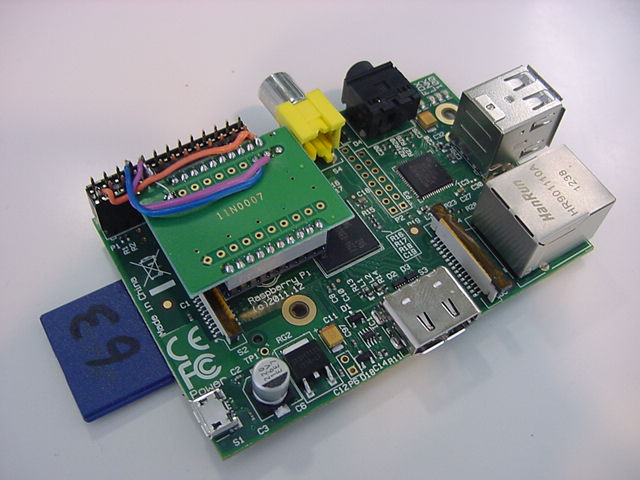
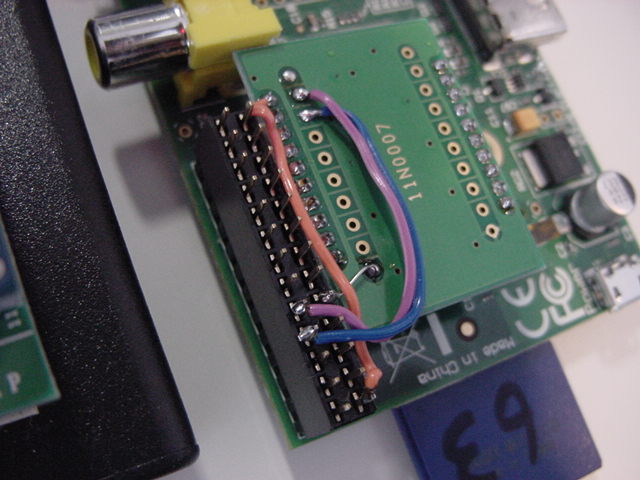
この日は遅めに研究室に出て、まずは「0712_IP61.img」「0712_IP62.img」「0712_IP63.img」ということで、ここまでのRaspberry Pi61号機/62号機/63号機のSDメモリカードのイメージを吸い上げて、3本まとめて16GBのSDカードにバックアップとして保存した。 何かトラブルがあっても、ここから再開する、というポイントは重要である。 そして、SUACboard上に搭載されているXBeeと同じものを(つまり同時に両方は使えない)以下のように書き込みした。


これにより、共通のMacに接続するXBeeモジュールと通信できる筈である。 そして午後にかけて、以下のようにRaspberry Pi63号機にXBeeを搭載するために、別のRaspberry PiのGPIOコネクタに、秋月電子のXBee変換基板を直付けして配線したところで、「CGクリエイター検定・直前勉強会」の時間となって本日終了である。


明日はCGクリエイター検定試験の当日ということで、たぶん続きは月曜日以降になりそうである。
2013年7月14日(日)
CGクリエイター検定の当日である。 朝の研究室だけでなく、検定事務局のCG-ARTS協会からの連絡があるかもしれない、という事で試験会場にMacを用意したので、試験の合間にもWebの調べものだけは出来る、と気づいた(^_^;)。 そこで一昨日リストアップした、「Raspberry PiのGPIOのUARTにXBeeを繋ぐ」ための関連ページを順に眺めてみた。このページ は、XBee制御にJavaを使う、ということで「当面パス」と判断した。 もともとJavaに入れ込んでいる人がRaspberry Piというプラットフォームに出会った、という文脈だったからである。 僕としては当面のところ、普通のパソコンでも重いJavaをわざわざRaspberry Piに入れるつもりは無いのだ。
このページ は、Raspberry PiにUSBシリアルアダプタを繋いで、minicomという簡易シリアルコンソールをインストールして「minicom -b 115200 -o -D /dev/ttyUSB0」・・・という手法で、これはXBeeでも使えるもののようなので、今後も要チェックである。
このページ はもっとそのものズバリ、「Raspberry Pi and XBee」というページであり、以下のようなコード例があった。 たぶんserialというのは標準であるので、これはもっとも簡単そうであり、まずは最初にここから追いかけよう、という要チェックページである。
import serial
xbee=serial.Serial(port='/dev/ttyAMA0',baudrate='9600')
xbee.write('8')
このページ のタイトルもまた「Raspberry PI + Xbee: UART / Serial howto」とズバリであった。 こちらもminicomを使う、という解説だったので、これも着手のpriorityは2番手である。
このページ は、タイトルこそ「Raspberry Pi’s onboard Serial connection」とあったが、シリアル接続の詳細というよりは、シリアル経由でRaspberry PIのコンソール出力をプリンタから印刷する、というハッキングが中心だった。 そこでこちらも、「当面パス」と判断した。
このページ には、Raspberry PiのGPIOポートのUARTピン配置ぐらいの情報しかなかったが、そこからのリンクで こんなページ では、なんだかRaspberry Piには2種類のUARTがある・・・などという混乱する情報が充実していた(^_^;)。 これは混乱するだけなので見なかったことにして、とりあえず「当面パス」である。
このページ も「Raspberry Pi and Arduino via GPIO UART」というタイトルで、目標としてはRaspberry PiとArduinoを繋ぐ、ということらしい。 このページは物理的な接続だけで、そこからのリンクで こんなページ に誘導された。 ここは「Pythonでシリアル」という広大な世界で(^_^;)、もしかするとこれもお世話になるような気もする。 とりあえずpriorityを「1.5」とした、要チェックページである。
このページ は、単にYAHOO.COMで「Raspberry Pi GPIO UART」と画像検索した結果ページであり、とりあえずのハンダ付けが終わっているので、もうパスである。 ・・・と調べていたら、なんと午前のペーシックの試験は、単願(1科目)だけでなく併願(2科目)の学生も早々に解答終了して、早めに終わってしまった。 試験監督のバイトをお願いした小畑さんは院生室に休憩に行き、僕もいったん研究室に戻って昼食休憩ということになった。
そして研究室で、相穴熊という地味過ぎる将棋をチェックしながら このページ をさらに眺めてみると、「I didn't test it with a XBee Pro attached, this will certainly draw too much current from the RasPi. The 3.3V supply only delivers 50mA as per this wiki . This is fine with the normal XBee which has 40mA max. current demand as per datasheet. If you need more current (XBee PRO needs 295mA@3.3V when transmitting with maximum output power) you could use the 5V power source with a subsequent voltage regulator as mentioned in the blog entries before.」という記述にドキッとした。 そうだった、Raspberry Piの+3.3Vの電源供給電流は50mAまでであり、またXBeeには通常のXBeeとハイパワーのXBee Proの2種類があったのだが、小出力の通常XBeeの方の消費電流が40mAとギリギリだったのである。 慌ててRaspberry Piに挿していたコネクタを外して、秋月電子のマニュアルと照合したところ、無事にProでない通常版と判明してホッとした。(^_^;)
ハードはとりあえずOKとして、ソフトの方もちゃんと読んでみると、上記のシンプルなPythonコードのためには、「If you want to communicate via Python you have to get pyserial (sudo apt-get install python-serial or sudo apt-get install python3-serial for Python3).」ということで、DHCPに切り換えてモバイルWiFiルータに切り換えて「apt-get」が必要なのだ、と判明した。 この記述から、対応したモジュールを「apt-get」するために、使っているRaspberry PiのPythonのバージョンを調べる必要があるが、 このページ からあっさりと、「python -V」または「python --version」とすればいい、と解決した。
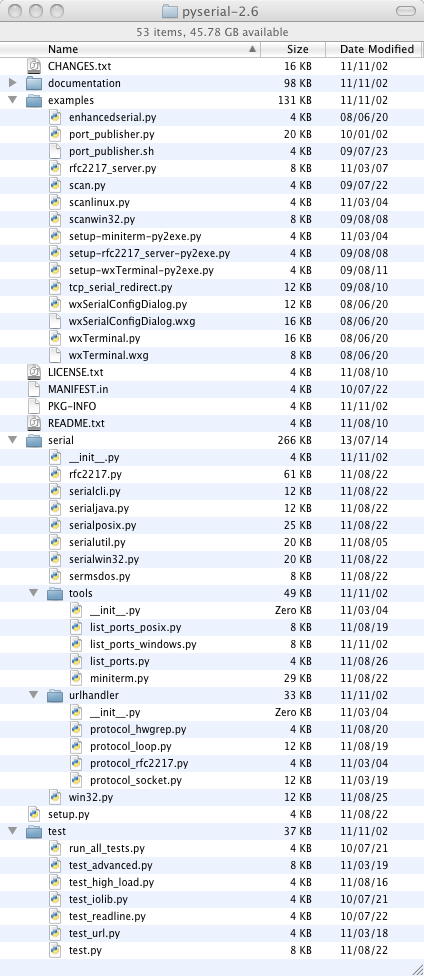
そして、「sudo apt-get install python-seria」ないし「sudo apt-get install python3-serial for Python3」について、YAHOO.COMで「python serial」で検索すると、どうしても ここ にやってくる、と判明し、 ダウンロード ページにあるのは、「pyserial 2.6」というものであると判った。 Pythonのバージョンの2と3との違いと、この2.6というのはどうやら無関係のようだが、実に紛らわしい(^_^;)。 とりあえずこの「pyserial-2.6.tar.gz」をダウンロードして解凍してみると、これまで何度となく見てきた膨大な世界が出て来た。 解凍したディレクトリの直下にある「README.txt」の肝心の部分には、以下のような記述があった。
そしてその「setup.py」を見ると以下のようになっている。 これはつまり、ここでゲットした「pyserial-2.6.tar.gz」をRaspberry Piにrcpしてunzipして、上記のようにPythonがバージョン3である事を確認してから「sudo python3 setup.py install」とやれば、「sudo apt-get install python3-serial」と同じことになりそうな気がする。 apt-getは自分でインターネット上の該当モジュールの最新版を探し当てて取って来るので、これが結果として、たぶんPython3に対応した「pyserial-2.6」となるのでは、という事である。 以下のsetupのソース内でも、Python2.3未満だと「ごめんなさい」である。 しかし、そうやって失敗して長い回り道をしたような苦い記憶も蘇る(^_^;)。Documentation ============= For API documentation, usage and examples see files in the "documentation" directory. The ".rst" files can be read in any text editor or being converted to HTML or PDF using Sphinx. Examples ======== Examples and unit tests are in the directory "examples". Installation ============ Detailed information can be found in "documentation/pyserial.rst". The usual setup.py for Python libraries is used for the source distribution.無事に試験が終了して、返送答案を取りに来たクロネコヤマトに渡した後で、せっかくなので、3台ジョイントしたものでない単独のRaspberry Piに63号機のSDカードを挿して、上記の「pyserial-2.6.tar.gz」の転送を試してみた。 まず、これはzipでなかったのでunzipではなくて(^_^;)、「tar zxvf pyserial-2.6.tar.gz」とやると、ズラズラと解凍された。 そして「sudo python3 setup.py」とやると、「error: no commands supplied」というエラーが出た(^_^;)。 ここでこの日記の過去ページを調べて「install」の抜けを発見して、改めて「sudo python3 setup.py install」とやってみると、順調にbuildが出来てあれこれコピーした後に途中でパッタリと止まってしまって焦ったが(^_^;)、無事に以下のように作業はエラーなく終了した。# setup.py for pySerial # # Direct install (all systems): # "python setup.py install" # # For Python 3.x use the corresponding Python executable, # e.g. "python3 setup.py ..." import sys from distutils.core import setup if sys.version_info >= (3, 0): try: from distutils.command.build_py import build_py_2to3 as build_py from distutils.command.build_scripts import build_scripts_2to3 as build_scripts except ImportError: raise ImportError("build_py_2to3 not found in distutils - it is required for Python 3.x") suffix = "-py3k" else: from distutils.command.build_py import build_py from distutils.command.build_scripts import build_scripts suffix = "" if sys.version < '2.3': # distutils that old can't cope with the "classifiers" or "download_url" # keywords and True/False constants and basestring are missing raise ValueError("Sorry Python versions older than 2.3 are no longer" "supported - check http://pyserial.sf.net for older " "releases or upgrade your Python installation.") # importing version does not work with Python 3 as files have not yet been # converted. #~ import serial #~ version = serial.VERSION import re, os version = re.search( "VERSION.*'(.+)'", open(os.path.join('serial', '__init__.py')).read()).group(1) setup( name = "pyserial" + suffix, description = "Python Serial Port Extension", version = version, author = "Chris Liechti", author_email = "cliechti@gmx.net", url = "http://pyserial.sourceforge.net/", packages = ['serial', 'serial.tools', 'serial.urlhandler'], license = "Python", long_description = "Python Serial Port Extension for Win32, Linux, BSD, Jython, IronPython", classifiers = [ 'Development Status :: 5 - Production/Stable', 'Intended Audience :: Developers', 'Intended Audience :: End Users/Desktop', 'License :: OSI Approved :: Python Software Foundation License', 'Natural Language :: English', 'Operating System :: POSIX', 'Operating System :: Microsoft :: Windows', 'Programming Language :: Python', 'Programming Language :: Python :: 2', 'Programming Language :: Python :: 2.3', 'Programming Language :: Python :: 2.4', 'Programming Language :: Python :: 2.5', 'Programming Language :: Python :: 2.6', 'Programming Language :: Python :: 2.7', 'Programming Language :: Python :: 3', 'Programming Language :: Python :: 3.0', 'Programming Language :: Python :: 3.1', 'Programming Language :: Python :: 3.2', 'Topic :: Communications', 'Topic :: Software Development :: Libraries', 'Topic :: Software Development :: Libraries :: Python Modules', 'Topic :: Terminals :: Serial', ], platforms = 'any', cmdclass = {'build_py': build_py, 'build_scripts': build_scripts}, scripts = ['serial/tools/miniterm.py'], )これはもしかすると、いつもの面倒な「DHCPに切り換えて、モバイルWiFiルータに切り換えて、ネットからapt-getして、また固定IPに切り換えて・・・」というのをスキップ出来たのかもしれない。 ただし、Raspberry Piにも出来たこの「pyserial-2.6.tar.gz」を解凍したその下には、Mac画面で見ると以下のような膨大なPythonプロクラムがあり、中には「scan」「Java」「server」など、どう考えても上級編も並んでいる。 もっともシンプルなテストサンプルは一体どれなのか(^_^;)。Last login: Sun Jul 14 07:18:31 on console nagasm-Mac-mini:~ nagasm$ ls Desktop Downloads Movies Pictures Sites Documents Library Music Public nagasm-Mac-mini:~ nagasm$ ssh pi@172.16.65.63 pi@172.16.65.63's password: Linux raspberrypi 3.6.11+ #456 PREEMPT Mon May 20 17:42:15 BST 2013 armv6l The programs included with the Debian GNU/Linux system are free software; the exact distribution terms for each program are described in the individual files in /usr/share/doc/*/copyright. Debian GNU/Linux comes with ABSOLUTELY NO WARRANTY, to the extent permitted by applicable law. Last login: Tue Jun 25 02:06:09 2013 pi@raspberrypi ~ $ rcp nagasm@172.16.65.31:Desktop/pyserial-2.6.tar.gz . Password: pyserial-2.6.tar.gz 100% 114KB 113.6KB/s 00:01 pi@raspberrypi ~ $ ls Desktop RPi.GPIO-0.1.0 blink1-tool ocr_pi.png python_games twilight.png GPIO_clear SimpleOSC blink_autorun pyOSC pyusb-1.0.0-a1 OSC_disp63.py bcm2835-1.25 null pyserial-2.6.tar.gz pyusb-1.0.0a3 pi@raspberrypi ~ $ unzip pyserial-2.6.tar.gz Archive: pyserial-2.6.tar.gz End-of-central-directory signature not found. Either this file is not a zipfile, or it constitutes one disk of a multi-part archive. In the latter case the central directory and zipfile comment will be found on the last disk(s) of this archive. unzip: cannot find zipfile directory in one of pyserial-2.6.tar.gz or pyserial-2.6.tar.gz.zip, and cannot find pyserial-2.6.tar.gz.ZIP, period. pi@raspberrypi ~ $ tar zxvf pyserial-2.6.tar.gz pyserial-2.6/ pyserial-2.6/CHANGES.txt pyserial-2.6/README.txt pyserial-2.6/MANIFEST.in pyserial-2.6/examples/ pyserial-2.6/examples/setup-miniterm-py2exe.py pyserial-2.6/examples/port_publisher.sh pyserial-2.6/examples/wxTerminal.wxg pyserial-2.6/examples/enhancedserial.py pyserial-2.6/examples/scanwin32.py pyserial-2.6/examples/rfc2217_server.py pyserial-2.6/examples/wxTerminal.py pyserial-2.6/examples/port_publisher.py pyserial-2.6/examples/tcp_serial_redirect.py pyserial-2.6/examples/scan.py pyserial-2.6/examples/setup-wxTerminal-py2exe.py pyserial-2.6/examples/setup-rfc2217_server-py2exe.py pyserial-2.6/examples/wxSerialConfigDialog.py pyserial-2.6/examples/scanlinux.py pyserial-2.6/examples/wxSerialConfigDialog.wxg pyserial-2.6/setup.py pyserial-2.6/documentation/ pyserial-2.6/documentation/shortintro.rst pyserial-2.6/documentation/index.rst pyserial-2.6/documentation/pyserial.rst pyserial-2.6/documentation/pyparallel.rst pyserial-2.6/documentation/pyserial.png pyserial-2.6/documentation/pyserial_api.rst pyserial-2.6/documentation/conf.py pyserial-2.6/documentation/appendix.rst pyserial-2.6/documentation/examples.rst pyserial-2.6/documentation/Makefile pyserial-2.6/PKG-INFO pyserial-2.6/test/ pyserial-2.6/test/test_readline.py pyserial-2.6/test/run_all_tests.py pyserial-2.6/test/test_high_load.py pyserial-2.6/test/test.py pyserial-2.6/test/test_advanced.py pyserial-2.6/test/test_url.py pyserial-2.6/test/test_iolib.py pyserial-2.6/LICENSE.txt pyserial-2.6/serial/ pyserial-2.6/serial/win32.py pyserial-2.6/serial/serialposix.py pyserial-2.6/serial/rfc2217.py pyserial-2.6/serial/serialwin32.py pyserial-2.6/serial/tools/ pyserial-2.6/serial/tools/miniterm.py pyserial-2.6/serial/tools/list_ports.py pyserial-2.6/serial/tools/list_ports_posix.py pyserial-2.6/serial/tools/__init__.py pyserial-2.6/serial/tools/list_ports_windows.py pyserial-2.6/serial/urlhandler/ pyserial-2.6/serial/urlhandler/protocol_socket.py pyserial-2.6/serial/urlhandler/protocol_loop.py pyserial-2.6/serial/urlhandler/protocol_rfc2217.py pyserial-2.6/serial/urlhandler/protocol_hwgrep.py pyserial-2.6/serial/urlhandler/__init__.py pyserial-2.6/serial/sermsdos.py pyserial-2.6/serial/serialutil.py pyserial-2.6/serial/serialjava.py pyserial-2.6/serial/__init__.py pyserial-2.6/serial/serialcli.py pi@raspberrypi ~ $ ls Desktop RPi.GPIO-0.1.0 blink1-tool ocr_pi.png pyserial-2.6.tar.gz pyusb-1.0.0a3 GPIO_clear SimpleOSC blink_autorun pyOSC python_games twilight.png OSC_disp63.py bcm2835-1.25 null pyserial-2.6 pyusb-1.0.0-a1 pi@raspberrypi ~ $ cd pyserial-2.6 pi@raspberrypi ~/pyserial-2.6 $ ls -l 合計 52 -rw-r--r-- 1 pi pi 13700 11月 2 2011 CHANGES.txt -rw-r--r-- 1 pi pi 2850 8月 9 2011 LICENSE.txt -rw-r--r-- 1 pi pi 968 7月 21 2010 MANIFEST.in -rw-r--r-- 1 pi pi 1399 11月 2 2011 PKG-INFO -rw-r--r-- 1 pi pi 1237 8月 9 2011 README.txt drwxr-xr-x 2 pi pi 4096 11月 2 2011 documentation drwxr-xr-x 2 pi pi 4096 11月 2 2011 examples drwxr-xr-x 4 pi pi 4096 11月 2 2011 serial -rw-r--r-- 1 pi pi 3215 8月 22 2011 setup.py drwxr-xr-x 2 pi pi 4096 11月 2 2011 test pi@raspberrypi ~/pyserial-2.6 $ sudo python3 setup.py usage: setup.py [global_opts] cmd1 [cmd1_opts] [cmd2 [cmd2_opts] ...] or: setup.py --help [cmd1 cmd2 ...] or: setup.py --help-commands or: setup.py cmd --help error: no commands supplied pi@raspberrypi ~/pyserial-2.6 $ sudo python3 setup.py install running install running build running build_py creating build creating build/lib creating build/lib/serial copying serial/serialcli.py -> build/lib/serial copying serial/__init__.py -> build/lib/serial copying serial/serialjava.py -> build/lib/serial copying serial/rfc2217.py -> build/lib/serial copying serial/win32.py -> build/lib/serial copying serial/serialposix.py -> build/lib/serial copying serial/serialwin32.py -> build/lib/serial copying serial/sermsdos.py -> build/lib/serial copying serial/serialutil.py -> build/lib/serial creating build/lib/serial/tools copying serial/tools/__init__.py -> build/lib/serial/tools copying serial/tools/list_ports.py -> build/lib/serial/tools copying serial/tools/list_ports_posix.py -> build/lib/serial/tools copying serial/tools/list_ports_windows.py -> build/lib/serial/tools copying serial/tools/miniterm.py -> build/lib/serial/tools creating build/lib/serial/urlhandler copying serial/urlhandler/__init__.py -> build/lib/serial/urlhandler copying serial/urlhandler/protocol_rfc2217.py -> build/lib/serial/urlhandler copying serial/urlhandler/protocol_hwgrep.py -> build/lib/serial/urlhandler copying serial/urlhandler/protocol_loop.py -> build/lib/serial/urlhandler copying serial/urlhandler/protocol_socket.py -> build/lib/serial/urlhandler Skipping implicit fixer: buffer Skipping implicit fixer: idioms Skipping implicit fixer: set_literal Skipping implicit fixer: ws_comma running build_scripts creating build/scripts-3.2 copying and adjusting serial/tools/miniterm.py -> build/scripts-3.2 changing mode of build/scripts-3.2/miniterm.py from 644 to 755 Skipping implicit fixer: buffer Skipping implicit fixer: idioms Skipping implicit fixer: set_literal Skipping implicit fixer: ws_comma running install_lib creating /usr/local/lib/python3.2/dist-packages/serial copying build/lib/serial/serialcli.py -> /usr/local/lib/python3.2/dist-packages/serial copying build/lib/serial/__init__.py -> /usr/local/lib/python3.2/dist-packages/serial copying build/lib/serial/serialjava.py -> /usr/local/lib/python3.2/dist-packages/serial copying build/lib/serial/rfc2217.py -> /usr/local/lib/python3.2/dist-packages/serial creating /usr/local/lib/python3.2/dist-packages/serial/urlhandler copying build/lib/serial/urlhandler/__init__.py -> /usr/local/lib/python3.2/dist-packages/serial/urlhandler copying build/lib/serial/urlhandler/protocol_rfc2217.py -> /usr/local/lib/python3.2/dist-packages/serial/urlhandler copying build/lib/serial/urlhandler/protocol_hwgrep.py -> /usr/local/lib/python3.2/dist-packages/serial/urlhandler copying build/lib/serial/urlhandler/protocol_loop.py -> /usr/local/lib/python3.2/dist-packages/serial/urlhandler copying build/lib/serial/urlhandler/protocol_socket.py -> /usr/local/lib/python3.2/dist-packages/serial/urlhandler copying build/lib/serial/win32.py -> /usr/local/lib/python3.2/dist-packages/serial copying build/lib/serial/serialposix.py -> /usr/local/lib/python3.2/dist-packages/serial copying build/lib/serial/serialwin32.py -> /usr/local/lib/python3.2/dist-packages/serial creating /usr/local/lib/python3.2/dist-packages/serial/tools copying build/lib/serial/tools/__init__.py -> /usr/local/lib/python3.2/dist-packages/serial/tools copying build/lib/serial/tools/list_ports.py -> /usr/local/lib/python3.2/dist-packages/serial/tools copying build/lib/serial/tools/list_ports_posix.py -> /usr/local/lib/python3.2/dist-packages/serial/tools copying build/lib/serial/tools/list_ports_windows.py -> /usr/local/lib/python3.2/dist-packages/serial/tools copying build/lib/serial/tools/miniterm.py -> /usr/local/lib/python3.2/dist-packages/serial/tools copying build/lib/serial/sermsdos.py -> /usr/local/lib/python3.2/dist-packages/serial copying build/lib/serial/serialutil.py -> /usr/local/lib/python3.2/dist-packages/serial byte-compiling /usr/local/lib/python3.2/dist-packages/serial/serialcli.py to serialcli.cpython-32.pyc byte-compiling /usr/local/lib/python3.2/dist-packages/serial/__init__.py to __init__.cpython-32.pyc byte-compiling /usr/local/lib/python3.2/dist-packages/serial/serialjava.py to serialjava.cpython-32.pyc byte-compiling /usr/local/lib/python3.2/dist-packages/serial/rfc2217.py to rfc2217.cpython-32.pyc byte-compiling /usr/local/lib/python3.2/dist-packages/serial/urlhandler/__init__.py to __init__.cpython-32.pyc byte-compiling /usr/local/lib/python3.2/dist-packages/serial/urlhandler/protocol_rfc2217.py to protocol_rfc2217.cpython-32.pyc byte-compiling /usr/local/lib/python3.2/dist-packages/serial/urlhandler/protocol_hwgrep.py to protocol_hwgrep.cpython-32.pyc byte-compiling /usr/local/lib/python3.2/dist-packages/serial/urlhandler/protocol_loop.py to protocol_loop.cpython-32.pyc byte-compiling /usr/local/lib/python3.2/dist-packages/serial/urlhandler/protocol_socket.py to protocol_socket.cpython-32.pyc byte-compiling /usr/local/lib/python3.2/dist-packages/serial/win32.py to win32.cpython-32.pyc byte-compiling /usr/local/lib/python3.2/dist-packages/serial/serialposix.py to serialposix.cpython-32.pyc byte-compiling /usr/local/lib/python3.2/dist-packages/serial/serialwin32.py to serialwin32.cpython-32.pyc byte-compiling /usr/local/lib/python3.2/dist-packages/serial/tools/__init__.py to __init__.cpython-32.pyc byte-compiling /usr/local/lib/python3.2/dist-packages/serial/tools/list_ports.py to list_ports.cpython-32.pyc byte-compiling /usr/local/lib/python3.2/dist-packages/serial/tools/list_ports_posix.py to list_ports_posix.cpython-32.pyc byte-compiling /usr/local/lib/python3.2/dist-packages/serial/tools/list_ports_windows.py to list_ports_windows.cpython-32.pyc byte-compiling /usr/local/lib/python3.2/dist-packages/serial/tools/miniterm.py to miniterm.cpython-32.pyc byte-compiling /usr/local/lib/python3.2/dist-packages/serial/sermsdos.py to sermsdos.cpython-32.pyc byte-compiling /usr/local/lib/python3.2/dist-packages/serial/serialutil.py to serialutil.cpython-32.pyc running install_scripts copying build/scripts-3.2/miniterm.py -> /usr/local/bin changing mode of /usr/local/bin/miniterm.py to 755 running install_egg_info Writing /usr/local/lib/python3.2/dist-packages/pyserial_py3k-2.6.egg-info pi@raspberrypi ~/pyserial-2.6 $
上の多数のPythonブログラムを眺めて、どれがもっとも基本的か、というのを捜すのは明日以降にする、と決めて、とりあえず このページ にあった、たった3行のサンプルをまずはダメもとで実験することにした。 Python 3の場合には、以下のようにすると書かれていた。
そこで、かつてPropellerの時に作った、XBeeからのデータを受け取るMaxパッチを走らせておいて、上記サンプルのボーレートだけ対応させた以下のプログラムを「test.py」をRaspberry Piにrcpして「sudo python ./test.py」と走らせてみたが、エラーは出ないものの、沈黙であった(^_^;)。import serial xbee=serial.Serial(port='/dev/ttyAMA0',baudrate='9600') xbee.write(b'8')まぁ、シリアルポートの「port='/dev/ttyAMA0'」というのもまだ調べていないし、これで何かが届いたらむしろ、気味が悪いところである。 とりあえず今日はこの入口まで、ということで、続きは明日である。#!/usr/bin/env python import serial xbee=serial.Serial(port='/dev/ttyAMA0',baudrate='38400') xbee.write(b'8')
2013年7月15日(月)
新しい週の月曜日であるが、今週後半にはいよいよSketching2013に行く週である。 祝日だが授業日であり、2限の「音楽情報科学」と5限のアカペラ補習特訓、さらに午後には明日の「企画立案演習」の最終プレゼンデータの提出などがあるが、Raspberry Piもまだまだ進められる。 Sketching2013での僕の発表は3日間のうち2日目の午後なので、プレゼンはまだ全く作っていない(^_^;)。 直前まで進めて、その場の空気を読んで、現場で作るのがSketchingの醍醐味である。「一晩、寝かす」というのはいい言葉である。 これまで、トラブル/問題点に突き当たったまま前日が終わって、翌日、目覚めた瞬間に閃いて一気に解決した、という例は数えきれないぐらい、たくさんあった。 寝ている間にも脳内で状況が整理される、という事もあるし、リフレッシュして視点が広がる、という事もあるだろう。 その意味でも、行き詰まった時にダラダラと無駄に徹夜する、というのは最低の戦略なのである。 そして今朝もまた、朝イチの解決を体験した(^_^)。
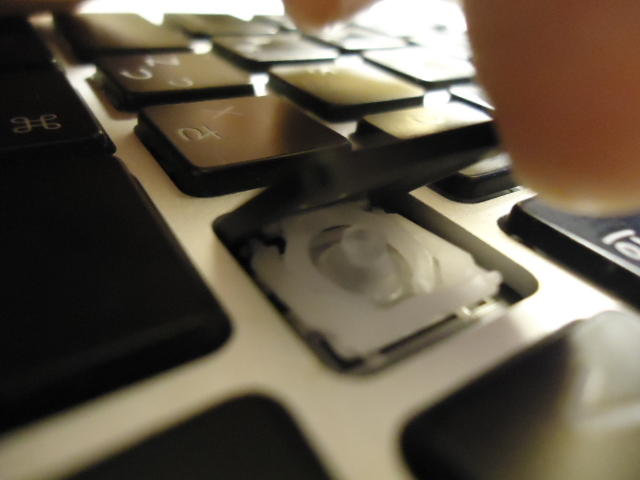
研究室に出て来てお仕事パソコンの前に置かれた、XBeeを取り付けたRaspberry Piと、ホストMacのUSBシリアルに繋ぐXBeeボックスが並んでいるのをフト見た瞬間、またまたの初歩的バグに気付いたのである。 以下のように、2つのXBeeで裏表が反対なのに、同じ側から配線が出ている。(^_^;)
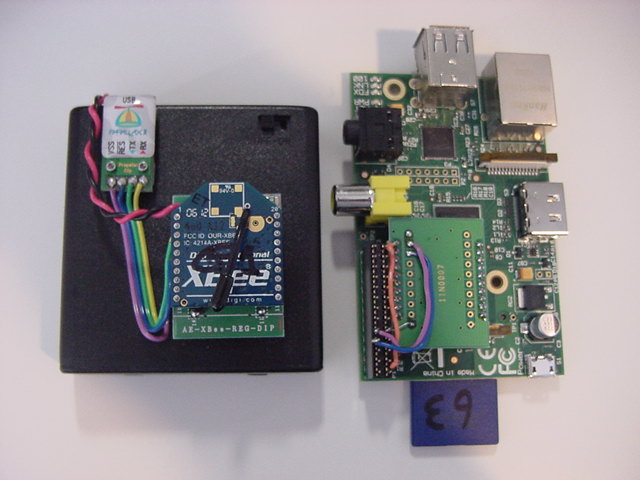
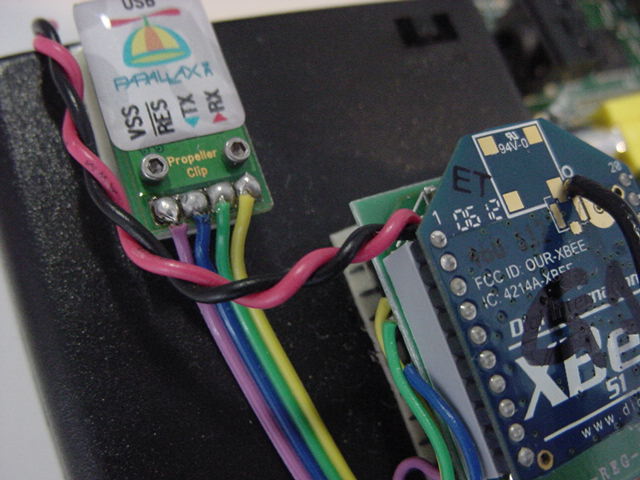
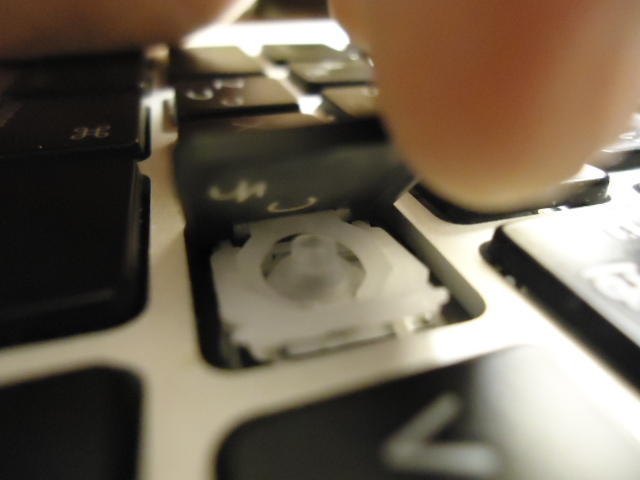
つまりこれは、Raspberry Piに取り付けたXBeeは、裏表を間違えていて、反対側のラインから配線しているので、TX/RXの信号だけでなく、+3.3Vの電源もGNDも、全て接続されていない、浮いている(なので壊れてもいない)状態なのであった。 配線した一昨日も、実験した昨日も、まったく気付かなかったが、そういえばSUACboardのバグの一つは、XBeeのTX/RXの取り違えであった。 XBeeというのは、なかなか鬼門である(^_^;)。 そこでまずは朝イチで、以下のように配線を正しく修正した。
そしてここから、昨日インストールした「pyserial」の中のサンプルのうち、テストできそうなものは無いか・・・とあれこれ試行錯誤的に、Raspberry Piにrcpしては実行する、と繰り返した。 そして2限を挟んで昼休みに再開したところで、改めて昨日チェックした関連ページの記述をザッと読み流してみると、次第に以下のような事が判ってきた。
このページ では、Raspberry Piのシリアルポートをコンソール端末として使うトピックが書かれていた。 これについては後述する別のWebページの詳しい解説に従って対応することとなった。
このページ では、以下のように「dialout」という謎のグループについて書かれていたが、他のページでこういう話題がまったく出て来ないので、とりあえず無視することにした。(^_^;)
The Serial Port is generally usable by the users in the group dialout.
To add oneself to the group dialout the the following command
needs to be executed with root privileges:

$useradd -G {dialout} your_name
このページ は新しく到達したページだったが、Raspberry Piのシリアルポートをコンソールに使う、という全体を解説したページであり、上で謎だった「dialout」についても書かれていた。 しかしこれはパスの話題なのでパスした。
このページ には、Raspberry PiのGPIOのこのポートは「Raspberry Pi’s Mini-UART」という名前であること、さらに以下のように、Raspberry Piのシリアルポートは、defaultではコンソール端末とやりとりするポートとして設定されているので、自分のプログラムにRaspberry Piのシリアルポートを使うためには、このdefault定義をdisableしなければならないとあった。 どこかで見かけて謎だった「/dev/ttyAMA0」も書かれていた(^_^)。 これについては後述する別のWebページの詳しい解説に従って対応することとなった。
Since the GPIO pins give access to the Mini UART, you can establish a serial
console, which can be used to log in to the Pi, and many other things.
You can reconfigure the RPi so that the Mini UART isn’t acting as a serial
console and use it for outer purposes (e.g. communicate with an attached
Arduino or Xbee).  Using the Raspberry Pi’s serial port requires some Linux
reconfiguration and the abandonment of the serial console, and potentially
some level conversion, but it could be useful. The Mini-UART pins to provide
access to Linux’s /dev/ttyAMA0 serial port.  To be able to use the serial
port to connect and talk to other devices, the serial port console login needs
to be disabled and the post “Raspberry Pi and the Serial Port” shows you how.
このページ にも同様に、以下が書かれていた。 そしてステップバイステップで、その作業手順が書かれていたが、次に紹介するページの方が、ほぼ同様の内容をよりスッキリと並べていたので、そちらに従うことにした。もし問題があったら、ここに戻ってくればいい。
If you intend to use the serial port for a software application running on
the Raspberry Pi, there is a bit of configuration required to disable the
console from using this port.   By default, the serial port is configured
as a console port for interacting with the Linux OS shell.  The following
steps will guide you through disabling the port from console access.
このページ にも同様に以下のように書かれていて、まさに僕は推奨されているようにネットワーク越しにSSHしている、という事で安心した(^_^)。 そしてこのページの「手順」が、もっとも同類のページの中で整理されているように思えたので、これを進めてみることにした。
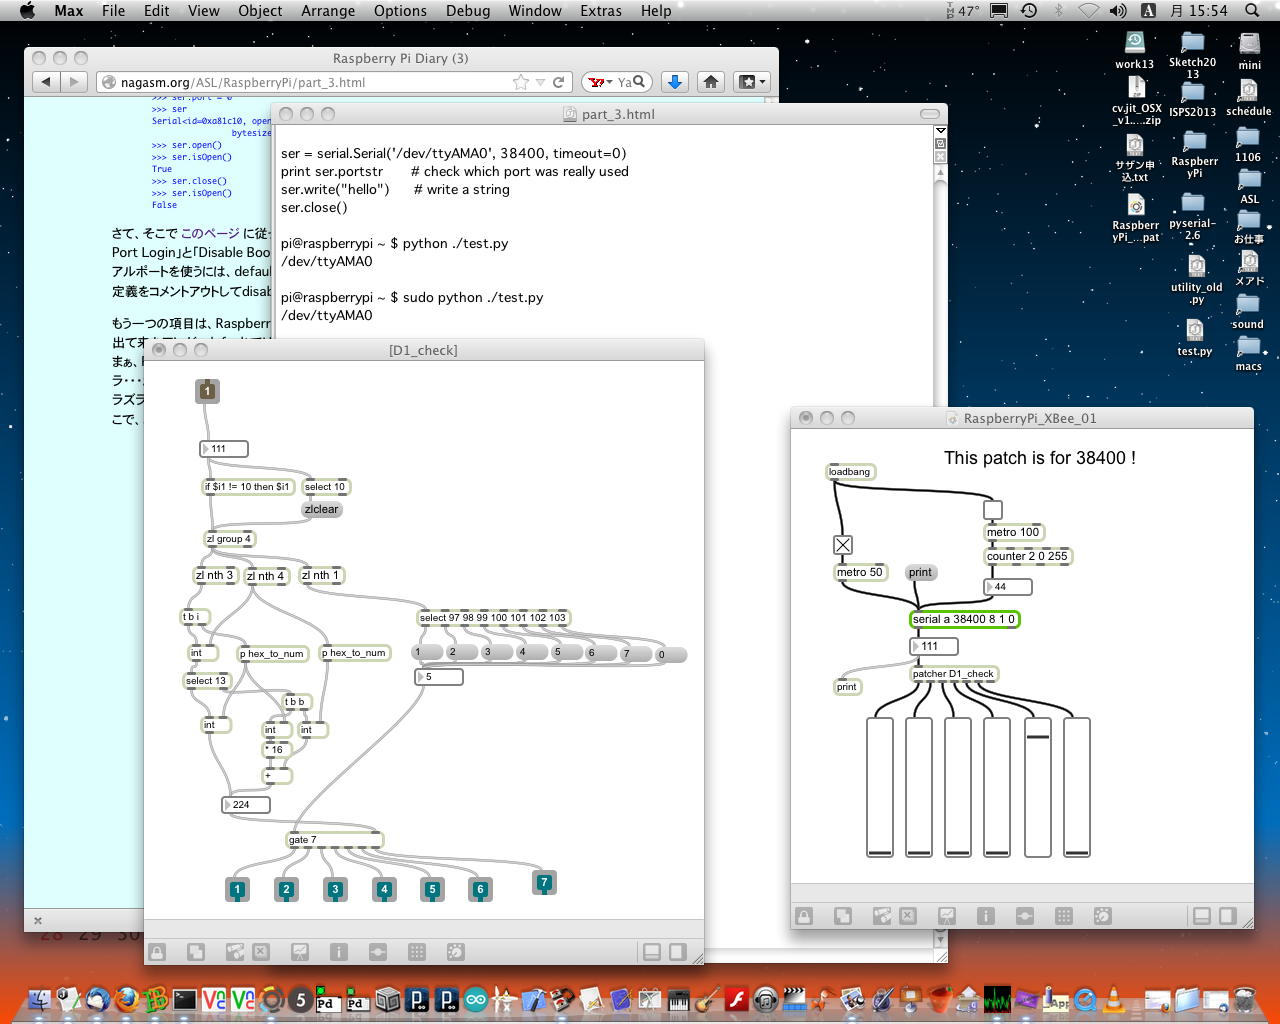
ただし気になったのは、あと1カ所 このページ である。 以下のように脳天気にPythonコマンドが並んでいて、他ページとまるで雰囲気が違う(^_^;)。 そこでとりあえず、「test.py」にこれらを入れて走らせてみて、何も起きない、つまり環境設定が先である、とまず確認しておいた。By default the Raspberry Pi’s serial port is configured to be used for console input/output. Whilst this is useful if you want to login using the serial port, it means you can't use the Serial Port in your programs. To be able to use the serial port to connect and talk to other devices (e.g. Arduino), the serial port console login needs to be disabled. Needless to say you will need some other way to login to the Raspberry Pi, and we suggest doing this over the network using an SSH connection.さて、そこで このページ に従っての環境設定である。 環境の変更は大きく2項目あり、「Disable Serial Port Login」と「Disable Bootup Info」であり、前者は必須、後者はoptionalである。 自分の用途にシリアルポートを使うには、defaultではコンソールとしてログインに使えるようになっているシリアルポートの定義をコメントアウトしてdisableすればいい。Short introduction Opening serial ports Open port 0 at “9600,8,N,1”, no timeout: >>> import serial >>> ser = serial.Serial(0) # open first serial port >>> print ser.portstr # check which port was really used >>> ser.write("hello") # write a string >>> ser.close() # close port Open named port at “19200,8,N,1”, 1s timeout: >>> ser = serial.Serial('/dev/ttyS1', 19200, timeout=1) >>> x = ser.read() # read one byte >>> s = ser.read(10) # read up to ten bytes (timeout) >>> line = ser.readline() # read a '\n' terminated line >>> ser.close() Open second port at “38400,8,E,1”, non blocking HW handshaking: >>> ser = serial.Serial(1, 38400, timeout=0, ... parity=serial.PARITY_EVEN, rtscts=1) >>> s = ser.read(100) # read up to one hundred bytes ... # or as much is in the buffer Configuring ports later Get a Serial instance and configure/open it later: >>> ser = serial.Serial() >>> ser.baudrate = 19200 >>> ser.port = 0 >>> ser Serial<id=0xa81c10, open=False>(port='COM1', baudrate=19200, bytesize=8, parity='N', stopbits=1, timeout=None, xonxoff=0, rtscts=0) >>> ser.open() >>> ser.isOpen() True >>> ser.close() >>> ser.isOpen() Falseもう一つの項目は、Raspberry Piに外部モニタを接続して起動した時にズラズラズラズラズラズラ・・・と出て来たアレが、defaultではこのシリアルポートにも出てしまう、というのを止めるかどうか、である。 まぁ、Raspberry Piを起動した後でホストのMaxと繋ぐ、というような場合には、別にズラズラズラズラ・・・が出た後でMaxのパッチを開けば関係ないし、今回のようにまだ稼働していない場合には、このズラズラズラズラ・・・の出力をMaxでモニタすると、ハードウェア的に動作していることの確認も出来る。 そこで、以下にこの部分の手順を転載しておいて、この後者の作業は「行わない」という事にした。
そこでいよいよ、「Disable Serial Port Login」である。 作業内容は以下のようにシンプルである。Disable Bootup Info When the Raspberry Pi boots up, all the bootup information is sent to the serial port. Disabling this bootup information is optional and you may want to leave this enabled as it is sometimes useful to see what is happening at bootup. If you have a device connected (i.e. Arduino) at bootup, it will receive this information over the serial port, so it is up to you to decide whether this is a problem or not. You can disable it by editing the file /boot/cmdline.txt The contents of the file look like this dwc_otg.lpm_enable=0 console=ttyAMA0,115200 kgdboc=ttyAMA0, 115200 console=tty1 root=/dev/mmcblk0p2 rootfstype=ext4 elevator=deadline rootwait Remove all references to ttyAMA0 (which is the name of the serial port). The file will now look like this dwc_otg.lpm_enable=0 console=tty1 root=/dev/mmcblk0p2 rootfstype=ext4 elevator=deadline rootwaitということでリブートしたが、defaultのRaspberry Piのボーレートは115200bpsなので、38400でモニタしているMaxには何も出て来なかった(^_^;)。 とりあえず、以下のように「sudo nano /etc/inittab」は改訂されている事をまず確認した。
- 「sudo nano /etc/inittab」とする
- いちばん下にあった以下の部分に「#」を付けてコメントアウトする
#Spawn a getty on Raspberry Pi serial line
T0:23:respawn:/sbin/getty -L ttyAMA0 115200 vt100
↓
#Spawn a getty on Raspberry Pi serial line
#T0:23:respawn:/sbin/getty -L ttyAMA0 115200 vt100- ctrl+Oで上書きする
- ctrl+Xで終了する
- 「sudo shutdown -r now」でリブートする
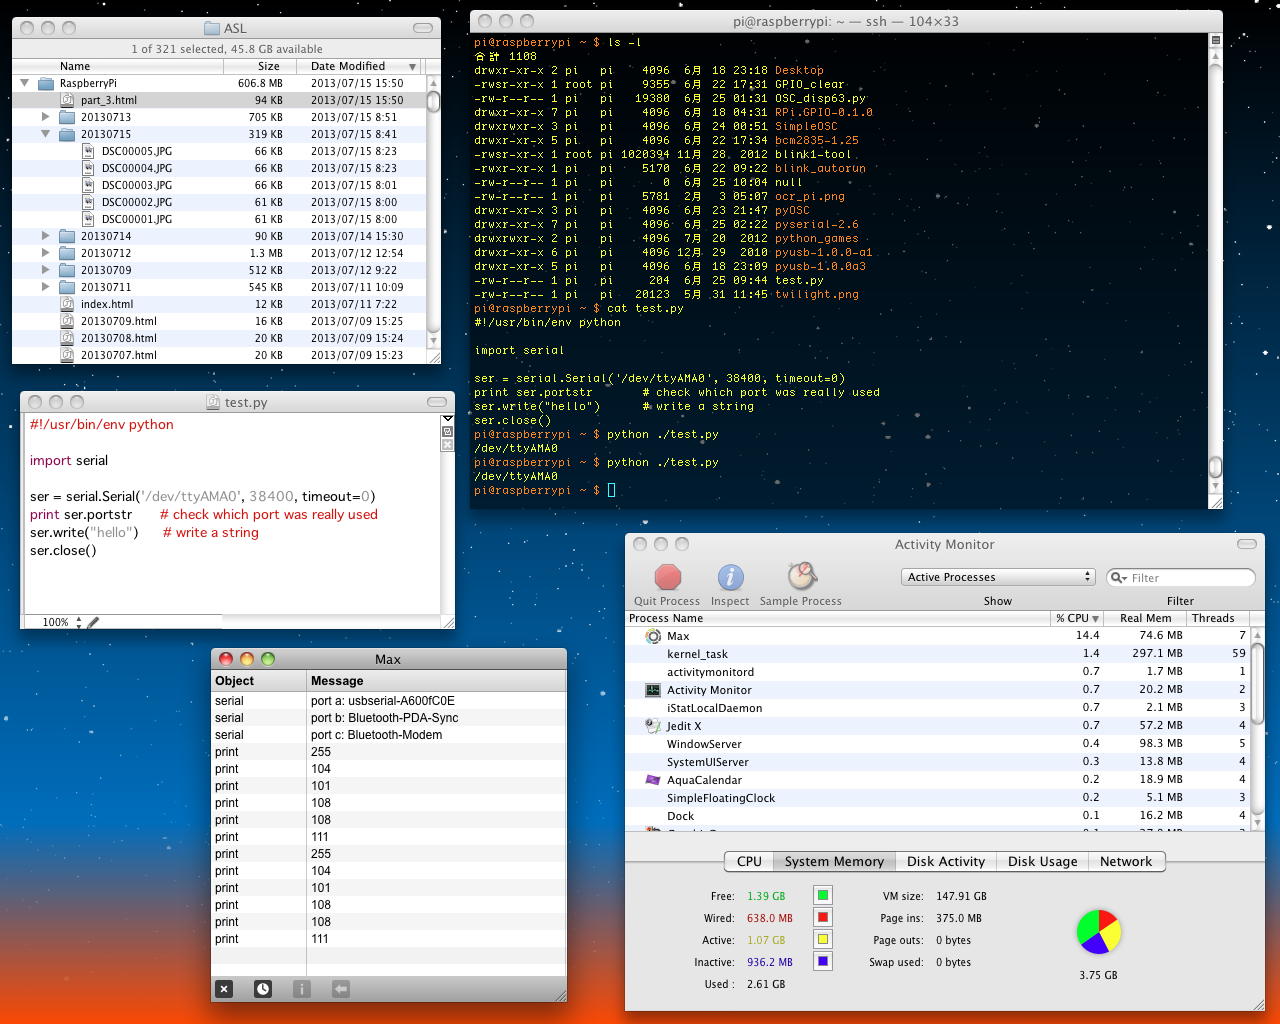
これが済んだら、「sudo apt-get install minicom」とminicomという簡易コンソールツールをRaspberry Piにインストールして、「minicom -b 9600 -o -D /dev/ttyAMA0」でホストPCと通信してみろ、とある。 しかし1日分600円を惜しむ貧乏人根性から、稼働してしまえば使わないので出来ればこれを避けたい(^_^;)という理由で、悪あがきをしてみる事にした。nagasm-Mac-mini:~ nagasm$ ssh pi@172.16.65.63 pi@172.16.65.63's password: Linux raspberrypi 3.6.11+ #456 PREEMPT Mon May 20 17:42:15 BST 2013 armv6l The programs included with the Debian GNU/Linux system are free software; the exact distribution terms for each program are described in the individual files in /usr/share/doc/*/copyright. Debian GNU/Linux comes with ABSOLUTELY NO WARRANTY, to the extent permitted by applicable law. Last login: Tue Jun 25 07:51:47 2013 pi@raspberrypi ~ $ ls Desktop RPi.GPIO-0.1.0 blink1-tool ocr_pi.png python_games test.py GPIO_clear SimpleOSC blink_autorun pyOSC pyusb-1.0.0-a1 twilight.png OSC_disp63.py bcm2835-1.25 null pyserial-2.6 pyusb-1.0.0a3 pi@raspberrypi ~ $ cat /etc/inittab # /etc/inittab: init(8) configuration. # $Id: inittab,v 1.91 2002/01/25 13:35:21 miquels Exp $ # The default runlevel. id:2:initdefault: # Boot-time system configuration/initialization script. # This is run first except when booting in emergency (-b) mode. si::sysinit:/etc/init.d/rcS # What to do in single-user mode. ~~:S:wait:/sbin/sulogin # /etc/init.d executes the S and K scripts upon change # of runlevel. # Runlevel 0 is halt. # Runlevel 1 is single-user. # Runlevels 2-5 are multi-user. # Runlevel 6 is reboot. l0:0:wait:/etc/init.d/rc 0 l1:1:wait:/etc/init.d/rc 1 l2:2:wait:/etc/init.d/rc 2 l3:3:wait:/etc/init.d/rc 3 l4:4:wait:/etc/init.d/rc 4 l5:5:wait:/etc/init.d/rc 5 l6:6:wait:/etc/init.d/rc 6 # Normally not reached, but fallthrough in case of emergency. z6:6:respawn:/sbin/sulogin # What to do when CTRL-ALT-DEL is pressed. ca:12345:ctrlaltdel:/sbin/shutdown -t1 -a -r now # Action on special keypress (ALT-UpArrow). #kb::kbrequest:/bin/echo "Keyboard Request--edit /etc/inittab to let this work." # What to do when the power fails/returns. pf::powerwait:/etc/init.d/powerfail start pn::powerfailnow:/etc/init.d/powerfail now po::powerokwait:/etc/init.d/powerfail stop # /sbin/getty invocations for the runlevels. # # The "id" field MUST be the same as the last # characters of the device (after "tty"). # # Format: #: : : # # Note that on most Debian systems tty7 is used by the X Window System, # so if you want to add more getty's go ahead but skip tty7 if you run X. # ##1:2345:respawn:/sbin/getty --noclear 38400 tty1 1:2345:respawn:/bin/login -f pi tty1 /dev/tty1 2>&1 2:23:respawn:/sbin/getty 38400 tty2 3:23:respawn:/sbin/getty 38400 tty3 4:23:respawn:/sbin/getty 38400 tty4 5:23:respawn:/sbin/getty 38400 tty5 6:23:respawn:/sbin/getty 38400 tty6 # Example how to put a getty on a serial line (for a terminal) #T0:23:respawn:/sbin/getty -L ttyS0 9600 vt100 #T1:23:respawn:/sbin/getty -L ttyS1 9600 vt100 # Example how to put a getty on a modem line. #T3:23:respawn:/sbin/mgetty -x0 -s 57600 ttyS3 #Spawn a getty on Raspberry Pi serial line #T0:23:respawn:/sbin/getty -L ttyAMA0 115200 vt100 pi@raspberrypi ~ $ このページ から、「minicom-2.6.2.tar.gz」は簡単にダウンロード出来た。 しかしこれはPythonでなくCなので、ちょっと簡単ではない(^_^;)。 以下のように、「README」にインストールの手順が書かれているが、makeモノである。 これは悩ましい。
あくまでminicomは、Raspberry PiのGPIOポートにあるUARTを自分用に使うための環境設定が出来たことの確認に使うだけである。 この環境設定は、上記のように、まぁたぶん出来ている。 そして手元には、エラーなくインストール出来た模様の「pyserial-2.6」もある。 ということはやはり、今度は環境設定まで済んでいるのだ、という前提で、 このページ を攻めて行けばいい筈である。Quick instructions for installation: 1. Change to the minicom-$VERSION directory. 2. ./configure (see ./configure --help for options) 3. make 4. make install 5. minicom -s (for changing /etc/minicom you probably need to run it as root) Change what should be changed on your system, and choose 'Save setup as dfl' from the configuration menu to save the changed settings as system defaults. Now add every user which should be allowed to use minicom to the group of the corresponding character devices (e.g. /dev/ttyS0). On Debian this group already exists and is called 'dialout'. Now you should have minicom compiled, installed and ready to use. For more information, have a look at the other files.そこで、改めて このページ の簡単なサンプルをrcpして実行させてみると、以下のようにエラーは出ず、ポートも正しく表示され、XBeeをモニタしているMaxの画面にも、無事にデータの到着が表示された(^_^)。 ただし、"hello"という文字列の出力に対して、何故か先頭に「255」という値が付いてきた。
pi@raspberrypi ~ $ ls
Desktop        RPi.GPIO-0.1.0  blink1-tool    ocr_pi.png    python_games    test.py
GPIO_clear     SimpleOSC       blink_autorun  pyOSC         pyusb-1.0.0-a1  twilight.png
OSC_disp63.py  bcm2835-1.25    null           pyserial-2.6  pyusb-1.0.0a3

pi@raspberrypi ~ $ rcp nagasm@172.16.65.31:Desktop/test.py .
Password:
test.py                                                               100%  192     0.2KB/s   00:00

pi@raspberrypi ~ $ cat test.py
#! python

import serial

ser = serial.Serial('/dev/ttyAMA0', 38400, timeout=0)
print ser.portstr       # check which port was really used
ser.write("hello")      # write a string
ser.close()

pi@raspberrypi ~ $ python ./test.py
/dev/ttyAMA0

pi@raspberrypi ~ $ sudo python ./test.py
/dev/ttyAMA0

pi@raspberrypi ~ $

これでOK、ということで、実験用に使った単体のRaspberry PiからXBee付きのGPIOコネクタを外して、3台合体のRaspberry Piの63号機に繋いで動作確認・・・とテストしてみると、何故かMaxのモニタが沈黙してしまった(^_^;)。 さっきは動いていたのでハード障害ではなく、Maxのシリアルポートのご機嫌かもしれないが、ここで5限となったので今日はおしまいである。 明日は終日ギッシリの予定なので、だいたいここらあたりまで、という感じになってきた。
2013年7月17日(水)
渡米前日である。 「サウンドデザイン」の課題に関して2回生からのアポが1限と5限に入り、M1のリュ君のアポが2限に入り、放課後はアカペラもあるので、ここでどたばたとRaspberry Piを進める余裕は無いと見て、持参するMacBookAirに最新ソフトを移したり、明日(当日)の朝に自宅からスーツケースを持ってきてバッキングするために機材をまとめたり、持参するビデオカメラとデジカメとiPod touchなどに充電したり・・・という雑作業の一日となった。 合間があれば、昨日、相談を受けた柴野さんの映像作品のための作曲、ということになる。そんな中、朝イチで届いたSketching MLのメイルがそこそこ、盛り上がってきた。 これは後日のためのメモであるが、今年のSketching2013の「旬な話題」になりそうである。 事の発端は、 こんなもの である。 「タイル」という小さなタグであるが、これを自分の持ち物などに付けておくと、それを紛失したり盗まれた時に、iPhone/iPadから検索してGoogle Map上で表示したり、遠隔制御で鳴らしたり出来る、というものである。 これはどういう技術なのか? というのが最初のメイルだった。
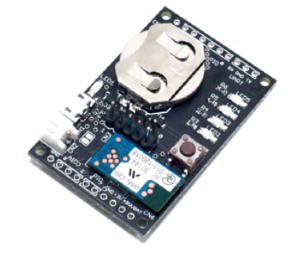
そして2-3時間のうちに、世界各地のSketching MLのメンバーからのメイルにより、これはBLE、つまり低エネルギー版BlueTooth(BLE)であろう、という事で一致した。 さらには、似たものとして こんなもの が紹介された。 こちらも小さくて丸いステッカーで、紛失したり盗まれた時に、iPhone/iPadから検索してGoogle Map上で表示したり、遠隔制御で鳴らしたり光らせたり出来る、というものである。 そしてこのコア技術としては、テキサスインスツルメンツ(TI)社が提供しているチップだろう、とも指摘された。
この技術は注目すべきものであるが、なんせBLEでは電磁波が届く範囲が狭いので、ちょうどXBeeネットワークのように、あるタイルはその近くの誰かのiPhoneと接続してネットワークに加わり、それがさらに他の人々のモバイルネットワークと繋がることで、捜している本人のiPhoneまで到達する、というネットワークの構想に繋がる、という点が重大な問題となる。 P2Pネットワーク上の「共有」によって違法コンテンツが世界中に普及しているように、このタイルと持ち主が繋がる、というために、世界中のモバイル機器が、建前としてはその上を流れている情報は暗号化されていて通過させるだけで読めない、としてそれぞれの情報を媒介し合う、という「共有」の文化は、ブライバシーの問題とどう折り合うのか、注視していく必要があるだろう。
そして一連のメイルの最後に、さすがの小林さんのメイルがあった。 こんなこと をやっています、それは金曜日(明後日、つまりSketching2013の初日)に紹介しますよ、という事だった(^_^)。 こちらもまさしくBLEの活用である。 僕はiPhone/iPadをコントローラとして使うことにあまり興味が無いのだが、iOSの枠組みをJavaScriptで回避して作れるとすれば、これは学生にとってはソソラレルところなのではないかと思う。 この最新状況を目の前で見られる、というのは、明日の渡米の楽しみがまた増えた、というところだ。

2013年7月20日(土)
日付けでは2日スキップしているが、いま日本時間で7月20日(土)の夕方18時である。 しかしここは米国カリフォルニアのパロアルト、まだ7月20日(土)になったばかりの午前2時である(^_^;)。 ここ最近の海外出張では、基本的にセントレアに前泊して朝イチのフライトで成田に飛び、成田を午前11時あたりに出発するフライトで欧州でも米国でも出かけてきたが、今回は例外的に「当日出発・当日到着」というパターンとなった。 この便利さは、アメリカ西海岸に行くフライトだけの例外のようである。もう一昨日となるが、7月18日(木)の朝に大学に出て、午前にクルマで浜松西インターに行ってe-wingに乗り、昼過ぎにセントレアに着いて、14時台のフライトで成田に飛んで、成田を17時台という夕方に出発するサンフランシスコ行きに乗ったので、9時間半のフライトで到着したサンフランシスコは時計が戻り、まだ同じ7月18日(木)の午前11時過ぎだった。 そこからBARTとCaltrainを乗り継いでPalo Altoに来て、ホテルに15時にチェックインした。 そして翌日、7月19日(金)がSketching2013の初日であり、中身の濃い1日が終わってホテルで爆睡したものの、前夜に続いて午前1時過ぎには目が覚めて(当たり前、日本ではまだ夕方)、もう眠れないので起き出してこれを書き始めたのである。
2夜連続で睡眠時間が3時間程度とキツいが、まぁ日本から米国西海岸に行った時の時差ぼけは最もキツいので仕方ない。 実りあるSketching2013のテンションで乗り切っていこう。 日々刻々と改訂されるが、GoogleスケジュールにアップされているSketching2013の現在のところのスケジュールは これ である。 既に小林さんは初日の昨日に颯爽とプレゼンを終えたが、僕のプレゼンはいよいよ今日の午後(最も眠い時間(^_^;))である。 昨日の晩もやはり午前1時過ぎに目覚めて眠れず、深夜にホテルの部屋でコーヒーを淹れて、朝までかかって今日のプレゼンは完成させた。 Sketching2013のメンバーはGoogle Driveで互いのプレゼンPDFを共有しているが、僕は例外的に発表前なのにアップロードしていて、 これ である。
去年のSketching2012での「ジャミーズ娘+」のシートから始まり、翌月にMOM2012の機会にMac上でのPropellerの開発ツール「bst」と出会い、そこからICMC2012とアルスの旅行中に進めたのが「PropellerとXBee」であった。 そして「Propeller日記」の中で、やりかけて途中までで棚上げされていたのが、 OLED_XBeeのまとめ と OLED_XBeeの補遺 のページであった。 今日はまず、ここにタグを追加してここからジャンプするように、また今日のこの部分にもジャンプして来れるようにした。
そして秋から冬には、汎用実験/試作ツールとして「SUAC board」を開発していったが、これはPropellerを搭載するために、引き続き「Propeller日記」として書き進めた。 SUACboardの開始 から始まって無事に最初のバージョン0.5が完成し、改訂すべきバグ等もクリアになったところで、 SUACboardの最後 までで、この最後のところで「Propeller日記」を終えていた(ここにもタグを追加してここからジャンプできるように、また今日のこの部分にも続けてジャンプして来れるようにした)。
そして新たに「Raspberry Pi日記」が始まったのであるが、今月あたりからはなんとSUACboardに接続するという展開に進展したのである。 今年は獲得した予算の関係でSUACboardを改訂して試作するかまだ未定なのだが、 SUACboardの最後 のところに書いたようにホストからAKI-H8を外して、その代わりにRaspberry Piにも対応させていくような展開となっている。 そして、今回のSketching2013での僕の 発表 は、まさにここまでの推移を報告する、という事なのである(^_^)。
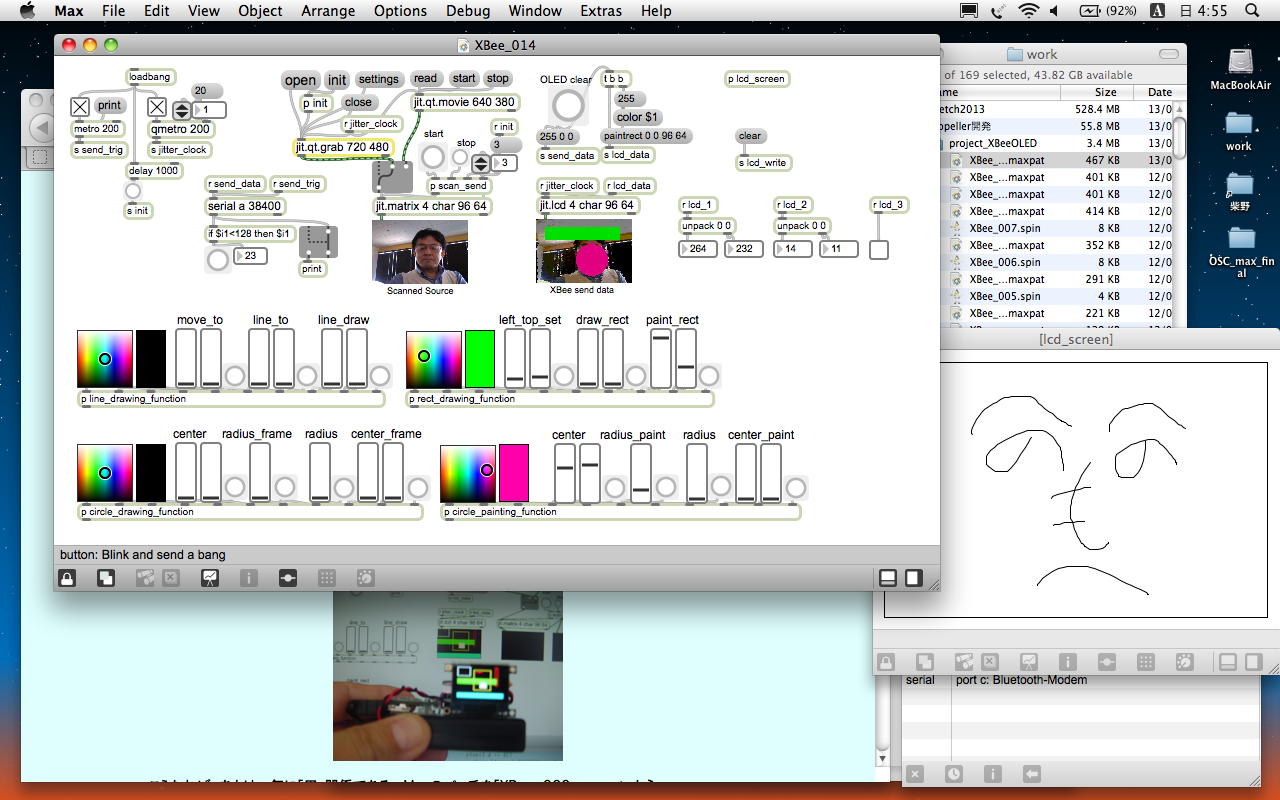
「Propeller日記」の「PropellerとXBee」の部分はもう完全に忘却の彼方であるが、たしかMaxプログラミングがまだ残っていた。 今回のSketching2013には、SUACboardとRaspberry Piとともにこの一式も持参したので、今日の発表に続いて、明日のショーケース(参加者全員がそれぞれデモ等をする)では紹介したいところである。 いま持参した機材を並べて、「2012年9月18日」というタイムスタンプのMaxパッチを起動してみると、確かに動いてくれたが、どうもMaxパッチはあまり美しくない。 まったく「Raspberry Pi日記」では無い(^_^;)のだが、今日はSketching2013の合間に、ここから再開していこう。
Sketching2013については、いつものように多数の写真を撮っているので、いつものようなフォトレボートのページがいずれ出来ると思われるが、昨日の初日には、会場となっているPARC(XeroxのPalo Alto Research Center)のラボ見学(※写真ナシ)なども出来たので、忘れないうちにメモしておこう。 「Sketching2013フォトレボート」のページからも、ここにリンクを張っておけばいいわけだ。 大袈裟に言えば(実はちっとも大袈裟でなく)、ここPARCは人類の叡智の一つの拠点である。 ここ でも ここ でも ここ でも ここ でも ここ でも ここ でも ここ でも ここ でも、PARCの記述はあまりに多く、伝説として語られている。 ただしPARCは単に過去の伝説でなく、いま現在も、これからの人類の未来のための研究などを推進しているのである。
ランチタイムの合間に数人ずつに別れてPARCの中を案内してもらったが、世界で初めてPARCが「マウス」というコンピュータインターフェースを生み出した、その最初のマウス(のレプリカ)にも触れた。 「イーサネット」もここPARCから生まれたとのことで、初代Xeroxコピー機の置かれた部屋の壁にある小さな扉を開けて見せてくれたのは、「世界で初めて実際に稼働したイーサネットケーブルの接合部分」であった。 壁の内側で、上下から来ている同軸ケーブルが、そこでコネクタによって接続されているだけ(^_^;)なのだが、これはまだ現役である。 今の地球上からインターネットが生まれていなかった展開を想像することは困難だが、そのインターネットの基盤技術であるイーサネットをPARCが提供しなかったらインターネットが出現していなかった可能性はとても高いのである。 そんな「聖地」で開催されているSketching2013なのだ。(^_^)
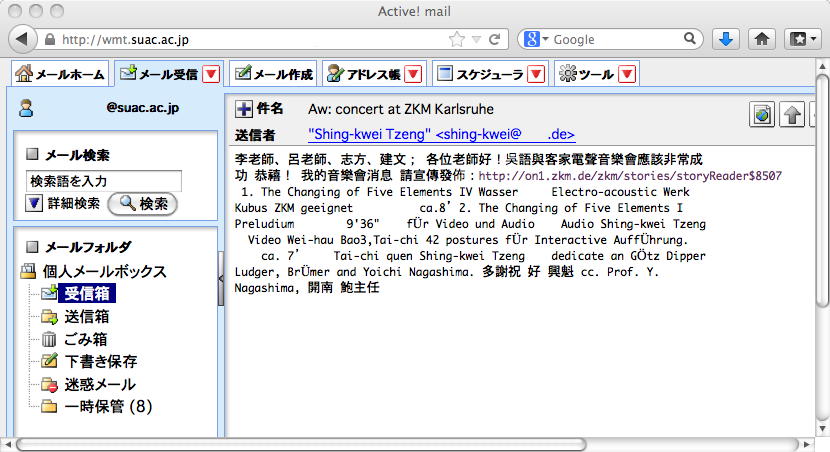
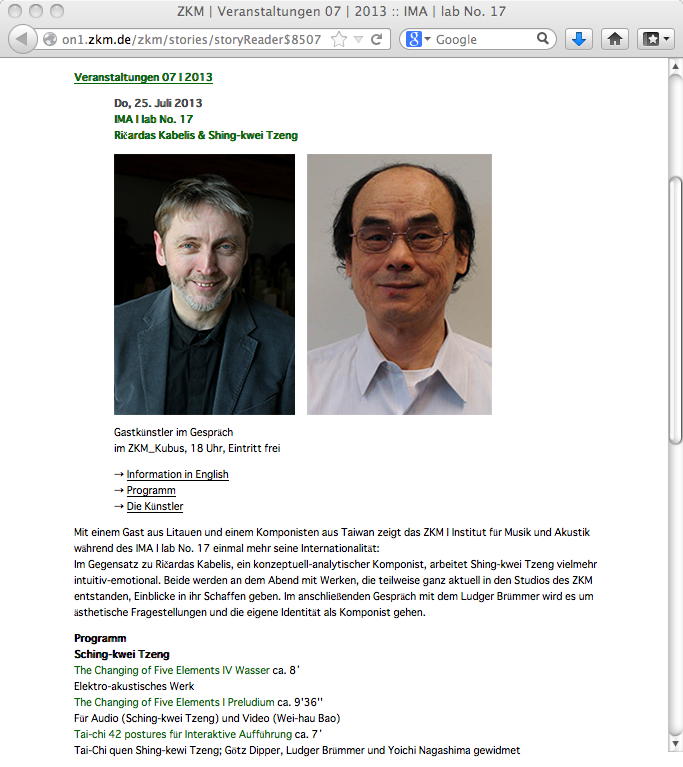
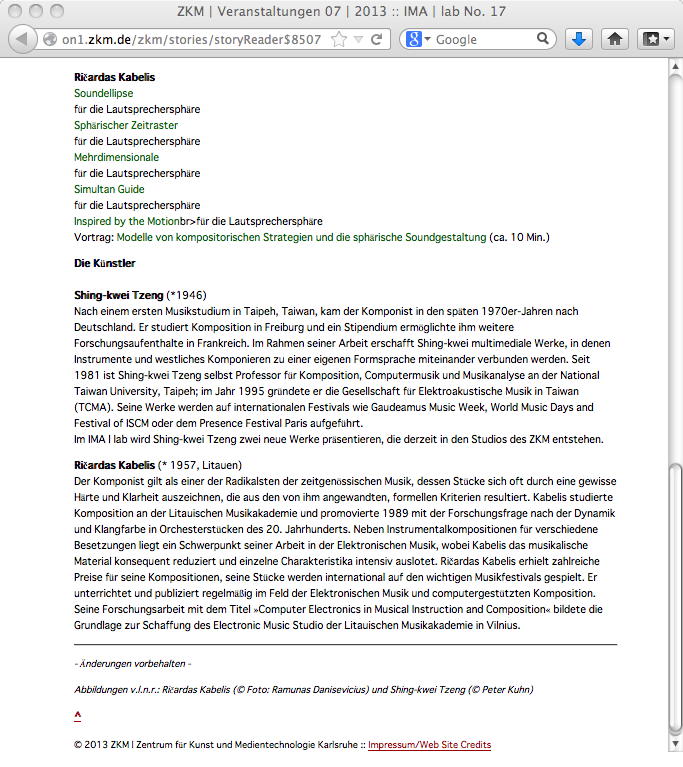
・・・ここまで書いてフト軽く眠くなり、1時間ほどウトウトしていると朝6時半になり、目覚まし時計が鳴った。 いよいよSketching2013の2日目のスタートであるが、そこに到着したメイルは以下のようなものだった。 このように 今年の3月にまた来日してSUACに来ていろいろ勉強していった、台湾・開南大学のShing-kwei Tzeng教授からのドイツ語のメイルで、この春にいろいろ手伝った作品が、無事にドイツのZKM(教授が短期レジデントで滞在して新作を作曲)での コンサート で公演されたようである(^_^)。 ドイツ語なので詳細は不明だが、プログラムによれば、旧作2作品の再演とともに、今回の新作「Tai-chi 42 postures fur Interaktive Auffuhrung ca. 7’」のところには、「Tai-Chi quen Shing-kewi Tzeng; Gotz Dipper, Ludger Brummer und Yoichi Nagashima gewidmet」と僕の名前もあり、おそらくパフォーマンスをしたShing-kewi先生の名前に続く3人は、この新作の作曲に協力した謝辞的なものなのだろう。
せっかくなので、この情報を、3月のShing-kewi先生の来日を一緒に迎えた、音楽家のRAKASU PROJECT.さんと、院生のリュ君と、2回生の金重さんと坂下さんにメイルで知らせておいた。 そしてシャワーを浴びて、いよいよ2日目のSketching2013に出発である。 続きはまた今日の深夜か明日の朝になるかもしれないが、プレゼンでアピールして、晩のパーティでは美味しいビールを飲みたいところだ。
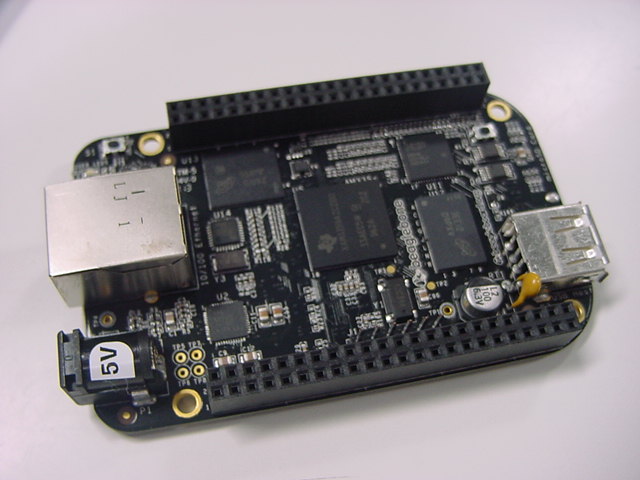
・・・そしてここはPARCのホール、午前のセッション中である。 朝のメイルへのリプライで、さっそくRAKASU PROJECT.さんからのメイルが届いた。 ちょうどRaspberry Piを仕入れたところだということで、またミニワークショップでも出来ればいいと思う。 そして昨夜のディナーの席でPARCの研究者から仕入れた情報を本人にいま確認して、 BeagleBone Black の名前を確認して、リンクを置いたところである。 昨日からあちこちで「なんとかブラック」という単語が行き来していたのは、これだったのだ。 詳細はおいおい調べるが、このボードは35ドルのRaspberry Piとあまり違わない45ドルなのに、相当にI/Oポートが拡張されているのだという。 チップが異なるのでRaspberry Piとソフト互換という事は無いのかもしれないが、愛好者が多いならフリーのツールも充実しているかもしれない。 「Processor: AM335x 1GHz ARM Cortex-A8」ということでRaspberry Piより強力で、「2x 46 pin headers」ということで確かにI/Oが多い模様である。 「Software Compatibility : Ubuntu」とあるので、GPIOのドライバは別として、Raspberry Piとほぼ互換かもしれない。 帰国したらさっそく発注して、実験してみよう。
・・・そして昼休みとなり、午後はPARCのホールから移動して、週末はお休みのカフェテリアの一角がSketching2013の会場となった。 昼食はケータリングの業者を路上販売のワゴンごと呼ぶあたり、まさにアメリカである。 そして去年の ここ から懸案だった、OLED_XBeeのためのMaxパッチの改訂については、以下のように無事に完成して動作を確認した。 カラーを指定して、座標を設定して描画する、というその機能を実現するだけでなく、さらにMaxパッチ内の「lcd」にマウスで描画したパターンをXBeeから送る、という新たな機能拡張の要素も作りかけたところだが、これはまた、余裕がある時に進めればいい。 とりあえず、3時間後に迫ったプレゼンまでに、忘却の彼方だったOLED_XBeeをほぼ思い出せたのは収穫である。
・・・そして午後になり、以下のように無事にプレゼンを終えて(写真は最前列のMikeに撮ってもらった(^_^))、僕の次のプレゼンターは、Maxの生みの親のDevid Ziccaeri氏であった。 さすがにこの世界のスーパースターだなぁ(^_^)。 そして今日の最後は、Forbesの表紙を飾った、こちらもスーバースターの中国のEric Pan氏である。 この会社 のCEOで、スケッチングを受けて速攻で安価に量産してしまう、世界のイノペーティブ・プロダクションを裏で支える立役者である。


上の写真は夕方ホテルに帰ってきて部屋から上げたが、今日の晩はシャトルバスでパーティに向かうので、今日はたぶんここまでである。 たくさん撮ったDevid Ziccaeri氏の写真その他は、別のデジカメでまだ撮影中なので、帰国後にフォトレボートのページに上げることになる。 既に日本時間は日曜日(参議院選挙投票日)の午前10時を過ぎているが、ちゃんと不在者投票を済ませておいたので、あとは帰ってきたらYAHOOニュースでも見てみよう。
2013年7月21日(日)
さて、いよいよSketching2013の最終日である。 昨夜は3日目にしてようやく連続6時間ほど睡眠できたが、これで日本に帰国するとまた時差ぼけである(^_^;)。 日本では日曜日から月曜日になって深夜の25時半だが、こちらは午前のセッションが始まった朝9時半である。 昨日のメモだけ、まずは忘れないうちにセッションの内職で書いておこう。昨夜はパロアルトのダウンタウンのお店に出かけてのパーティ(スポンサーはIntel)だったが、プレゼン後ということで色々な話題で盛り上がった。 中国・深センから来たという この会社 のシニア・マーケティングマネージャーでありインタラクション・デザイナであるという若い人といろいろ話したが。なんと聞いてみると彼の年齢はちょうど僕の半分(^_^;)で、僕の下の息子と同い年であった。 意欲と才能のある若者のパワーは見習わないといけない(彼と同じ歳の頃には、脳細胞の端から端まで絞って、回路の5万トランジスタの隅々の動作まで追いかけてカスタムLSIを設計/検証したものだが、その経験こそが今の僕を成立させている)。
そして、昨日のプレゼンでは「儲かって儲かって、遂に自社ビルを建てることになった」と笑わせて喝采を浴びた、GainerやArduinoを提供して日本でもかなり有名になったSparkFun社のCEOのNathan Seidle氏をつかまえて、SUACboardを1枚プレゼントしつつ回路図を渡して詳しく解説し、これをSparkFunならいくらで作れるか、と質問した。 日本では格段に安いと話題の「P板.com」で作ったSUACboardであるが、彼によれば「相当に高いねぇ」(^_^;)という事であった。 やはり世界の潮流はもっと凄いのであった。 こうなると、SUACboardの改訂版は「P板.com」でなく、海外の SparkFun か Seeed に依頼する、という可能性も検討しないといけない。 前例の無いことを避けたいSUACの事務局が対応してくれるかどうか、交渉しないといけないかなぁ。
この後、午前の前半のセッションではインテルやグーグルやPARCの研究者の強力なプレゼンが続いたが、ここで強烈な眠気が襲ってきて(日本時間で深夜1時から2時(^_^;))、なかなかに辛かった。 午前の後半では、東大からMITに来ている 川原先生 のプレゼンがあった。 家庭用のインクジェットプリンタでプリントバターンが印刷できてフレキシブル基板になる、というのは注目したい技術である。 三菱製の銀の微粒子の入ったインク?と専用ペーパー(布もOK)で印刷するということで、これはこれまで導電スプレーであれこれやってきた事の延長として何か出来るかもしれない。 その後も、Google Glassに対する話題、そして午前の最後のタイトルは「Is JavaScript a good first physical computing language?」だが、中身はBeagleBone Blackまで出て来て(これでかろうじてRaspberry Pi日記となる)、いろいろと収穫だった。
午後のセッションでは、embeddedシステムでサウンドを出す、つまりMax/MSPにセンサデータを送るのでなくてハンディ機器そのものがサウンドまで生成する、という話題があった。 確かにRaspberry PiはPdにも対応しているので、これはちょうど、MIDIだけだったMaxにソフトウェア合成のMSPが加わった1994-1995年あたりのMacの時代を想起させるが、今となってあの時代のチープなサウンドを求める、というのは、ちょっと僕には賛同できない(^_^;)。 SDカードでサンプリングする、という苦労の跡も、まぁ同じである。 CCRMAが35ドルで販売しているRaspberry PiのSDカードには、PdだけでなくSuperColliderまでインストールされているという。 リアルタイム信号処理ででギター用のディジタルエフェクタを作ったようだが、こうなると楽器メーカはますます大変そうである。 Seeed から出しているGROVEブランドで、組み込み用のMP3再生モジュールも安価だが、まぁiPodを使っている身としとては、これまたソソラレないのである。
元々はMikeが今年のShetchingに向けて振った「iiCloudで何か出来るか」・・・という話題は、NETLAB Toolkitのプロモと合体しているるので、ちょっとピンと来なかった。 Raspberry Piでもそうだが、シカテムのアプリケーションとしてサーバ連携のような方向にソソラレないのと関係しているのかもしれない。 このあたりは、Raspberry PiにSuperColliderを走らせてサウンド生成・・・というところに行けば変わるのかもしれない。 そして最後のプレゼンのタイトルは、NYUの先生なのに何故か「Hardware is Hard」であった(^_^;)。 これは国内のデザイン/アート系の大学の先生との間でもよく出てくる話題で、学生の目指すところと学生の得意・不得意がいろいろでタイヘンだ、というお話だった。 学生は実際のモノを作るよりソフトウェア(コピペ可能)に走りやすい、簡単にスマートな成果を求めたがる、サンブルコードを改変して済ませたがる・・・などという、まさに我々の業界が直面している事は、NYUの学生でも同じなのだなぁ、とヘンに感心した。 結論の提案(学生に言いたいこと)は「Become a Craftman」であった。 決して手作りのもの作りだけでなく、もちろんITを駆使するとしても、デザイナの「心」はここなのだろう。
2013年7月22日(月)
ここで日本時間で7/22と日付けを改めたが、実はまだ現地は7/21の夜9時(日本は午後1時)である(^_^;)。 Sketching2013が無事に終わり、ある程度のメンバーはホテルからさらにシャトルバスでプライベートな打ち上げのBarに向かったのだが、前夜祭から3日連続で(行きのフライトからは4日連続)飲み続けて疲れたので、ホテルまで到着したところで脱落した。 そしてホテルの部屋で、とりあえず今日ここまでの写真を、どうせ「Sketching2013レポート」として上げるので、ホテルの売店で買ったビールをちびちびやりながら(結局、飲んでる(^_^;))、上げてみた。 これ である。そして、ここで突然にトラブルに遭遇した。 なんと以下のように、キーボードの「そ」「C」というキートップが、右側だけ外れて斜めに浮き上がってしまったのである(^_^;)。 「C」といえばコピペの「command+C」でもっとも多く叩く事になるキーの一つであるが、これは甚だ不安である。 さっそくネットで「Macbook air キートップ 外れ」と検索すると、出るわ出るわ、けっこう多いトラブルのようだが、普通にあるのは「キートップとパンタグラフが嵌め合わさったものがキーボードから外れる」というものだった。 しかしここで起きているのは、キートップとパンタグラフの片側(右側)だけが外れていて、パンタグラフはキーボードとしっかり付いている。


パンタグラフの右側にある、キートップと嵌め合わせる突起は上下両方ともちゃんとあるが、キートップの裏側を見ると、この突起にハマる筈の「挟む部分」が、どうも上下とも折れてしまったようである。 ネットの情報だと、アップルに修理を依頼すると2万円でキーボード交換である。 ここ だともう少し安いようであるが、キートップの内側のハメ合わせ部分が折れて交換なので、そこそこは覚悟する必要がある。 ただし、接着というのは論外としても、キートップの裏側の、パンタグラフと触れる部分に、薄手の両面テープを貼ればなんとかなる気もする。 帰国してからになるが、まずはこれを試して、駄目なら業者に修理依頼することにしよう。 キーボードはプログラミングで酷使しているので、いくらかかっても、これは仕方ない。
2013年7月23日(火)
サンフランシスコから成田に向かう帰途のANA機内(暗くしているが外はずっと暮れない)である。 前日の日記から10数時間が経過したところで、パロアルトのホテルを朝9時前に出て、CaltrainとBARTで空港にやってきたのが11時前、そこから2時間ほど空港でまったりして(搭乗ゲートのエリアはWiFiが無くて、仕方なくこれまで観ること無く貯めていた「ももクロ」の武道館ライヴを1時間も観れたのがある意味で収穫(^_^;))、サンフランシスコ空港を昼過ぎに飛び立った。 帰途のフライトは10時間以上かかる予定が、何故か向かい風が弱いので30分以上も早く着くとのことで、いつものようにワイン爆睡の3時間半から目覚めて、残りが6時間ほどになった太平洋上である。 日本時間はこの時点で朝9時過ぎで、短い睡眠だったがこの後は帰宅するまで12時間、睡魔と戦ってでも、「寝ない」事が時差ぼけ軽減のために重要である。昨日の日記に関しては、ちょっと新しい事を思いついた。 ネットで「Macbook air キートップ 外れ」と検索した時に、一つのYouTube動画と出会ったが、爪楊枝で簡単にMacBookProのキートップを外したりまた付けたり出来る・・・というものだった。 そして、ちょうど大学からもう1台のMacBookAirを研究室に受け取ったばかりだった、と思い出したのである。 この出張用メインのMacBookAirから、問題のキートップを外して、研究室のスペアのMacBookAirのキートップと交換すればいいのであった(^_^)。 この片側だけ外れたキートップを両面テープで補修するとして、それが出張用メインでなく研究室のスペアであれば、叩く頻度も大幅に低下するので好都合なのだ。
そういえば1990年代の半ばには、当時としては最新鋭のPowerBookをいつも持ち歩いて、毎週、浜松と大阪(京都/神戸)を往復していた。 大阪のイメージ情報科学研究所、京都の京都芸術短期大学(現在の京都造形芸術大学)、神戸の神戸山手女子短期大学(現在の神戸山手大学)に、2泊して毎週3日、浜松から通っていたのである。 今では新幹線に乗ると、たくさんの出張族のおっさん達がいそいそとWindowsパソコンを開くので、僕は逆に滅多にパソコンを出す事は無くなったが、1995年頃にはまだノートパソコンを持ち歩くビジネスマンは殆ど存在せず、PowerBook2400cの小型軽量な画面で、14歳で衝撃のデビューを果たした宇多田ヒカルの武道館ライヴの映像を新幹線の席で楽しむというのは「目立った」ものだった。 ところが定宿の梅田のホテルでキーボードにコーヒーをこぼして動作不良となり(^_^;)、梅田のパソコンショップで外付けキーボードを購入してその場をしのぎ、液晶バックライトの半分が暗くなっていたスペアのPowerBook2400cをバラしてキーボードを取り外して交換して、無事にメインのPowerBook2400cを復活させた事もあったのだった。 メインのために犠牲となったスペアの方も、外付けモニタと外付けキーボードによって、内部のMaxはちゃんと走るので、時には複数バソコンが連携する作品で、ちゃんとサブマシンとして働いていたのである。
さて、まだ機内の時間が十分にあるので、この機会に恒例の「これからどうしようか」を、徒然なるままに書きつつ考えてみる事にした。 Raspberry Pi日記としては、そこそこ進めたRaspberry Piをここらでオシマイにするのか、それともここからさらに深入りしていくのか、ある意味で「岐路」なのだ。 そこでまず、機内で時間があるので、ここまでの「Raspberry Pi日記」をザッと読み返して、てにをはのバグを修正しつつ、何か気付いた事があればどんどんメモとして追加する、という4時間弱を過ごした。そのメモは以下である。
ここでフライトの残りは2時間半、バッテリも41%となった。 乗り継ぎの成田空港のロビーでは、壁際に座り込んで充電しながら、「ももクロ武道館」の後半を観てみよう(^_^)。
- Raspberry Piを活用した事例のムービーを集めた「YouTube_RaspberryPi」(13ムービー、534MB)をまだ観ていなかった → 帰国したらチェックすべし
- part1の「2013年5月24日(金)」にあった、内蔵サウンド再生の部分は改めて攻めるべし → スタンドアロンのサウンドインスタレーション
- それとは別にふーみん本のUSBサウンドインターフェースもapt-getして実験すべし
- part2の「2013年6月17日(月)」に、スタンドアロンのLANではVNCはOKだがSSHは駄目、とあったが、Sketching2013のScience Fairの場ではSSHも出来ていた(^_^;)
- GPIOのピン定義の最終版は → part2の「2013年6月24日(月)」にある
- 「OLED+XBee」の改訂はとりあえず完成として打ち止めにする
- Sketching2013のScience Fairの場で忘却してデモ出来なかった(^_^;)Propellerの設定は、part2の「2013年7月3日(水)」にあった → MIDIを受けてLEDを個別PWM制御する、という「board_010.spin」
- Macのアーカイブ機能でフォルダごとzip化したものをRaspberry Piにrcpしてunzipすればまとめて転送OK(^_^)
- Sketching2013のScience Fairの場では、Raspberry PiへのVNCとSSHはスタンドアロンLANで出来たが、OSC経由でのPWMデモはエラーで走らなかった。研究室LANのDHCPと切り離してOSCが通るかどうかの確認が必要
- ↑その設定手順はpart2の最後、「2013年7月9日(火)にある
- 機内でお仕事する(MacBookAirのバッテリを長持ちさせる)コツは以下
- CPUが頑張る仕事は避ける(Max6とかレンダリングとか)
- 過去のドキュメントを「読む」「考える」「メモする」仕事を中心にする
- バックライトは最低限にする
- キーボードのバックライトは書くときだけ明るくしてこまめに消す
- ブラインドのショートカットを多用する
- これで数時間のお仕事はOK(いま検証中(^_^))、機内睡眠の必要からこれで十分
- バッテリ残量表示が「50%」まではけっこう頑張るが、40%台になると減り方が速くなる(^_^;)
- 最終のToDoリストはpart3の「2013年7月11日(木)」にある → 改訂
- SEEED社がUSBでない?超小型のWebカメラを出すので買って実験してみる
- 3台のRaspberry PiのOSCグラフィックが遅かったのは、Raspberry PiというよりもVNCでビットマップを転送しているから
- Raspberry PiにOSCを入れてシンセサイザ、というのはSketching2013で発表があった (今市?)
- part3の「2013年7月15日(月)」の最後のところで、Raspberry PiにXBeeを繋いだ実験はまだ途中で未完である(^_^;)。先頭データの「255」と、3台スタック機での動作不良が未解決 → 忘れないうちにやるべし。SUACboard上のXBeeと同一なので共存不可であることに注意 !!
- 「CCRMAが35ドルで販売しているRaspberry PiのSDカードには、PdだけでなくSuperColliderまでインストールされている」 → チェックすべし
- 「Seeed から出しているGROVEブランドで、組み込み用のMP3再生モジュール」 → これはやはりチェックすべし
- 「iPhoneアプリをコントローラとする」ってのをやるかどうか・・・(^_^;)
・・・と書いたが、残念ながら「ももクロ」はお預けとなった。 今は17時過ぎ、成田からセントレアまでの45分のフライト中である。 国内線の乗り継ぎロビーに行って、チャージしつつ空港WiFiに繋いでみると、なるほど今日は火曜日、休講にしていた「サウンドデザイン」の時間にマルチメディア室で課題に挑戦したらしい2回生の多数から(さらに「音楽情報科学」の3回生も)、課題のMaxパッチについて質問/相談/支援要請、というアポが殺到していた(^_^;)。 既に先週のうちにアポを入れた学生には明日も対応するが、急に依頼しても対応されるとは限らないのをアポと言う。 とりあえず、以下のメッセージをテキストエディタで打って、メイルを出してきた学生からのメイルに全てコピペで返信した。
そして、カリフォルニアに比べて圧倒的に「蒸し暑い」日本の空気に閉口しつつ、いつも成田に着くとこのロビーで楽しむハーゲンダッツの抹茶アイスで涼をとった。 どうも積乱雲が出ているとかで、揺れるらしい。 とりあえずバッテリーは62%まで復活したので、揺れて酔わないうちはダウンロードしたニュースでも読むことにした。 これでセントレアからe-wingで浜松西インターに行き、クルマで帰宅するのは順調にいって21時である。 明日は予定満載、いよいよ今週末は前期末のあらえっさっさである。(^_^;)長嶋です。いまサンフランシスコから成田に着いたのですがあと30分で セントレアへのフライトです。同様のメイルが多数届いているのでまとめて コピペで返信します。今週「水→金」の予定は満載でアポ対応不可です。 次のメイルは明日の朝に大学で読みますので再度連絡します。以上
2013年7月29日(月)
前の日記が帰国日の7/23の火曜日だったが、もう1週間がたって、新しい週の月曜日である。 1限から5限まで予定はギッシリ、朝5時に起床して、研究室で朝6時半から仕事開始、通常ペースに戻ってきた。 これまで、まったく「Raspberry Pi」を書き継ぐ時間が取れなかったのであるが、以下は、それでも忘れてはイケナイ、と書き付けていた「7/24から7/27までのメモ」である。 詳細は省略である。(^_^;)そして今日は、1限と3限と4限に計4人の2回生から「サウンドデザイン」のMaxプログラミングの相談アポがあり、2限は「音楽情報科学」の課題プレゼン大会、そして5限はアカペラ補習特訓が待っている。 いよいよ前期最終週の試験期間であり、週末にはオープンキャンパスに突入する、緊張感とワクワク感のある前期末である(^_^)。
- 7月24日(水)
- 7/18に映像作品のサウンドトラック試作品を送り、7/20に改訂版を送っていた柴野さんからメイルが届き「最初のものでいく」と確定
- とりあえず、今回の フォトレポート を完成させて、Webに上げる
- MacBookAirのキートップを研究室のスペアのMacBookAirのキートップと無事に交換して、両方とも完全復活(^_^)
- 出張中にアポのメイルが来ていた学生2人にそれぞれ相談対応、Maxサンプルパッチを作って渡す
- 7月25日(木)
- 学科会議、教授会
- 午前に1人、午後に2人の課題の相談に対応
- さらに計7人のアポを受けて、週末を含めて来週までの予定が満杯となる
- 7月26日(金)
- 2-5限は4回生の「メディア造形総合演習II」の最終合評。 初めて観た 及川作品 は感動モノだった(^_^)
- 1限に学生に対応、さらに3人から相談アポが届いたがもう満杯なので無理と回答
- Sketching2013の Flickerのフォトレポート の情報が届く
- 7月27日(土)
- 7月28日(日)
そしてあと1ヶ月となって、ウイーンで開催される国際会議 ISPS2013 からも、発表者への連絡メイルがぼちぼち届き始めた。 Sketching2013の開催中の7/19に届いたメイルは以下のようなものだった。 国際会議ではいつもの事だが、これが届くと、いよいよと盛り上がってくる。(^_^)
上のメイルが届いた2日後には、今度は研究発表の担当者から「お前の論文は2行ほどオーバーしたので参考文献を2件カットしたがそれでいいか」というメイルが届いた。 あれこれ対応している時間がまったく無かったので、「OK」と即答したが、今回の発表は これ である。Dear ISPS delegate, We very much look forward to welcoming you to Vienna at the end of August. Here are a few important updates on the conference: SCHEDULE The finalised schedule is now available as a downloadable PDF at www.performancescience.org/ISPS2013/Program. A printed copy of the full programme, including abstracts of all presentations, will be available in your delegate pack at registration. VENUE The venue will be the University of Music and Performing Arts Vienna (mdw), located at Anton-von-Webern-Platz 1, 1030 Vienna. A location map is available at www.performancescience.org/ISPS2013/Venue. REGISTRATION The ISPS registration desk will be situated in the Entrance Hall (ground floor) of the mdw. Registration will open at 08:30 on Wednesday, 28 August, and the desk will be open each day of the conference from 08:30 to 18:30. DELEGATE PACK Your delegate pack will contain the following: - delegate badge - conference programme - conference proceedings - tickets for lunches and the conference dinner (if applicable) - list of delegates - city map and information on Vienna MESSAGES AND NOTICE BOARD A message and notice board will be situated near the ISPS registration desk throughout the conference. Any announcements, messages for delegates, and changes to the programme will be posted there. Anyone outside the conference wishing to leave messages ... MEALS AND REFRESHMENTS Refreshments (tea/coffee) and lunch will be available during breaks in the scheduled programme. The conference dinner will be on Friday, 30 August, from 20:00 at the Vienna City Hall (address: Lichtenfelsgasse 2, 1082 Vienna). A leaflet containing directions for travel to the City Hall will be available in your delegate pack and from the ISPS registration desk. INTERNET FACILITIES Wireless internet access will be available for delegates for the duration of the conference. The mdw is part of the eduroam system, a world-wide roaming access service for local wireless internet access, with which you may use your own eduroam account to log in. Alternatively, connect to mdw-guest, open a browser window, and enter... Should you have any questions about the conference, please feel free to email ... With best wishes,
2013年7月31日(水)
あれこれ予定をこなすだけで日々が過ぎて行く(^_^;)。 上記の月曜日(2回生の課題支援でひたすらMaxプログラミングに集中して、5限のアカペラ補習特訓に新入生が来てくれたものの、あまりに疲れてギブアップ、「茶話会」にしてもらった)からもう2日が経過して、水曜日の放課後のアカペラ直前である。 とりあえず、月曜日に「音楽情報科学」の最終合評、火曜日に「サウンドデザイン」の最終合評と「企画立案演習」の最終報告書提出、水曜日に成績評価マークシートを教務室に提出、と無事に済んで、火曜日に高校生向けサイトの取材に応じて、水曜日に修士中間発表のごく一部だけ覗いて、オープンキャンパスの下準備をして、やるべき事をただただこなした3日間であった。Raspberry Piについては、7月11日にあった「ToDo」リストを、既に解決したものを除いた上のリストに改訂した(実はこれは帰国日にやっていた)だけで、他には何も進展ナシである。 このまま週末のオープンキャンパスに突入するので、心の支えは「前夜祭」「打ち上げ」「就活祝勝会」だけである(^_^;)。
- Raspberry PiにXBeeを繋いだ実験はまだ途中で未完(^_^;)
- GPIOポートに外部A/Dコンバータを接続する (ふーみん本)
- Raspberry Piと他システムとでMIDI通信する (ふーみん本)
- オーディオインターフェースを稼働させる (ふーみん本)
- Webカメラを稼働させる (ふーみん本/CQ本)
- PureDataを稼働させる (ふーみん本)
- Raspberry PiにWebサーバを稼働させてCGIを提供する
2013年8月1日(木)
どたばたと過ぎた7月も終わり、8月に突入である。 初旬はオープンキャンパスと「41虎」、月末から2週間の渡欧、といういつもの夏休みであり、ここでの時間的余裕で何かが創れるか、が来年に繋がる重要な時期である。 朝4時半に目覚めると、ハムスターが飼育ケージから脱出して見当たらず、台所でプラ用ゴミ箱に落下してゴソゴソする音で発見された・・・という肝を冷やす事件があったりしたが(^_^;)、いつものように朝6時半からの研究室である。 ここでいくつか、この1週間ほど書く余裕の無かったトピック(広い意味では「Raspberry Pi日記」と同じ文脈のスケッチング/物理コンピューティングに関係すること)を記しておこう。

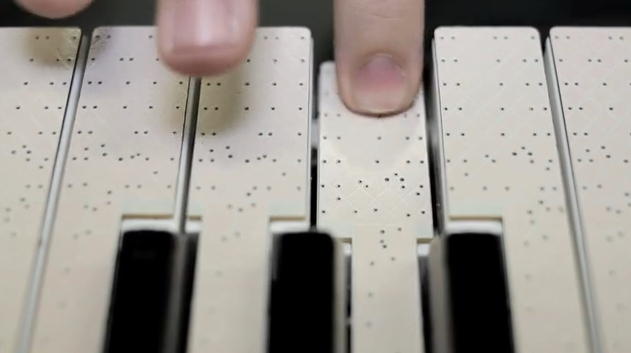
今年は韓国でのNIMEへの参加をパスしたが、NIME関係者のMLで「新しいキーボードをKickStarterで公開した」というニュースが飛び込んできた。 上の写真の これ である。 この TouchKeys であるが、音楽キーボードの白鍵と黒鍵のそれぞれの上に、タッチセンサのシートを全て貼って、その「指触り」の情報をコンピュータに取り込んで、通常の鍵盤演奏に加えて、ビブラートとかベンドとかモジュレーションとかの表現を拡張する、というものである。 まさに、NIME(New Interface for Musical Expression)そのものの王道の研究であり、 この動画 はうまくそのメリットをアピールしている(^_^)。 ただし、30000ポンドの到達目標に対してまだ7000ポンドであり、出足が遅い。 やはり「新楽器」というのは一般性は無いのかなぁ。 これを駆使するには、まず普通のキーボード演奏者として十分なレベルが必要なので、予測としては、到達しないような気がする。
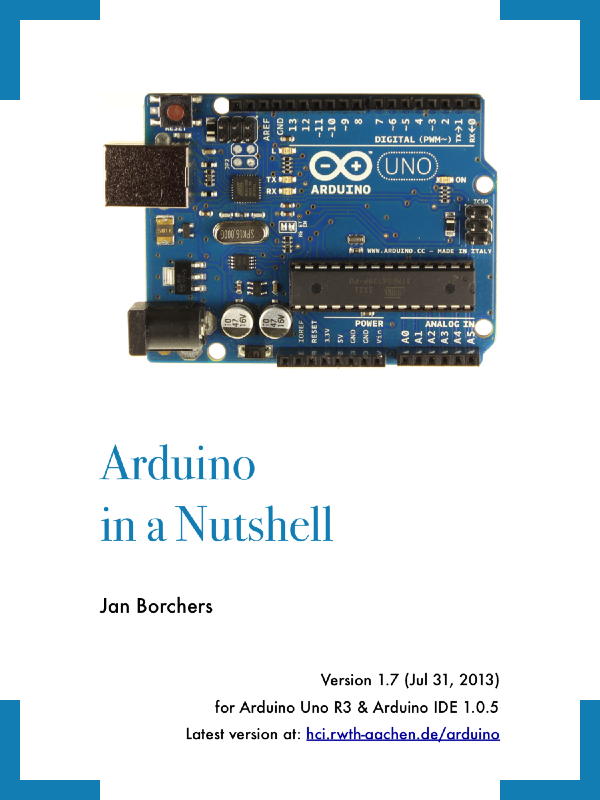
そしてSketching関係者のMLでは、UCSDのJan Borchersが、こんなフリーのArduinoテキストを作ったよ、という案内が届いた。 PDFでコンパクトにまとまった ここ にある これ である。 UCSDでは、これをテキストに、コンピュータサイエンスの学生に対して、以下のメニューで5時間のワークショップによってArduinoをマスターさせているという。 これは面白い。まだテーマが決まっていない「41虎」に提案してみたい。 必要最小限のことがコンパクトに書かれているので、英語の勉強も兼ねて、メンバーそれぞれがスタンドアロンの「何か」を新しく生み出す、というプロジェクトの題材としては格好の材料である。
Time Topic Book Chapter 1000 Warmup, welcome 1015 Lab overview 1030 Intro, use in research 1 1040 Installation 1050 Blink 2 1100 9v battery 3 1110 LED 4 1120 Resistor, breadboard 5 1140 Button 6 1200 Lunch 1300 Pullups 7 1310 Force sensor 8 1330 Serial 9 1350 PWM 10 1410 Servos 11 1430 Shields 12 1450 Next steps 13 1500 Wrap up, official end 1510 Open Dorkbot-style show and tell 1700 End 7月28日(日)のところで、「業者に これ を発注」と書いていたが、こちらはまだ届いていない。 ただしDigi-Keyなど海外からの調達でなく、既に在庫があったとのことなので、やはり、Raspberry Piからbeaglebone blackの方向に 進んでいる国内の研究者もいるのだろう。 そして同じ日に発注していたブツが、昨日、届いていたので、さっそく開けてみる事にした。 まずは、久しぶりに1106の風景であるが、ちょっと怪しさが出て来ている(^_^;)。

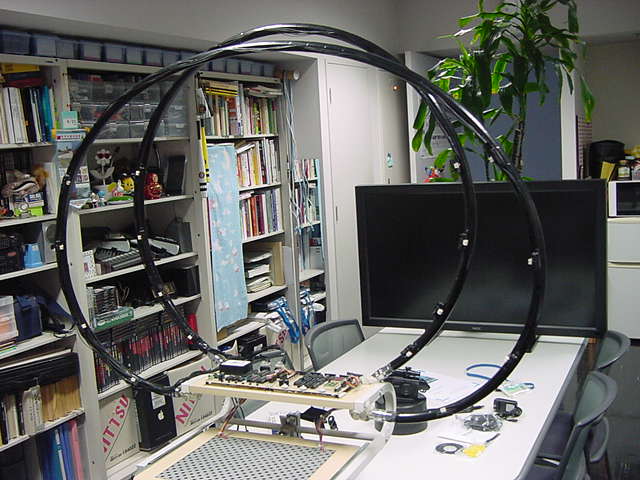

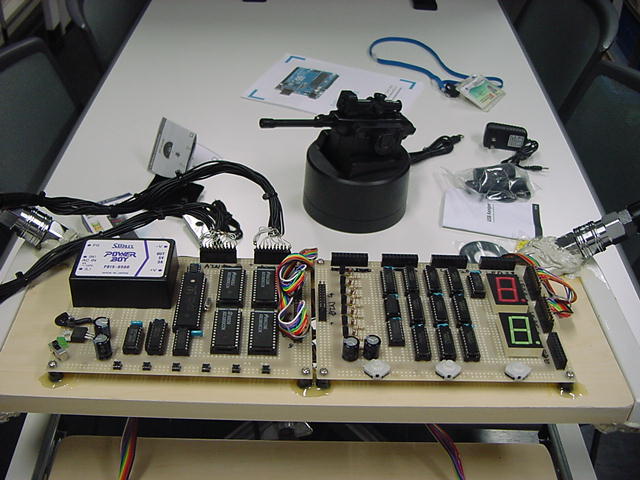


ダブルリングの新楽器(制作 : 2009年)は、本格的修理に時間がかかるので今年は展示を断念した「風見屏風」に代わって、オープンキャンパスで展示することにしたものである。 そして机上の砲台がなんともソソラレル(^_^;)が、まずは小さなモバイルWiFi-LANルータからである。 つまりはAirMacのペースステーションのようなものであり、LANに接続してWiFiで飛ばす、というものだが、なんと「上海問屋」ではこれが1000円台だったので、砲台(こちらがメイン)のついでに購入したのである。
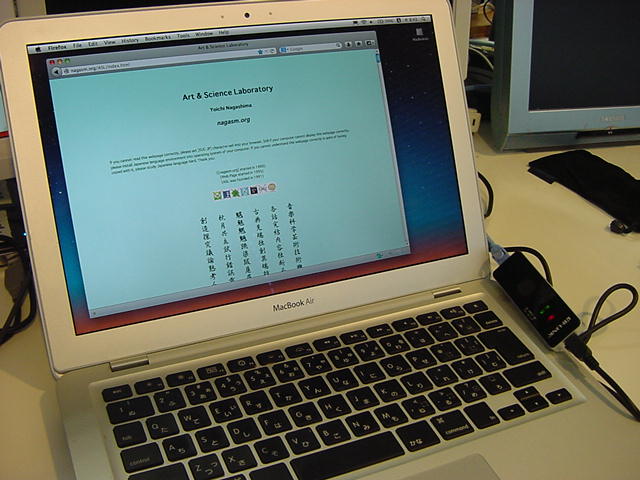
そして10分もしないうちに、上のように無事に稼働した。 設定は「パスワード無しの素通しDHCP」というもので(^_^;)、考えてみればこれを使うケースは、研究室や講義室など学内(SUACネットのファイアウォールの内側)と、出張中のホテル等の室内(他の部屋にも全て素通しのLANが来ている)だけで、別にこのWiFiルータを盗聴・悪用される事を想定されないケースに限るので、これでいいのだ。
ただしこのルータをRaspberry Piに繋げば、Raspberry Piをサーバとして外部からWiFiで繋ぐ、という、つまりはSketching2013で見た このロボット のような使い方への発展が見込めることになる。 この中国製のWiFiルータが、Raspberry Piのライブラリとして対応されているかは甚だ心もとないが(^_^;)、可能性としては面白い。

その後、昼前の1時間ほど悪戦苦闘して、「砲台」の結果は、上の写真にあるように このような悲しいこと になってしまった。 まぁ、Macは10数台ある1106研究室にWindowsパソコンはたった5台(Windows95とWindows98が各1台、あと3台がXP)ということで、超古いものなので動作が付いていかない、という可能性もあるが、CDROMのインストーラ自体にバグがあって複数メソッドが必ず起動しては警告される(^_^;)という代物なので、これは諦めるしかない。 USB接続のWebカメラで照準を合わせて、モータを制御してBB弾を発射する、というのはとても面白いのだが、起動すらしてくれないのでは、分解して解析することも出来ない。 久しぶりに「安物買いの銭失い」をやってもーた。(^_^;)
そして3限はゼミで、いよいよ後期から正式に長嶋ゼミとなる土佐谷さんと森川さん、M1のリュ君とで夏休み前の情報交換ミーティングを行った。 それぞれ、テーマと目標を高く掲げて成長して欲しいと思う。
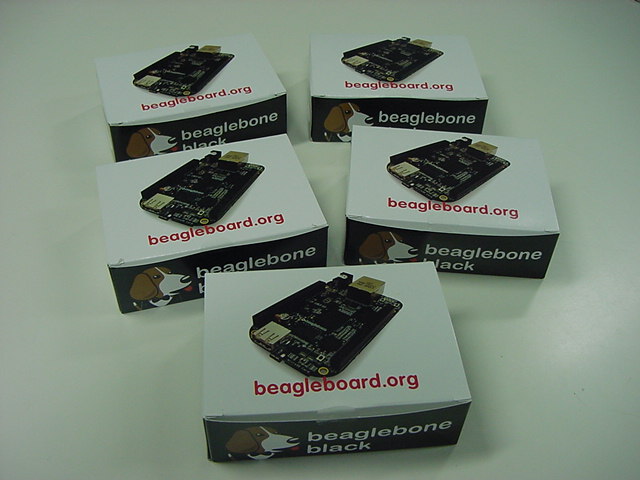

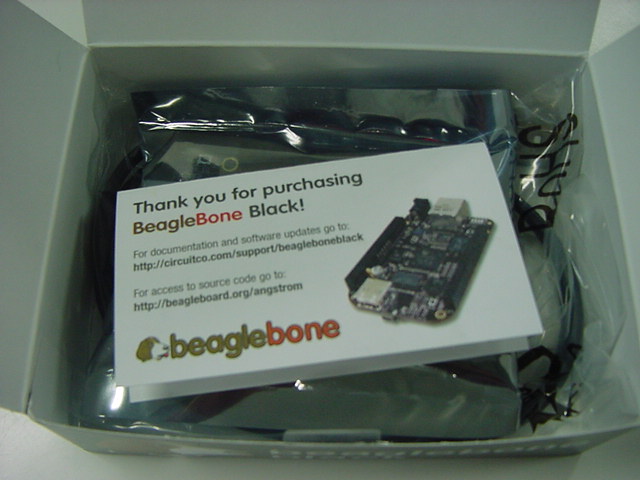

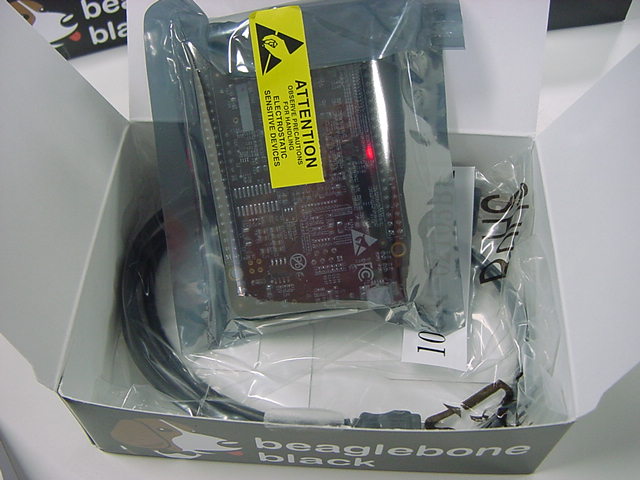
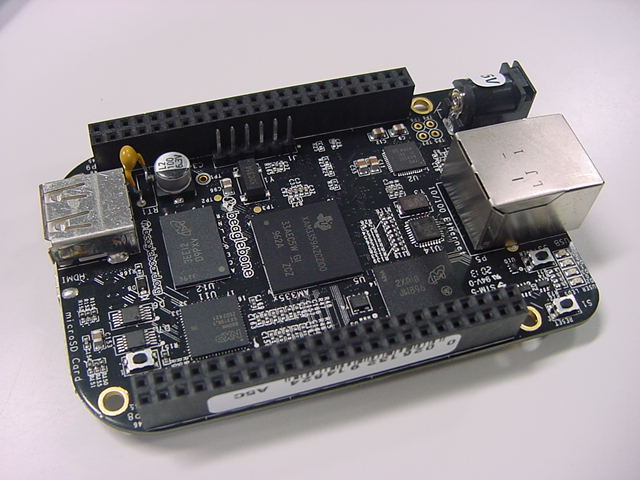
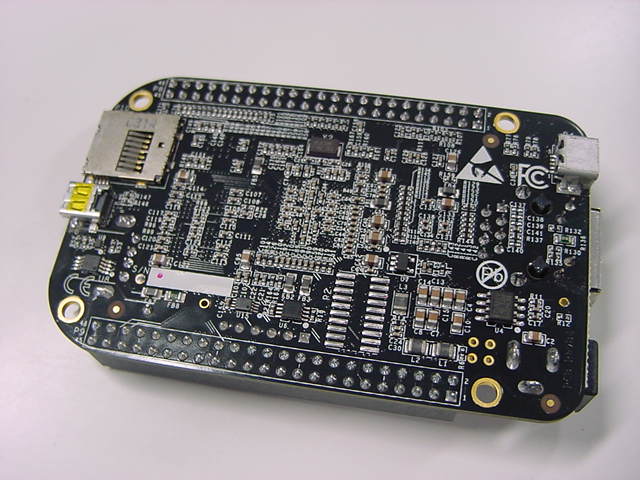

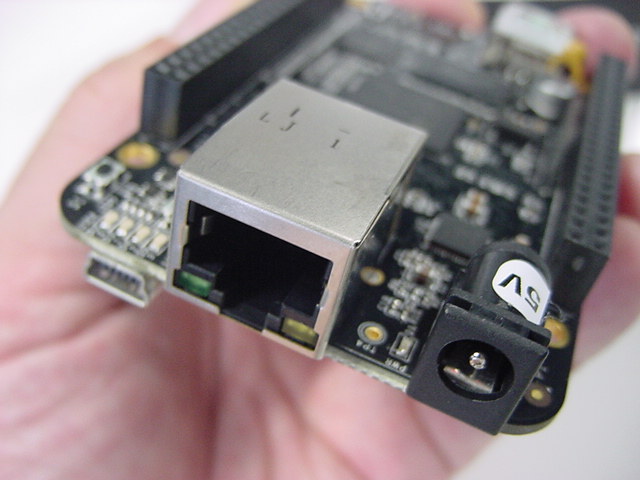
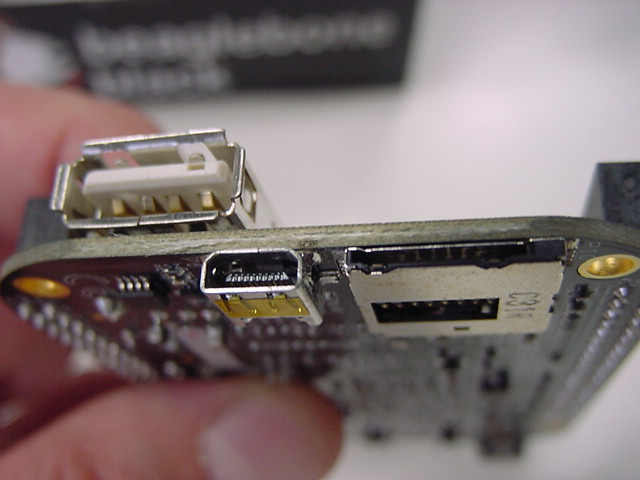
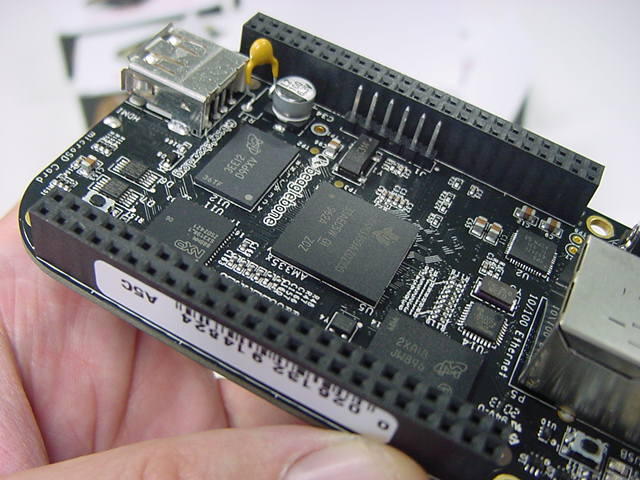
5限に41虎が集まる、というアポが確定した15時あたりには、なんと上のように、遂にbeaglebone blackが納品されてしまった。 なかなかに可愛いが、これはRaspberry Piの時と同じように、また最初から取り組まないといけないので、かなり根性が必要である。 まだドキュメントもまったく集めていない。 Raspberry Piが未消化なのにさらに発展系に取り組む、というのは、吉と出るか凶と出るか微妙である。 とりあえず今週末のオープンキャンパスを乗り越えつつ、どういう作戦で行くか、合間に考えていくことにしよう。
2013年8月7日(水)
上の日記からもう1週間である。 8月2日(金)はオープンキャンパスの設置日で40虎とインスタレーション等の設置をした後で前夜祭、あと総合演習で感動した 木ノ内作品 を受け取ってWebに上げた。 8月3日(土)は オープンキャンパス1日目、 8月4日(日)は オープンキャンパス2日目 と打ち上げがあり、昼間の合間にはインスタレーション作品の記録を ここに追記 した。 8月5日(月)は またまたドラえもん が再開し、 8月6日(火)は学科会議があり、晩にはおいちゃんまめちゃんの就活祝勝会ということでビアガーデンとジャズBarを堪能した。 そして今日、8月7日(水)は「41虎」の初日で、4人の新入生が1106に集まって、あれこれと実験と作戦会議を進めた。 1106にあってこれまで眠っていた「接写(顕微鏡)カメラ」「初音ミク」などがどんどん開拓されていった。 今回の41虎はどうも、学生が主体的にテーマを探って映像作品系の方向に進んでいきそうなので、僕は機材とか場所とかの手伝いに徹して、その裏では自分のお仕事を進められるというパターンになりそうである。BeagleBone Blackについては、 ここ とか ここ を眺めた限りでは、Raspberry Piとの互換性はCPUのバージョンの違いから期待できず、新たに二股に分かれていきそうである。 まだRaspberry Piを食い尽くしていないので、ヘタに深入りするのはちょっと待つべき、という気がしてきた。 Raspberry PiのToDoリストの最新版は7月31日のところにあるが、やはりSketching2013という直近の目標が終わってしまうと、6月から7月まで疾走したような入れ込み感が薄れているのも事実である(^_^;)。 いろいろ、秋とか来年に向けての構想も始まっていて、実際に手を動かす(没頭する)ところに踏み出さずにいる日々だが、どこかでグッと加速すると信じよう。
2013年8月8日(木)
前日は「立秋」だというのに、日本中に猛暑日宣言の出た暑い日である。 とりあえず、昨日の「41虎」を このように 上げてみた。 初音ミクの歌声をWAVにエクスポートしたデータが頭切れになっていたのはご愛嬌である(^_^;)。 また、学生がやってくる前に、顕微鏡スコープのホストPCを、Windows98ノートからDELLのWindowsXPノートに切り換えておいた。 なんせWindows98だと、最近のUSBメモリを挿しても認識せず、いちいちイーサネットを挿してFTPしないといけないのである。

そして上のように、アルスエレクトロニカから今年のフェスティバルに関するニュースが届いた。 いつものようにアレ系のいかにもな画像(^_^;)であるが、「生命を合成する」という、なかなかエキセントリックなテーマである。 今年の欧州ツアーの最後にはアルスエレクトロニカにも行くので、ここも要チェックである。
Raspberry Piはバッテリで動かすには電力食いなので、去年の欧州ツアーの時のPropeller OLEDモジュールのように、持参してあちこちでプログラミング、というのには適しない。 一昨年のイギリスのように、またまた久しぶりにProcessingとSuperColliderの残りのお勉強を発掘する、というのは最後の手として残っている。 あとは、せっかくインストールしたもののまだ全然触っていないPureDataである。 しかしMax歴が20年を越える身としては、ここでMaxと枝分かれしたPdにあまり深入りする気になかなかなれない、というのがネックである。 Raspberry PiではPdだけが動く、というのが唯一のモチベーションなのである。
明日の午後には「しゃみーず」が撮影スタジオで記録ビデオを撮影するのを41虎と手伝う、という予定があるが、今日は41虎だけで何もなく、41虎は学生たちが自主的に進める方向性が見えてきたので、ここはマル1日、Sketching2013以降ノータッチだったRaspberry Piと久しぶりにじっくり取り組んで、モバイルWiFiルータも活用して、あれこれ「apt-get」するチャンスである。
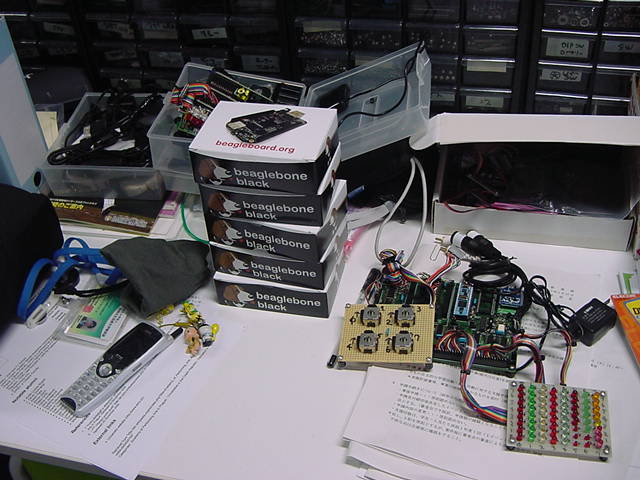
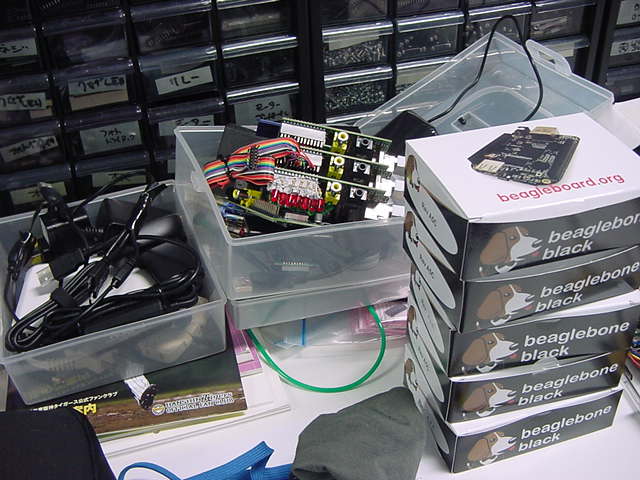
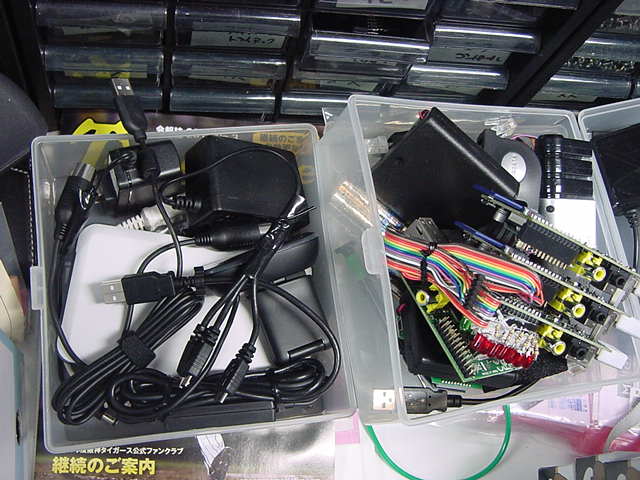
まずは上のように、机に積み上げたままだったRaspberry Piを取り出して、以下のように最後の実験のXBee-WiFi通信のセットアップに並べてみた。 これを見ても何もピンと来ないのが、やや不安である(^_^;)。
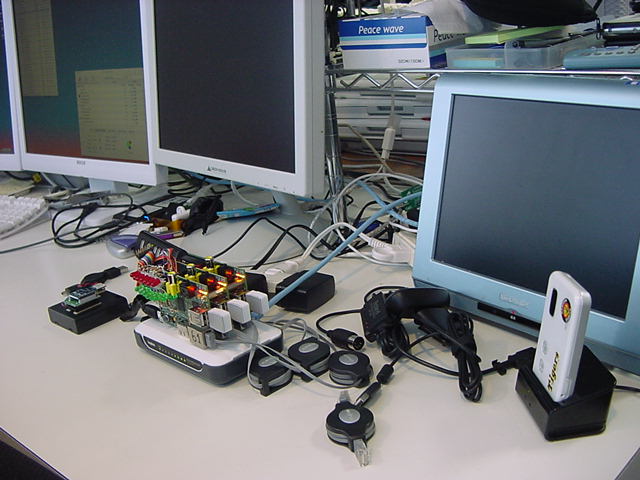
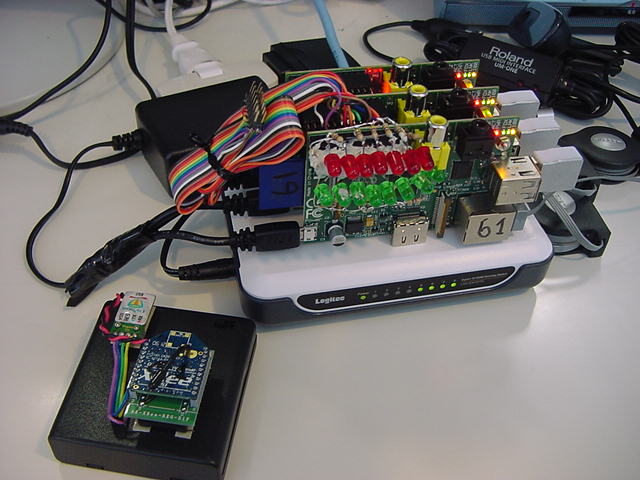
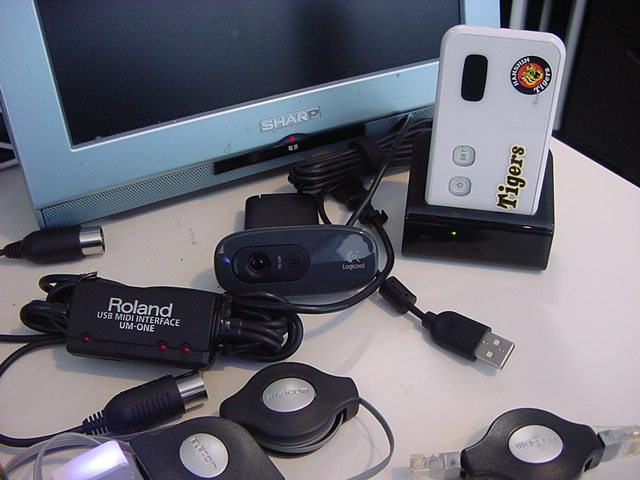
途中で止まっていたのは「2013年7月15日(月)」のところだったのを日記を読み返して確認して、メインMacのデスクトップに実験中だった 「RaspberryPi_XBee_01.maxpat」と「test.py」 がある事を確認して、Raspberry Piの63号機にsshして「python ./test.py」を実行してみると、無事にMaxパッチのMaxウインドウに、「先頭に255」「その後の5文字が"hello"」という受信データが表示された。 これで、宿題だったハード障害の可能性は否定されて、ソフトから引き続きやっていける、と確認できた(^_^)。
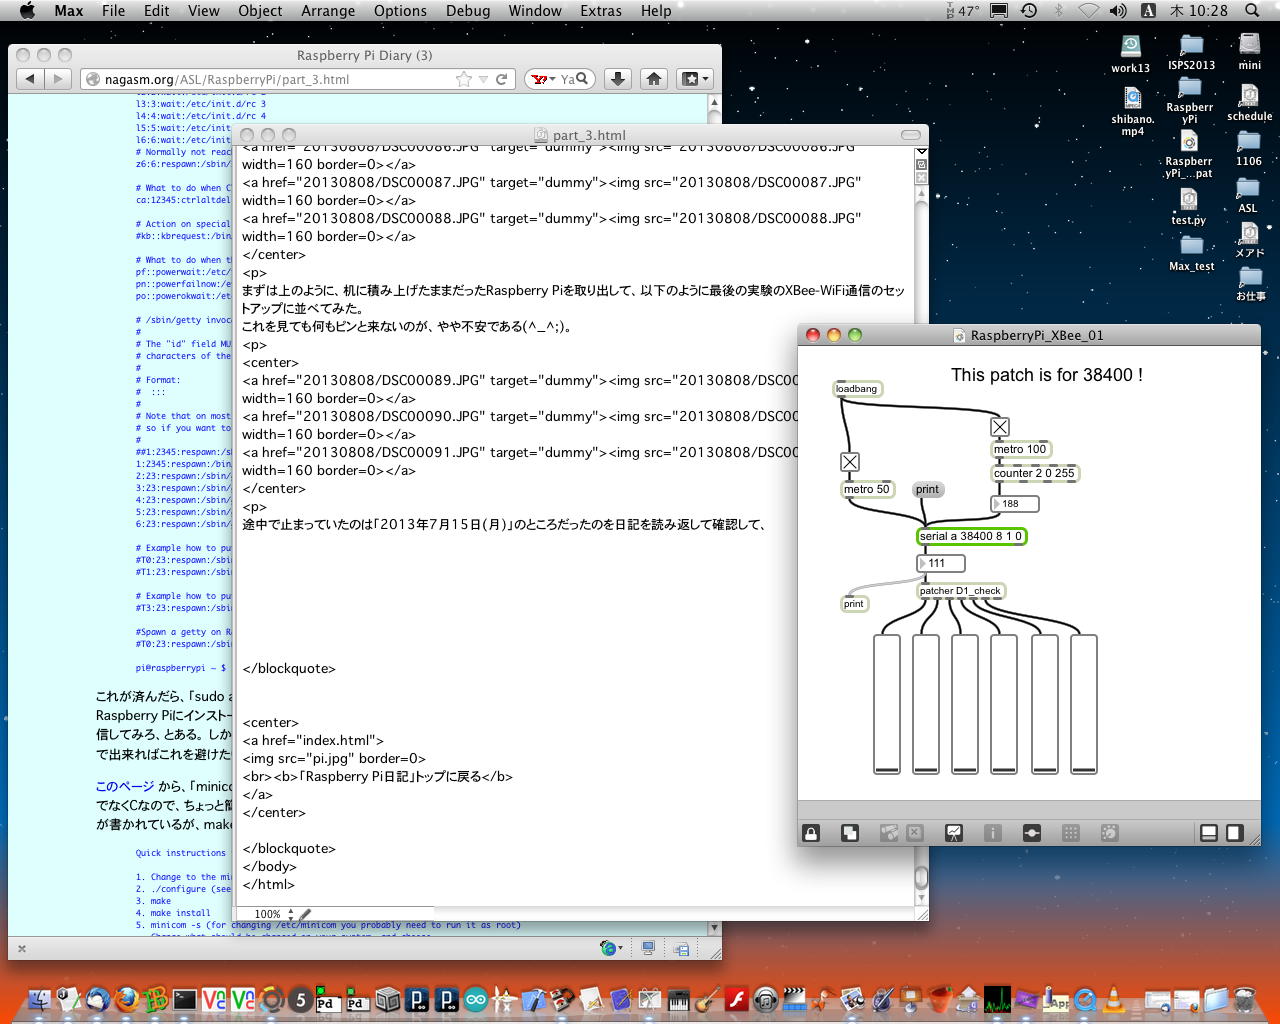
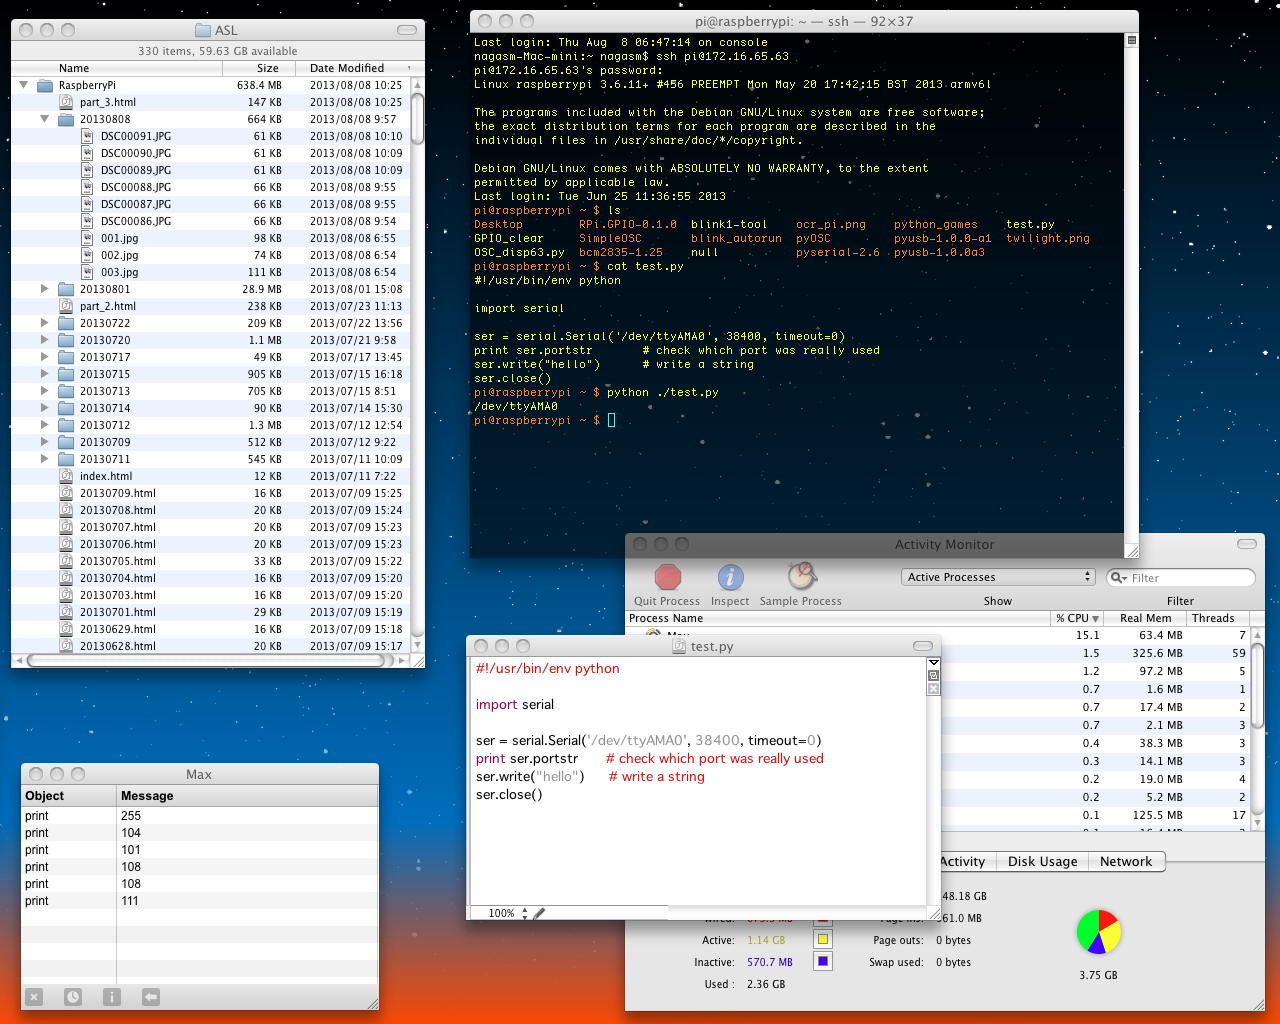
この状態では、MaxのパッチはずっとXBeeのシリアルポートを叩いてモニタ(ポーリング)しているのに対して、Raspberry PiのPythonプログラムは1メッセージを送ったらもうオシマイになっている。 やはり、リアルタイムに双方向通信するシステムを構築しておきたいので、Maxから刻々とバリューを送って、それをRaspberry Piが返すのをMaxで確認する、という事になるだろう。 この実験に使っていたMaxパッチ「RaspberryPi_XBee_01.maxpat」の以下のサブパッチは、Propeller-OLEDで定義したプロトコルのためのもので、実はまだここでは稼働しておらず、Maxウインドウにはシリアル入力がそのままモニタされている。 つまり、MaxとRaspberry Piの両方から、このプロトコルを改めて定義する必要もある。
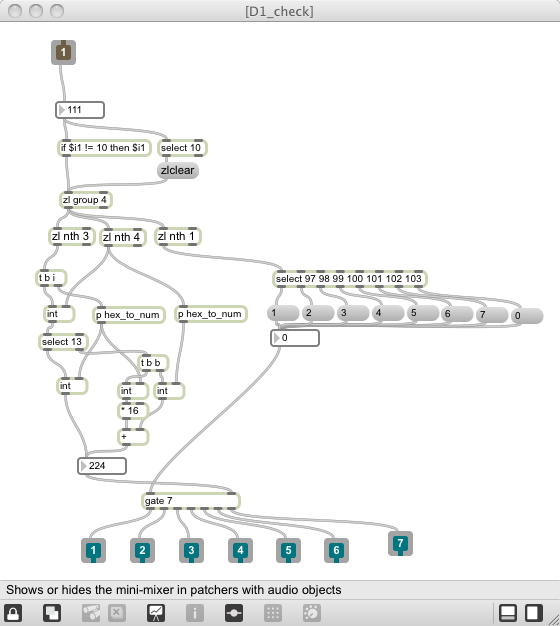
そしてMax側の「RaspberryPi_XBee_01.maxpat」を「RaspberryPi_XBee_02.maxpat」にリネームして、Raspberry PiのPythonプログラム「test.py」を、 このページ を参考にして、シリアル送信だけでなくシリアル受信も絡める、という実験をしてみて判明したのは、Raspberry PiはUnixであり、Pythonプログラムの「シリアル受信」のメソッドの部分で実際のシリアルデータを受信しているのでは無い、という事実だった。 Pythonプログラムで「while 1」などでシリアル受信をループさせる、というのは駄目なのである。
リハビリとは言え、ここまで判明するのに3時間ほどかかった(^_^;)が、Raspberry Piが外部からの情報を受けるのはイベントドリブンの記述が必須ということであり、そうなればこれはもう、「2013年7月12日(金)」のところでやったOSC経由、ということになる。 そこで作戦としては、 OSC通信の完成プログラム をベースにして、ここにXBeeのシリアル通信を加える、ということにした。
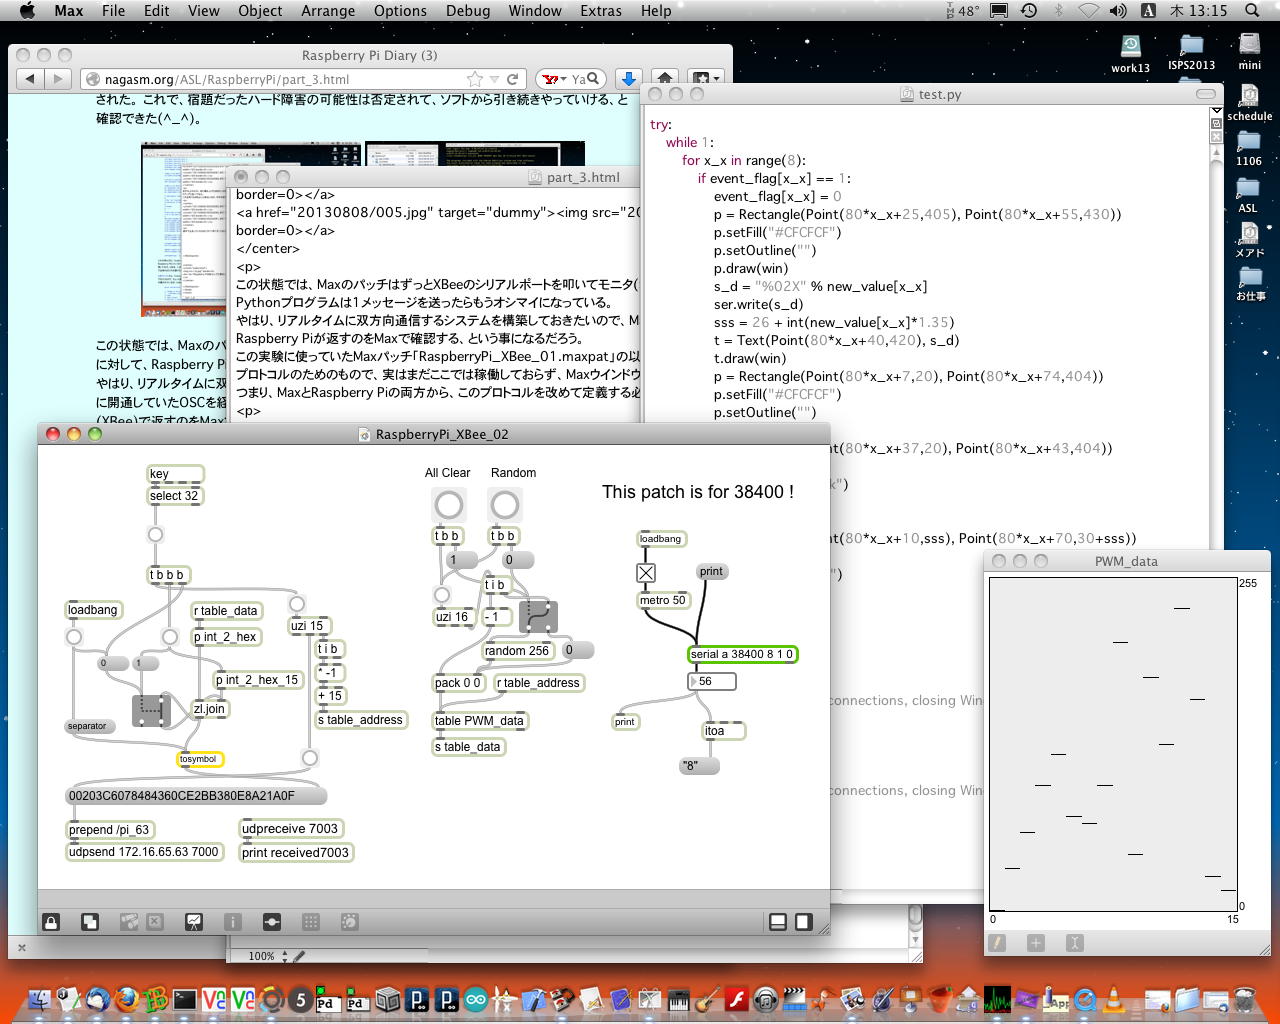
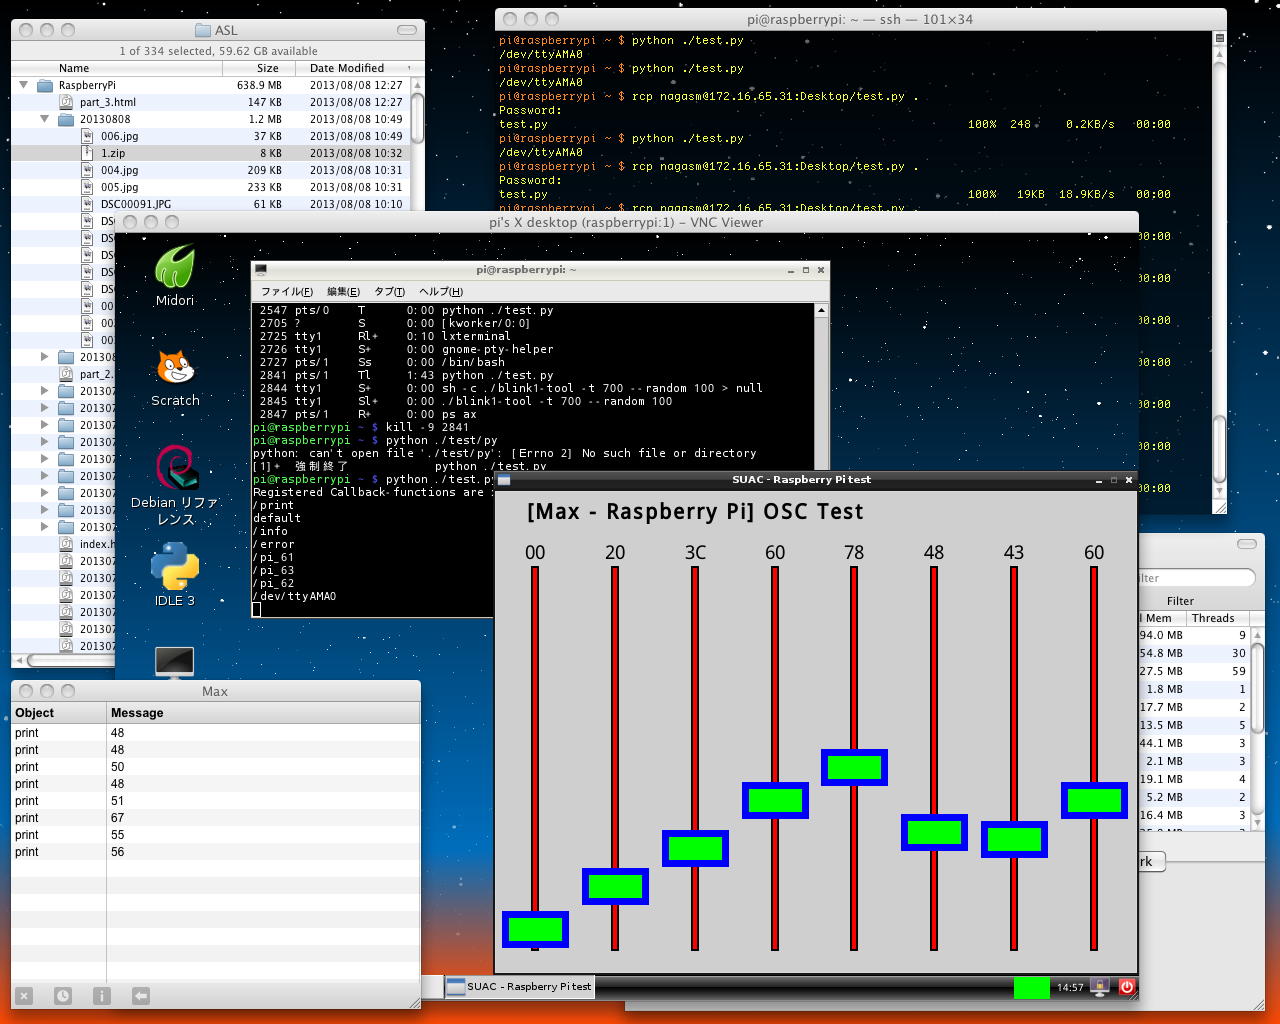
・・・そして1時間ちょっとで、上のように、「MacからOSCでRaspberry Piに情報伝送」→「Raspberry Piはグラフィカルにその値を表示」→「Raspberry Piは変化のあったデータを16進数としてXBeeからMaxに送信」というルートが無事に確立した。 詳しいフォーマットの整形は、Pythonの書式関係を忘却していたので省略であるが(^_^;)、これで双方向のインターフェースが開通、という意味では、一定の進展である。 ソースコードは「2013年7月12日(金)」とほとんど同じなのでここには再録しないが、 「RaspberryPi_XBee_02.maxpat」と「test.py」 である。
今日の「41虎」は このように 進んだこともあり、まずまずの進展となった。
2013年8月9日(金)
世間ではぼちぼち「お盆」である。 「しゃみーず」の撮影は8/15に延期となり、41虎の4人は「瞑想空間」で撮影の実験をしていて僕は1106にただ一人、まさにRaspberry Pi日和である。 ふーみん本の懸案のうち、どうも「Raspberry PiでWebカメラ」のパートはそこそこコンパクトに完結しているようなので、今日はここからやってみよう。 3段重ねのRaspberry Pi61/62/63号機にはBlink(1)も挿さっていて、500mAも必要なWebカメラとの共存は電源が苦しいので、ここは61/62/63号機のSDカードをそれぞれ抜いて、単体のRaspberry Piで動作させつつインストールする事にした。 現在のSDカードイメージは「0712_IP61.img」・「0712_IP62.img」・「0712_IP63.img」という3本であるが、これは16GBのSDカードにまとめてバックアップしてあるので、万一、何かトラブっても戻って来ることが出来る。この段取りの記録の場所は、Sketching2013から帰国のフライト中に過去記録を整理した「2013年7月23日(火)」のメモには無かった(^_^;)が、遠い記憶を探って「2013年6月1日(土)」と思い出した。 「apt-get」ということはモバイルWiFiルータを使うので、まずはLANからsshして固定IPをDHCPに書き換えて、あとは例の使いにくいキーボードとディスプレイを繋いで・・・という事になる。 そして、これも同じ「2013年6月1日(土)」に書かれているのを無事に思い出した。 また、「apt-get」に関する「sudo apt-get clean」・「sudo apt-get update」・「sudo apt-get upgrade」というおまじないも、「2013年5月31日(金)」にちゃんと書かれていた。
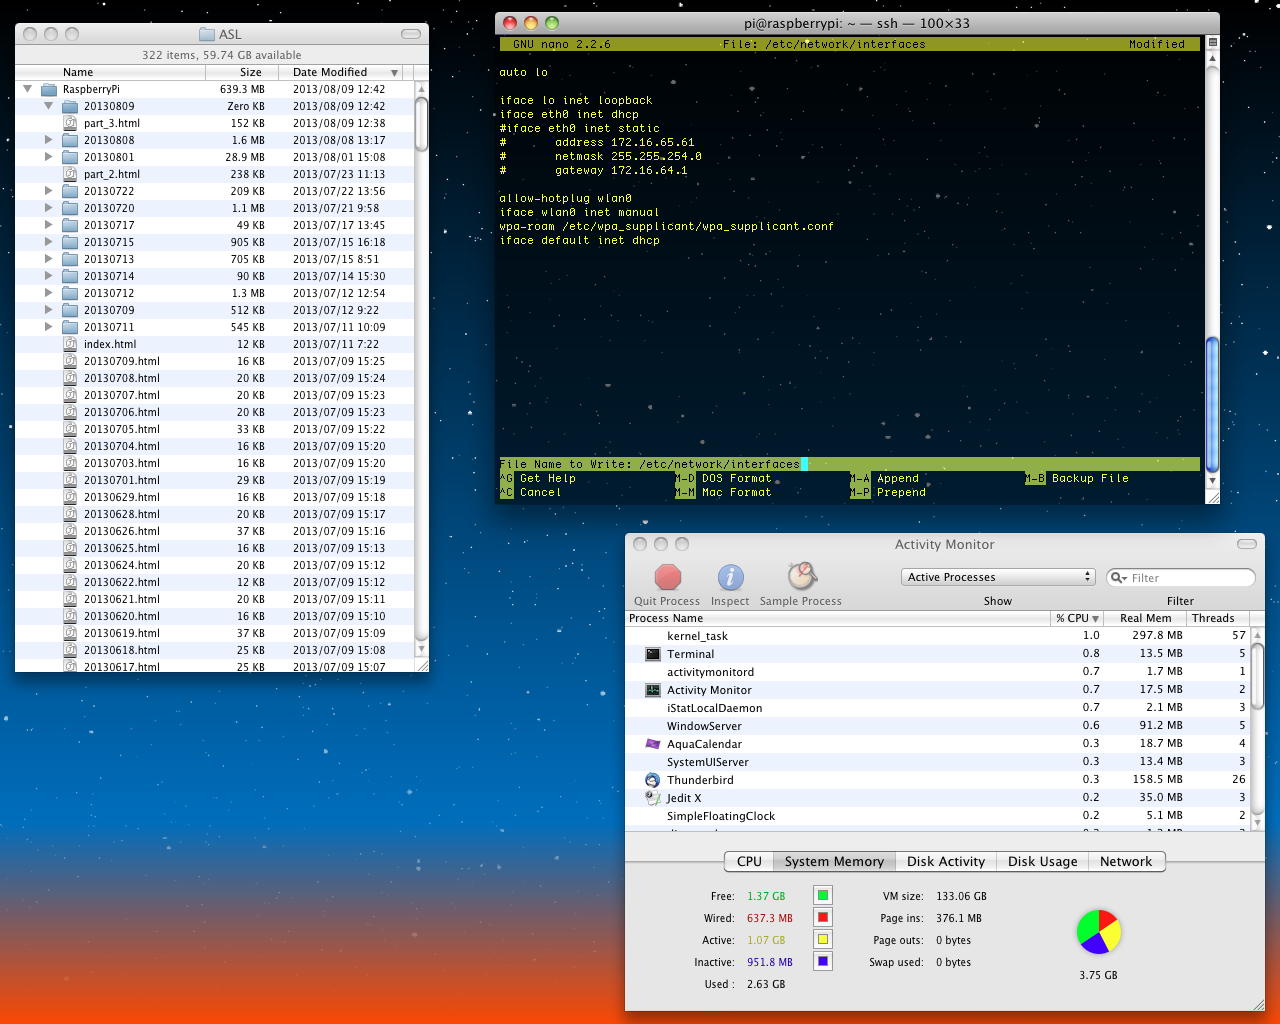
そこでまず、単体のRaspberry Piに61号機のSDカードを入れて、上のように研究室LANに繋いで立ち上げ、Macからsshして「sudo nano /etc/network/interfaces」で、固定IPをコメントアウトしてDHCPに設定変更し、保存して「sudo halt」した。 その後、モバイルWiFiルータを起動して、MacBookAirを接続してSUACネット(プロキシ)でなく直接のネット接続を指定すると、お約束の「1day = 600円」の契約画面が出て、クレジット支払いをOKとして無事に稼働したのを確認すると、今度は以下のように、Raspberry Piにモニタとキーボードとマウスを繋ぎ、LANをモバイルWiFiルータのクレードルに接続して立ち上げた。 Webカメラの電流が500mAということで、ACアダプタタイプのUSBハブを経由してキーボードとマウスとWebカメラを繋ぐと、まだソフトウェアはインストールしていないものの、ドライパはちゃんとこのロジテックのC270というWebカメラを「Devic 010」として認識してくれた(^_^)。
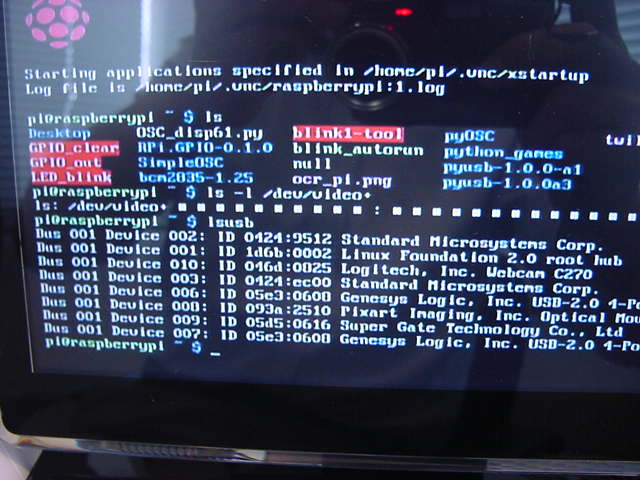
そしてここからは、いよいよインターネットと繋がったRaspberry Piが頑張るところである。 過去の教訓から、まずは「sudo apt-get update」としてみると、以下のようにズラズラズラズラ・・・と延々とアップデートされた。1ヶ月の間にこんなに色々とアップデートされているというのは、まさにRaspberry Piが世界中で活用されている証しである。 その後、さらに「sudo apt-get upgrade」した後で、残されていたものとして、「suso apt-get install motion」・「suso apt-get install i2c-tools」・「suso apt-get install nodejs」という3つのパッケージをインストールして、最後に再び「sudo apt-get update」・「sudo apt-get upgrade」で全て最新となってエラーが無い事を確認した。
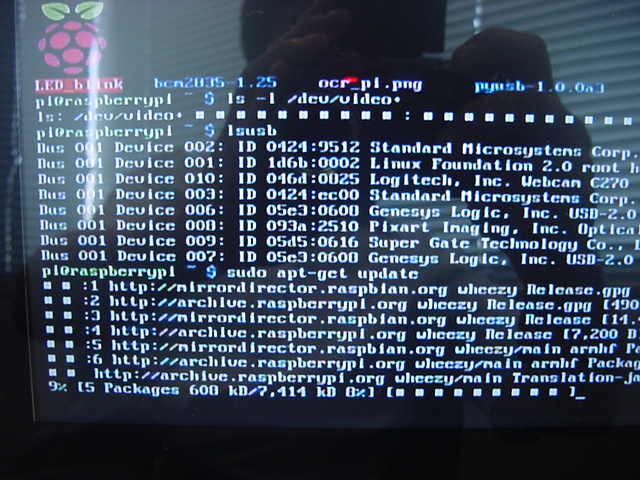
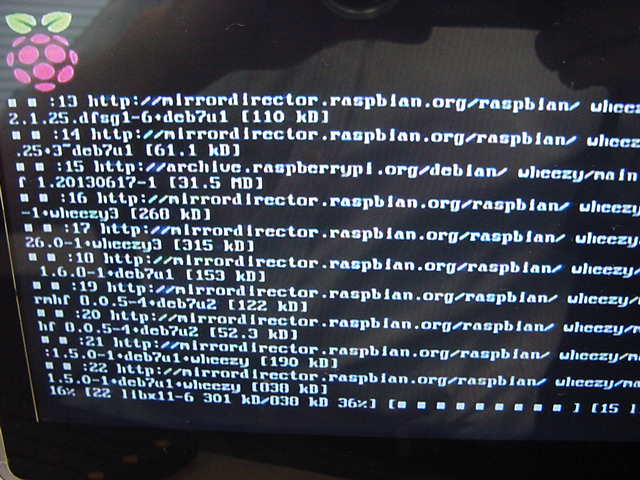
当初は、この作業を、どうせモバイルWiFiルータが1日料金で使い放題なので残りの62号機・63号機のSDカードでもやろうと思っていたが、あまりに膨大に改訂されるのを見て、方針を変更した。 61号機・62号機・63号機のSDカードに書かれている内容の違いは、それぞれの固定IPアドレス以外では、ログインユーザ「pi」のカレントディレクトリに置かれている、これまで作った実験用プログラム程度なので、もし必要があれば、今回の新しいSDカードを62号機・63号機用にコピーして、その差分の部分だけzipにまとめてコピーした方が、ずっと簡単なのだ。 そこで以下のように、61号機のSDカードだけにする事にして、研究室LANに戻してRaspberry Piを立ち上げた。
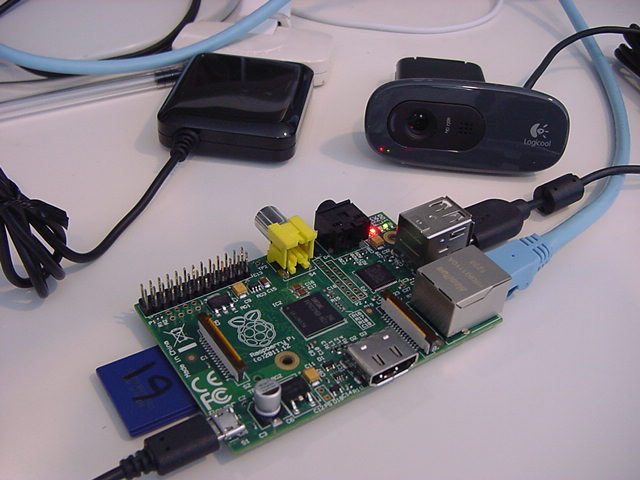
ここから改めて、ふーみん本の記述に従っていく。 Webカメラがビデオデバイスとして認識されている様子は以下である。
接続の様子とデバイス番号は以下である。pi@raspberrypi ~ $ ls -l /dev/video* crw-rw---T+ 1 root video 81, 0 1月 1 1970 /dev/video0 pi@raspberrypi ~ $Webカメラの詳しい情報は、以下のようにデバイス番号を添えて「lsusb -v -s 004 | less」とすると表示された。pi@raspberrypi ~ $ lsusb Bus 001 Device 002: ID 0424:9512 Standard Microsystems Corp. Bus 001 Device 001: ID 1d6b:0002 Linux Foundation 2.0 root hub Bus 001 Device 003: ID 0424:ec00 Standard Microsystems Corp. Bus 001 Device 004: ID 046d:0825 Logitech, Inc. Webcam C270 pi@raspberrypi ~ $さて、いよいよビデオ・ストリーミングと動体検知を行う「motion」であるが、ふーみん本に書かれているように、これはいきなり起動してはイケナイ(^_^;)。 defaultのまま起動すると、画像に変化があるたびに静止画ファイルをどんどん撮影して溜め込んでしまうらしい。 とりあえず最初に起動する前に変更すぺきらしい項目は、以下の4つである。pi@raspberrypi ~ $ lsusb -v -s 004 | less Bus 001 Device 004: ID 046d:0825 Logitech, Inc. Webcam C270 Device Descriptor: bLength 18 bDescriptorType 1 bcdUSB 2.00 bDeviceClass 239 Miscellaneous Device bDeviceSubClass 2 ? bDeviceProtocol 1 Interface Association bMaxPacketSize0 64 idVendor 0x046d Logitech, Inc. idProduct 0x0825 Webcam C270 bcdDevice 0.10 iManufacturer 0 iProduct 0 iSerial 2 bNumConfigurations 1 Configuration Descriptor: bLength 9 bDescriptorType 2 wTotalLength 2469 bNumInterfaces 4 bConfigurationValue 1 iConfiguration 0 bmAttributes 0x80 (Bus Powered) MaxPower 500mA Interface Association: bLength 8 bDescriptorType 11 bFirstInterface 0 bInterfaceCount 2 bFunctionClass 14 Video bFunctionSubClass 3 Video Interface Collection pi@raspberrypi ~ $そこで「sudo nano /etc/motion/motion.conf」として、以下のように膨大なmotion.confを改訂した。 apacheサーバのhttpd.confを何度もいじっているのでさして驚かないが、たかがWebカメラの設定だけで、これだけの知的努力が集積される、というオープンソースの気高さに圧倒される。
- daemon on
- ffmpeg_cap_new off
- output_normal off
- webcam_localhost off
デフォルトでデーモンモードをONにしたが、ここでの起動はノンデーモンモードなので、「sudo motion -n」である。 さすがに色々と起動しているが、以下のいちばん最後の「Started stream webcam server in port 8081」で、ポート8081でのストリーミングが始まった事がわかる。pi@raspberrypi ~ $ sudo cat /etc/motion/motion.conf # Rename this distribution example file to motion.conf # # This config file was generated by motion 3.2.12 ############################################################ # Daemon ############################################################ # Start in daemon (background) mode and release terminal (default: off) daemon on # File to store the process ID, also called pid file. (default: not defined) process_id_file /var/run/motion/motion.pid ############################################################ # Basic Setup Mode ############################################################ # Start in Setup-Mode, daemon disabled. (default: off) setup_mode off ########################################################### # Capture device options ############################################################ # Videodevice to be used for capturing (default /dev/video0) # for FreeBSD default is /dev/bktr0 videodevice /dev/video0 # v4l2_palette allows to choose preferable palette to be use by motion # to capture from those supported by your videodevice. (default: 8) # E.g. if your videodevice supports both V4L2_PIX_FMT_SBGGR8 and # V4L2_PIX_FMT_MJPEG then motion will by default use V4L2_PIX_FMT_MJPEG. # Setting v4l2_palette to 1 forces motion to use V4L2_PIX_FMT_SBGGR8 # instead. # # Values : # V4L2_PIX_FMT_SN9C10X : 0 'S910' # V4L2_PIX_FMT_SBGGR8 : 1 'BA81' # V4L2_PIX_FMT_MJPEG : 2 'MJPEG' # V4L2_PIX_FMT_JPEG : 3 'JPEG' # V4L2_PIX_FMT_RGB24 : 4 'RGB3' # V4L2_PIX_FMT_UYVY : 5 'UYVY' # V4L2_PIX_FMT_YUYV : 6 'YUYV' # V4L2_PIX_FMT_YUV422P : 7 '422P' # V4L2_PIX_FMT_YUV420 : 8 'YU12' v4l2_palette 8 # Tuner device to be used for capturing using tuner as source (default /dev/tuner0) # This is ONLY used for FreeBSD. Leave it commented out for Linux ; tunerdevice /dev/tuner0 # The video input to be used (default: 8) # Should normally be set to 0 or 1 for video/TV cards, and 8 for USB cameras input 8 # The video norm to use (only for video capture and TV tuner cards) # Values: 0 (PAL), 1 (NTSC), 2 (SECAM), 3 (PAL NC no colour). Default: 0 (PAL) norm 0 # The frequency to set the tuner to (kHz) (only for TV tuner cards) (default: 0) frequency 0 # Rotate image this number of degrees. The rotation affects all saved images as # well as mpeg movies. Valid values: 0 (default = no rotation), 90, 180 and 270. rotate 0 # Image width (pixels). Valid range: Camera dependent, default: 352 width 320 # Image height (pixels). Valid range: Camera dependent, default: 288 height 240 # Maximum number of frames to be captured per second. # Valid range: 2-100. Default: 100 (almost no limit). framerate 2 # Minimum time in seconds between capturing picture frames from the camera. # Default: 0 = disabled - the capture rate is given by the camera framerate. # This option is used when you want to capture images at a rate lower than 2 per second. minimum_frame_time 0 # URL to use if you are using a network camera, size will be autodetected (incl http:// ftp:// or file:///) # Must be a URL that returns single jpeg pictures or a raw mjpeg stream. Default: Not defined ; netcam_url value # Username and password for network camera (only if required). Default: not defined # Syntax is user:password ; netcam_userpass value # The setting for keep-alive of network socket, should improve performance on compatible net cameras. # 1.0: The historical implementation using HTTP/1.0, closing the socket after each http request. # keep_alive: Use HTTP/1.0 requests with keep alive header to reuse the same connection. # 1.1: Use HTTP/1.1 requests that support keep alive as default. # Default: 1.0 ; netcam_http 1.0 # URL to use for a netcam proxy server, if required, e.g. "http://myproxy". # If a port number other than 80 is needed, use "http://myproxy:1234". # Default: not defined ; netcam_proxy value # Set less strict jpeg checks for network cameras with a poor/buggy firmware. # Default: off netcam_tolerant_check off # Let motion regulate the brightness of a video device (default: off). # The auto_brightness feature uses the brightness option as its target value. # If brightness is zero auto_brightness will adjust to average brightness value 128. # Only recommended for cameras without auto brightness auto_brightness off # Set the initial brightness of a video device. # If auto_brightness is enabled, this value defines the average brightness level # which Motion will try and adjust to. # Valid range 0-255, default 0 = disabled brightness 0 # Set the contrast of a video device. # Valid range 0-255, default 0 = disabled contrast 0 # Set the saturation of a video device. # Valid range 0-255, default 0 = disabled saturation 0 # Set the hue of a video device (NTSC feature). # Valid range 0-255, default 0 = disabled hue 0 ############################################################ # Round Robin (multiple inputs on same video device name) ############################################################ # Number of frames to capture in each roundrobin step (default: 1) roundrobin_frames 1 # Number of frames to skip before each roundrobin step (default: 1) roundrobin_skip 1 # Try to filter out noise generated by roundrobin (default: off) switchfilter off ############################################################ # Motion Detection Settings: ############################################################ # Threshold for number of changed pixels in an image that # triggers motion detection (default: 1500) threshold 1500 # Automatically tune the threshold down if possible (default: off) threshold_tune off # Noise threshold for the motion detection (default: 32) noise_level 32 # Automatically tune the noise threshold (default: on) noise_tune on # Despeckle motion image using (e)rode or (d)ilate or (l)abel (Default: not defined) # Recommended value is EedDl. Any combination (and number of) of E, e, d, and D is valid. # (l)abeling must only be used once and the 'l' must be the last letter. # Comment out to disable despeckle EedDl # Detect motion in predefined areas (1 - 9). Areas are numbered like that: 1 2 3 # A script (on_area_detected) is started immediately when motion is 4 5 6 # detected in one of the given areas, but only once during an event. 7 8 9 # One or more areas can be specified with this option. (Default: not defined) ; area_detect value # PGM file to use as a sensitivity mask. # Full path name to. (Default: not defined) ; mask_file value # Dynamically create a mask file during operation (default: 0) # Adjust speed of mask changes from 0 (off) to 10 (fast) smart_mask_speed 0 # Ignore sudden massive light intensity changes given as a percentage of the picture # area that changed intensity. Valid range: 0 - 100 , default: 0 = disabled lightswitch 0 # Picture frames must contain motion at least the specified number of frames # in a row before they are detected as true motion. At the default of 1, all # motion is detected. Valid range: 1 to thousands, recommended 1-5 minimum_motion_frames 1 # Specifies the number of pre-captured (buffered) pictures from before motion # was detected that will be output at motion detection. # Recommended range: 0 to 5 (default: 0) # Do not use large values! Large values will cause Motion to skip video frames and # cause unsmooth mpegs. To smooth mpegs use larger values of post_capture instead. pre_capture 0 # Number of frames to capture after motion is no longer detected (default: 0) post_capture 0 # Gap is the seconds of no motion detection that triggers the end of an event # An event is defined as a series of motion images taken within a short timeframe. # Recommended value is 60 seconds (Default). The value 0 is allowed and disables # events causing all Motion to be written to one single mpeg file and no pre_capture. gap 60 # Maximum length in seconds of an mpeg movie # When value is exceeded a new mpeg file is created. (Default: 0 = infinite) max_mpeg_time 0 # Always save images even if there was no motion (default: off) output_all off ############################################################ # Image File Output ############################################################ # Output 'normal' pictures when motion is detected (default: on) # Valid values: on, off, first, best, center # When set to 'first', only the first picture of an event is saved. # Picture with most motion of an event is saved when set to 'best'. # Picture with motion nearest center of picture is saved when set to 'center'. # Can be used as preview shot for the corresponding movie. output_normal off # Output pictures with only the pixels moving object (ghost images) (default: off) output_motion off # The quality (in percent) to be used by the jpeg compression (default: 75) quality 75 # Output ppm images instead of jpeg (default: off) ppm off ############################################################ # FFMPEG related options # Film (mpeg) file output, and deinterlacing of the video input # The options movie_filename and timelapse_filename are also used # by the ffmpeg feature ############################################################ # Use ffmpeg to encode mpeg movies in realtime (default: off) ffmpeg_cap_new off # Use ffmpeg to make movies with only the pixels moving # object (ghost images) (default: off) ffmpeg_cap_motion off # Use ffmpeg to encode a timelapse movie # Default value 0 = off - else save frame every Nth second ffmpeg_timelapse 0 # The file rollover mode of the timelapse video # Valid values: hourly, daily (default), weekly-sunday, weekly-monday, monthly, manual ffmpeg_timelapse_mode daily # Bitrate to be used by the ffmpeg encoder (default: 400000) # This option is ignored if ffmpeg_variable_bitrate is not 0 (disabled) ffmpeg_bps 500000 # Enables and defines variable bitrate for the ffmpeg encoder. # ffmpeg_bps is ignored if variable bitrate is enabled. # Valid values: 0 (default) = fixed bitrate defined by ffmpeg_bps, # or the range 2 - 31 where 2 means best quality and 31 is worst. ffmpeg_variable_bitrate 0 # Codec to used by ffmpeg for the video compression. # Timelapse mpegs are always made in mpeg1 format independent from this option. # Supported formats are: mpeg1 (ffmpeg-0.4.8 only), mpeg4 (default), and msmpeg4. # mpeg1 - gives you files with extension .mpg # mpeg4 or msmpeg4 - gives you files with extension .avi # msmpeg4 is recommended for use with Windows Media Player because # it requires no installation of codec on the Windows client. # swf - gives you a flash film with extension .swf # flv - gives you a flash video with extension .flv # ffv1 - FF video codec 1 for Lossless Encoding ( experimental ) # mov - QuickTime ( testing ) ffmpeg_video_codec swf # Use ffmpeg to deinterlace video. Necessary if you use an analog camera # and see horizontal combing on moving objects in video or pictures. # (default: off) ffmpeg_deinterlace off ############################################################ # Snapshots (Traditional Periodic Webcam File Output) ############################################################ # Make automated snapshot every N seconds (default: 0 = disabled) snapshot_interval 0 ############################################################ # Text Display # %Y = year, %m = month, %d = date, # %H = hour, %M = minute, %S = second, %T = HH:MM:SS, # %v = event, %q = frame number, %t = thread (camera) number, # %D = changed pixels, %N = noise level, \n = new line, # %i and %J = width and height of motion area, # %K and %L = X and Y coordinates of motion center # %C = value defined by text_event - do not use with text_event! # You can put quotation marks around the text to allow # leading spaces ############################################################ # Locate and draw a box around the moving object. # Valid values: on, off and preview (default: off) # Set to 'preview' will only draw a box in preview_shot pictures. locate off # Draws the timestamp using same options as C function strftime(3) # Default: %Y-%m-%d\n%T = date in ISO format and time in 24 hour clock # Text is placed in lower right corner text_right %Y-%m-%d\n%T-%q # Draw a user defined text on the images using same options as C function strftime(3) # Default: Not defined = no text # Text is placed in lower left corner ; text_left CAMERA %t # Draw the number of changed pixed on the images (default: off) # Will normally be set to off except when you setup and adjust the motion settings # Text is placed in upper right corner text_changes off # This option defines the value of the special event conversion specifier %C # You can use any conversion specifier in this option except %C. Date and time # values are from the timestamp of the first image in the current event. # Default: %Y%m%d%H%M%S # The idea is that %C can be used filenames and text_left/right for creating # a unique identifier for each event. text_event %Y%m%d%H%M%S # Draw characters at twice normal size on images. (default: off) text_double off ############################################################ # Target Directories and filenames For Images And Films # For the options snapshot_, jpeg_, mpeg_ and timelapse_filename # you can use conversion specifiers # %Y = year, %m = month, %d = date, # %H = hour, %M = minute, %S = second, # %v = event, %q = frame number, %t = thread (camera) number, # %D = changed pixels, %N = noise level, # %i and %J = width and height of motion area, # %K and %L = X and Y coordinates of motion center # %C = value defined by text_event # Quotation marks round string are allowed. ############################################################ # Target base directory for pictures and films # Recommended to use absolute path. (Default: current working directory) target_dir /tmp/motion # File path for snapshots (jpeg or ppm) relative to target_dir # Default: %v-%Y%m%d%H%M%S-snapshot # Default value is equivalent to legacy oldlayout option # For Motion 3.0 compatible mode choose: %Y/%m/%d/%H/%M/%S-snapshot # File extension .jpg or .ppm is automatically added so do not include this. # Note: A symbolic link called lastsnap.jpg created in the target_dir will always # point to the latest snapshot, unless snapshot_filename is exactly 'lastsnap' snapshot_filename %v-%Y%m%d%H%M%S-snapshot # File path for motion triggered images (jpeg or ppm) relative to target_dir # Default: %v-%Y%m%d%H%M%S-%q # Default value is equivalent to legacy oldlayout option # For Motion 3.0 compatible mode choose: %Y/%m/%d/%H/%M/%S-%q # File extension .jpg or .ppm is automatically added so do not include this # Set to 'preview' together with best-preview feature enables special naming # convention for preview shots. See motion guide for details jpeg_filename %v-%Y%m%d%H%M%S-%q # File path for motion triggered ffmpeg films (mpeg) relative to target_dir # Default: %v-%Y%m%d%H%M%S # Default value is equivalent to legacy oldlayout option # For Motion 3.0 compatible mode choose: %Y/%m/%d/%H%M%S # File extension .mpg or .avi is automatically added so do not include this # This option was previously called ffmpeg_filename movie_filename %v-%Y%m%d%H%M%S # File path for timelapse mpegs relative to target_dir # Default: %Y%m%d-timelapse # Default value is near equivalent to legacy oldlayout option # For Motion 3.0 compatible mode choose: %Y/%m/%d-timelapse # File extension .mpg is automatically added so do not include this timelapse_filename %Y%m%d-timelapse ############################################################ # Live Webcam Server ############################################################ # The mini-http server listens to this port for requests (default: 0 = disabled) webcam_port 8081 # Quality of the jpeg (in percent) images produced (default: 50) webcam_quality 50 # Output frames at 1 fps when no motion is detected and increase to the # rate given by webcam_maxrate when motion is detected (default: off) webcam_motion off # Maximum framerate for webcam streams (default: 1) webcam_maxrate 1 # Restrict webcam connections to localhost only (default: on) webcam_localhost off # Limits the number of images per connection (default: 0 = unlimited) # Number can be defined by multiplying actual webcam rate by desired number of seconds # Actual webcam rate is the smallest of the numbers framerate and webcam_maxrate webcam_limit 0 ############################################################ # HTTP Based Control ############################################################ # TCP/IP port for the http server to listen on (default: 0 = disabled) control_port 8080 # Restrict control connections to localhost only (default: on) control_localhost on # Output for http server, select off to choose raw text plain (default: on) control_html_output on # Authentication for the http based control. Syntax username:password # Default: not defined (Disabled) ; control_authentication username:password ############################################################ # Tracking (Pan/Tilt) ############################################################ # Type of tracker (0=none (default), 1=stepper, 2=iomojo, 3=pwc, 4=generic, 5=uvcvideo) # The generic type enables the definition of motion center and motion size to # be used with the conversion specifiers for options like on_motion_detected track_type 0 # Enable auto tracking (default: off) track_auto off # Serial port of motor (default: none) ; track_port value # Motor number for x-axis (default: 0) track_motorx 0 # Motor number for y-axis (default: 0) track_motory 0 # Maximum value on x-axis (default: 0) track_maxx 0 # Maximum value on y-axis (default: 0) track_maxy 0 # ID of an iomojo camera if used (default: 0) track_iomojo_id 0 # Angle in degrees the camera moves per step on the X-axis # with auto-track (default: 10) # Currently only used with pwc type cameras track_step_angle_x 10 # Angle in degrees the camera moves per step on the Y-axis # with auto-track (default: 10) # Currently only used with pwc type cameras track_step_angle_y 10 # Delay to wait for after tracking movement as number # of picture frames (default: 10) track_move_wait 10 # Speed to set the motor to (stepper motor option) (default: 255) track_speed 255 # Number of steps to make (stepper motor option) (default: 40) track_stepsize 40 ############################################################ # External Commands, Warnings and Logging: # You can use conversion specifiers for the on_xxxx commands # %Y = year, %m = month, %d = date, # %H = hour, %M = minute, %S = second, # %v = event, %q = frame number, %t = thread (camera) number, # %D = changed pixels, %N = noise level, # %i and %J = width and height of motion area, # %K and %L = X and Y coordinates of motion center # %C = value defined by text_event # %f = filename with full path # %n = number indicating filetype # Both %f and %n are only defined for on_picture_save, # on_movie_start and on_movie_end # Quotation marks round string are allowed. ############################################################ # Do not sound beeps when detecting motion (default: on) # Note: Motion never beeps when running in daemon mode. quiet on # Command to be executed when an event starts. (default: none) # An event starts at first motion detected after a period of no motion defined by gap ; on_event_start value # Command to be executed when an event ends after a period of no motion # (default: none). The period of no motion is defined by option gap. ; on_event_end value # Command to be executed when a picture (.ppm|.jpg) is saved (default: none) # To give the filename as an argument to a command append it with %f ; on_picture_save value # Command to be executed when a motion frame is detected (default: none) ; on_motion_detected value # Command to be executed when motion in a predefined area is detected # Check option 'area_detect'. (default: none) ; on_area_detected value # Command to be executed when a movie file (.mpg|.avi) is created. (default: none) # To give the filename as an argument to a command append it with %f ; on_movie_start value # Command to be executed when a movie file (.mpg|.avi) is closed. (default: none) # To give the filename as an argument to a command append it with %f ; on_movie_end value # Command to be executed when a camera can't be opened or if it is lost # NOTE: There is situations when motion doesn't detect a lost camera! # It depends on the driver, some drivers don't detect a lost camera at all # Some hang the motion thread. Some even hang the PC! (default: none) ; on_camera_lost value ############################################################ # Common Options For MySQL and PostgreSQL database features. # Options require the MySQL/PostgreSQL options to be active also. ############################################################ # Log to the database when creating motion triggered image file (default: on) sql_log_image on # Log to the database when creating a snapshot image file (default: on) sql_log_snapshot on # Log to the database when creating motion triggered mpeg file (default: off) sql_log_mpeg off # Log to the database when creating timelapse mpeg file (default: off) sql_log_timelapse off # SQL query string that is sent to the database # Use same conversion specifiers has for text features # Additional special conversion specifiers are # %n = the number representing the file_type # %f = filename with full path # Default value: # insert into security(camera, filename, frame, file_type, time_stamp, text_event) values('%t', '%f', '%q', '%n', '%Y-%m-%d %T', '%C') sql_query insert into security(camera, filename, frame, file_type, time_stamp, event_time_stamp) values('%t', '%f', '%q', '%n', '%Y-%m-%d %T', '%C') ############################################################ # Database Options For MySQL ############################################################ # Mysql database to log to (default: not defined) ; mysql_db value # The host on which the database is located (default: localhost) ; mysql_host value # User account name for MySQL database (default: not defined) ; mysql_user value # User password for MySQL database (default: not defined) ; mysql_password value ############################################################ # Database Options For PostgreSQL ############################################################ # PostgreSQL database to log to (default: not defined) ; pgsql_db value # The host on which the database is located (default: localhost) ; pgsql_host value # User account name for PostgreSQL database (default: not defined) ; pgsql_user value # User password for PostgreSQL database (default: not defined) ; pgsql_password value # Port on which the PostgreSQL database is located (default: 5432) ; pgsql_port 5432 ############################################################ # Video Loopback Device (vloopback project) ############################################################ # Output images to a video4linux loopback device # The value '-' means next available (default: not defined) ; video_pipe value # Output motion images to a video4linux loopback device # The value '-' means next available (default: not defined) ; motion_video_pipe value ############################################################## # Thread config files - One for each camera. # Except if only one camera - You only need this config file. # If you have more than one camera you MUST define one thread # config file for each camera in addition to this config file. ############################################################## # Remember: If you have more than one camera you must have one # thread file for each camera. E.g. 2 cameras requires 3 files: # This motion.conf file AND thread1.conf and thread2.conf. # Only put the options that are unique to each camera in the # thread config files. ; thread /usr/local/etc/thread1.conf ; thread /usr/local/etc/thread2.conf ; thread /usr/local/etc/thread3.conf ; thread /usr/local/etc/thread4.conf pi@raspberrypi ~ $・・・しかし、ここでフト悩んでしまった。 ここはSUACネットのLANの中で、研究室のパソコンもRaspberry Piも、それぞれ固定IPアドレスとはいえ、ネットワークのアクセスにはSUACのプロキシサーバを経由しているのである。 Raspberry Piからストリーミングで送られているライブ動画を受け取るには、ブラウザで「http://172.16.65.61:8081」とすればいいのだが、プロキシに行っては見ることが出来ない。 Internet Explorerなどという邪悪なブラウザは駄目、とあるが、SafariでもChromeでも駄目だった。pi@raspberrypi ~ $ sudo motion -n [0] Processing thread 0 - config file /etc/motion/motion.conf [0] Motion 3.2.12 Started [0] ffmpeg LIBAVCODEC_BUILD 3482368 LIBAVFORMAT_BUILD 3478785 [0] Thread 1 is from /etc/motion/motion.conf [0] motion-httpd/3.2.12 running, accepting connections [0] motion-httpd: waiting for data on port TCP 8080 [1] Thread 1 started [1] cap.driver: "uvcvideo" [1] cap.card: "UVC Camera (046d:0825)" [1] cap.bus_info: "usb-bcm2708_usb-1.3" [1] cap.capabilities=0x04000001 [1] - VIDEO_CAPTURE [1] - STREAMING [1] Config palette index 8 (YU12) doesn't work. [1] Supported palettes: [1] 0: YUYV (YUV 4:2:2 (YUYV)) [1] 1: MJPG (MJPEG) [1] Selected palette YUYV [1] Test palette YUYV (320x240) [1] Using palette YUYV (320x240) bytesperlines 640 sizeimage 153600 colorspace 00000008 [1] found control 0x00980900, "Brightness", range 0,255 [1] "Brightness", default -8193, current 128 [1] found control 0x00980901, "Contrast", range 0,255 [1] "Contrast", default 57343, current 32 [1] found control 0x00980902, "Saturation", range 0,255 [1] "Saturation", default 57343, current 32 [1] found control 0x00980913, "Gain", range 0,255 [1] "Gain", default 57343, current 0 [1] mmap information: [1] frames=4 [1] 0 length=153600 [1] 1 length=153600 [1] 2 length=153600 [1] 3 length=153600 [1] Using V4L2 [1] Resizing pre_capture buffer to 1 items [1] Started stream webcam server in port 8081しかしここで思い出したのが、Firefoxのプロキシ指定の柔軟さである。 そして以下のように、他のウインドウはプロキシ経由でインターネットを見ているのに、ストリーミングを見るウインドウを選んだ状態でプロキシを外すことで、同時にローカルのストリーミングを受けることに成功した(^_^)。 後に、プロキシの設定のところで「プロキシを除外するIPアドレス」に指定してもいいと気付いたが、とにかく、これで懸案の一つ、「Raspberry PiでWebカメラの動画ストリーミング」は出来た。
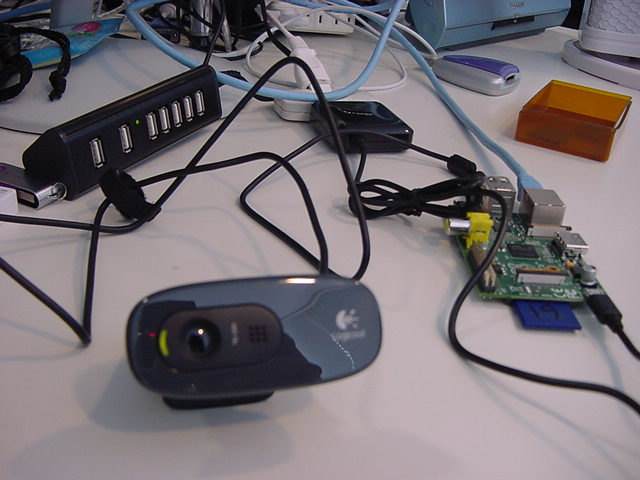
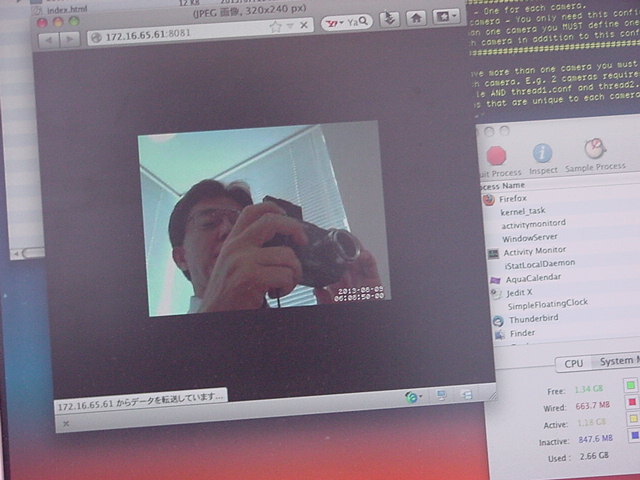
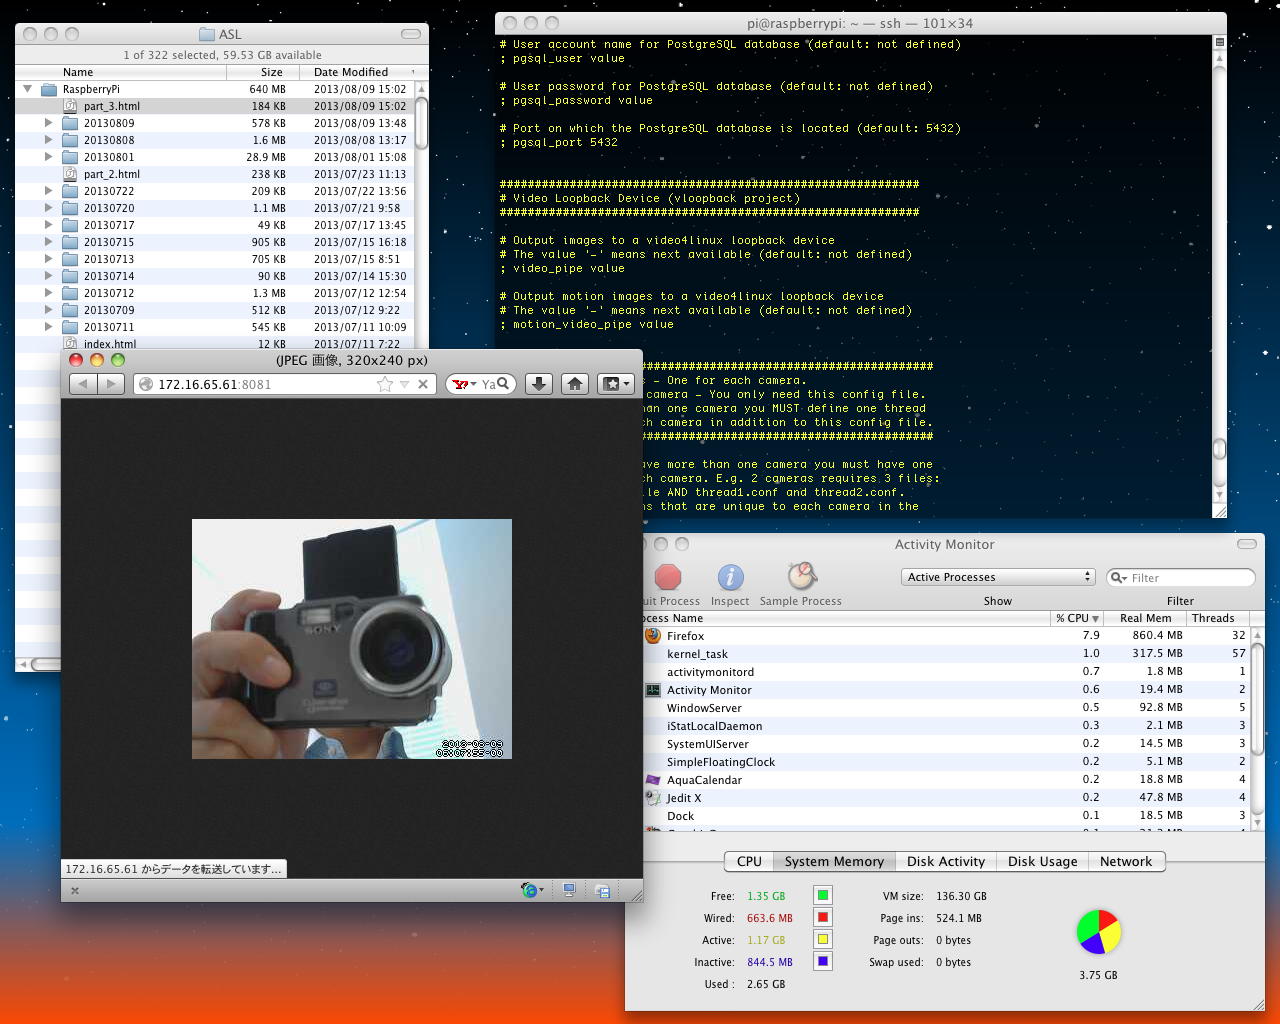
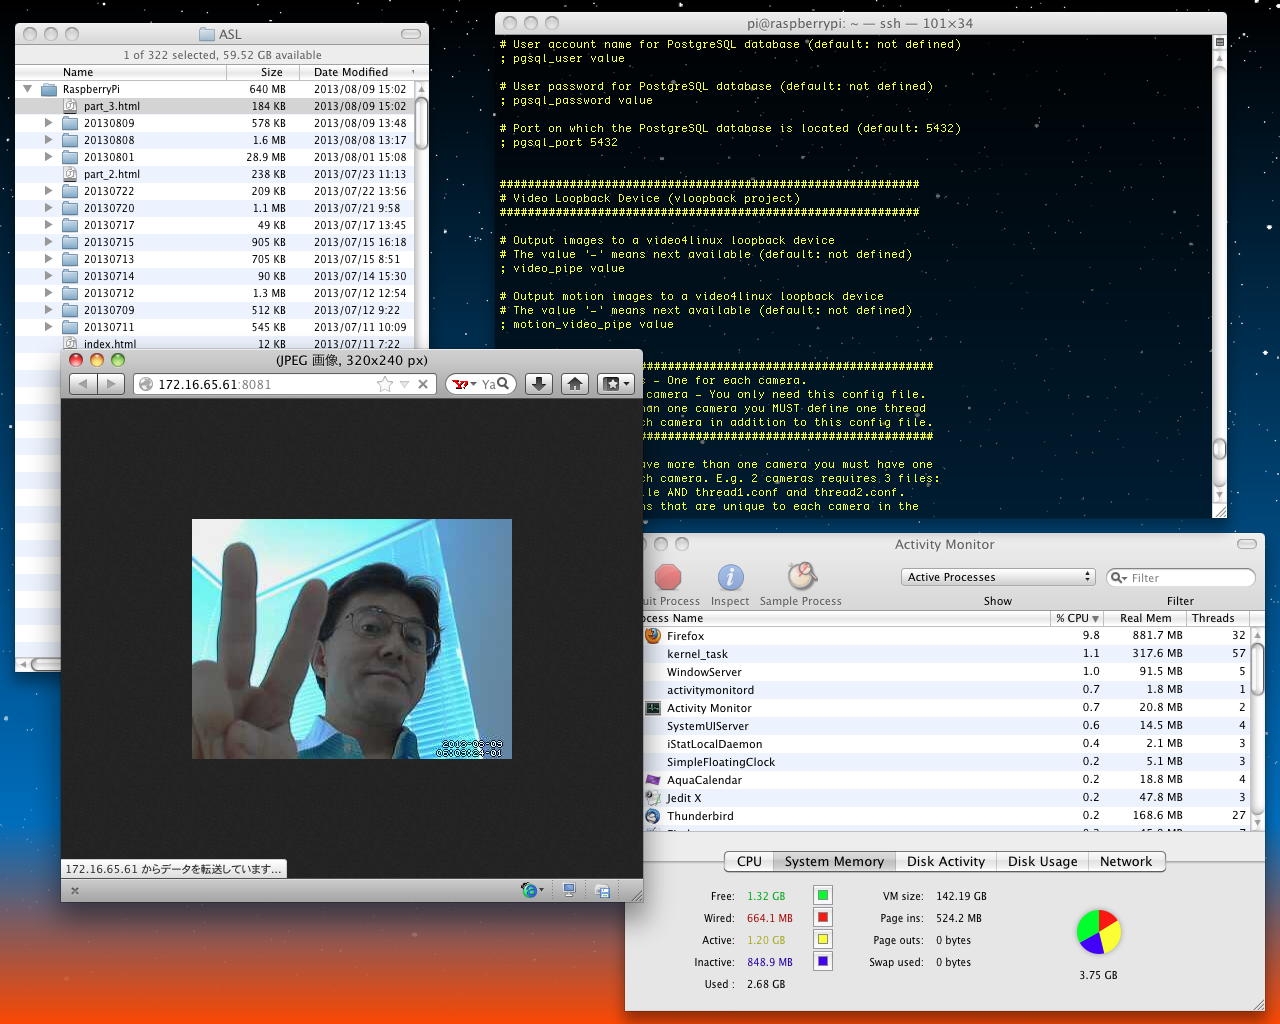

YouTube 41虎も このように だいぶ進んだようだが、なんとか僕も少しだけ成長(進展)することができた。 いいお盆休みになりそうである。(^_^)
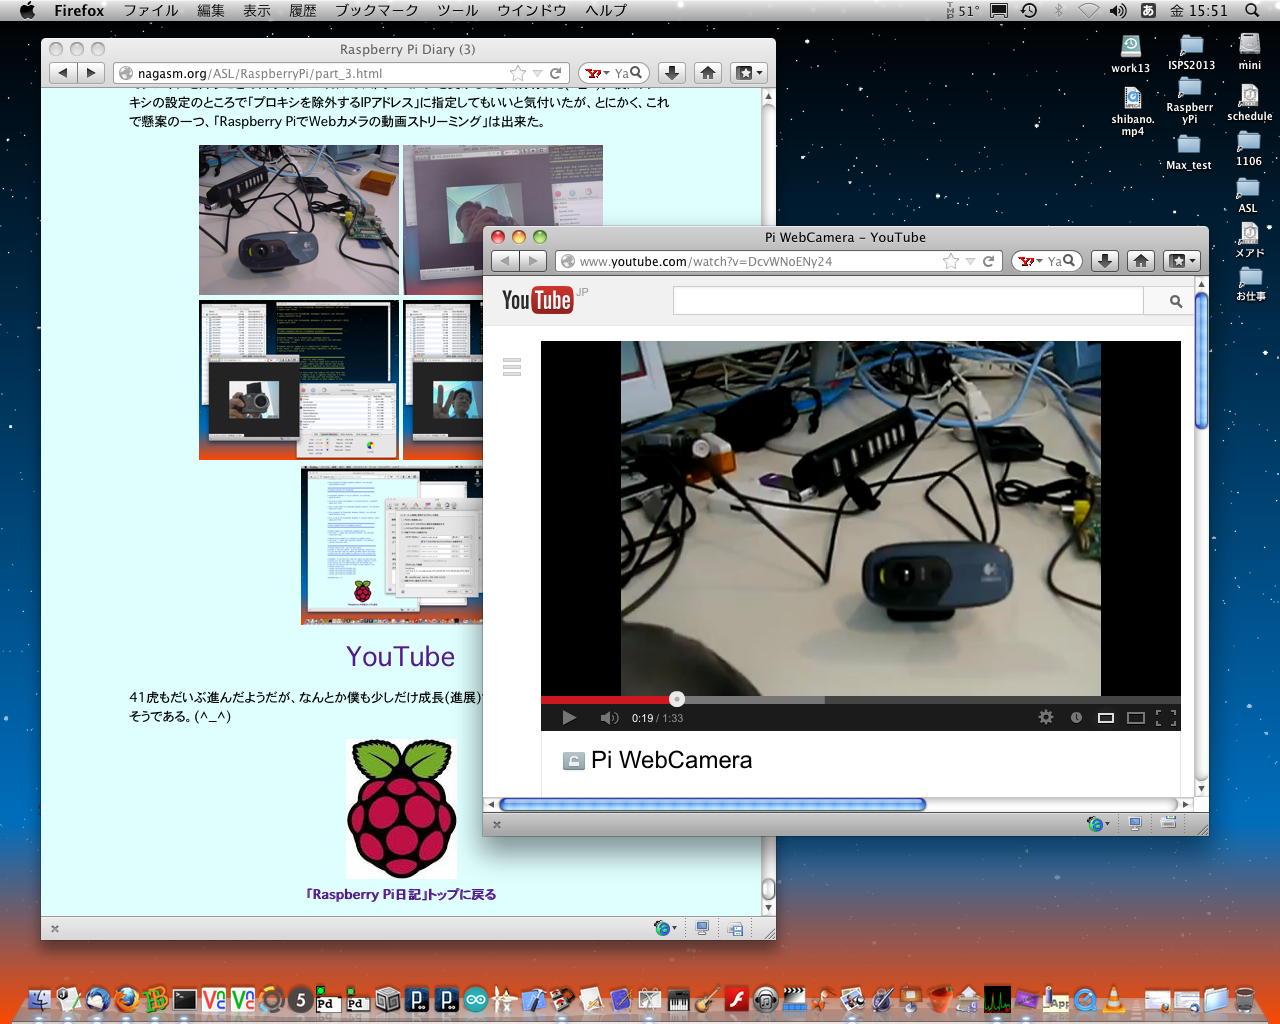
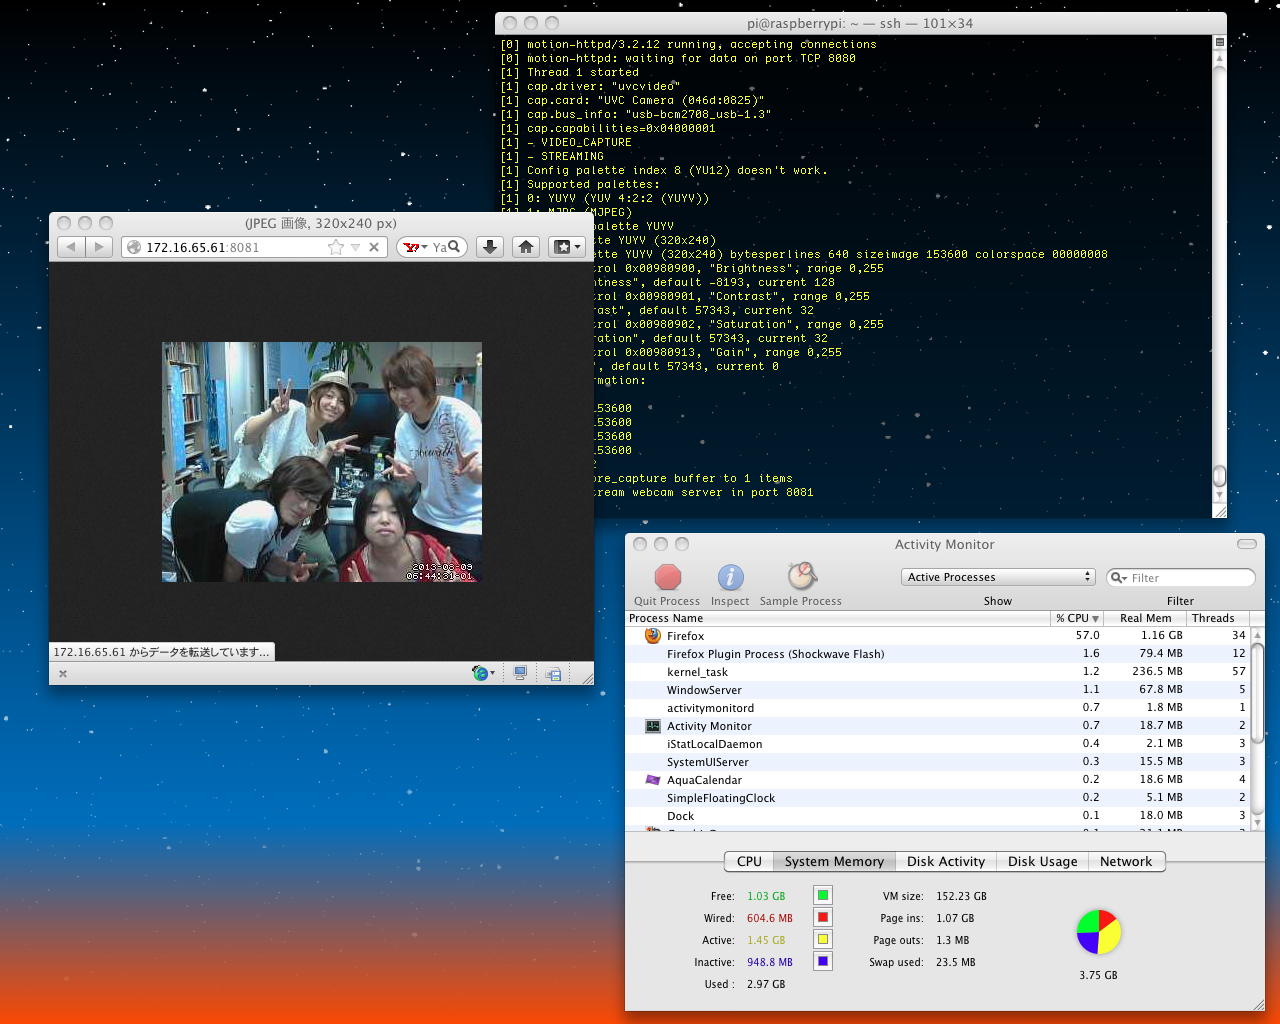

「Raspberry Pi日記」トップに戻る