Raspberry Pi 日記 (part3)
長嶋 洋一
2013年7月15日(月)
新しい週の月曜日であるが、今週後半にはいよいよSketching2013に行く週である。 祝日だが授業日であり、2限の「音楽情報科学」と5限のアカペラ補習特訓、さらに午後には明日の「企画立案演習」の最終プレゼンデータの提出などがあるが、Raspberry Piもまだまだ進められる。 Sketching2013での僕の発表は3日間のうち2日目の午後なので、プレゼンはまだ全く作っていない(^_^;)。 直前まで進めて、その場の空気を読んで、現場で作るのがSketchingの醍醐味である。「一晩、寝かす」というのはいい言葉である。 これまで、トラブル/問題点に突き当たったまま前日が終わって、翌日、目覚めた瞬間に閃いて一気に解決した、という例は数えきれないぐらい、たくさんあった。 寝ている間にも脳内で状況が整理される、という事もあるし、リフレッシュして視点が広がる、という事もあるだろう。 その意味でも、行き詰まった時にダラダラと無駄に徹夜する、というのは最低の戦略なのである。 そして今朝もまた、朝イチの解決を体験した(^_^)。
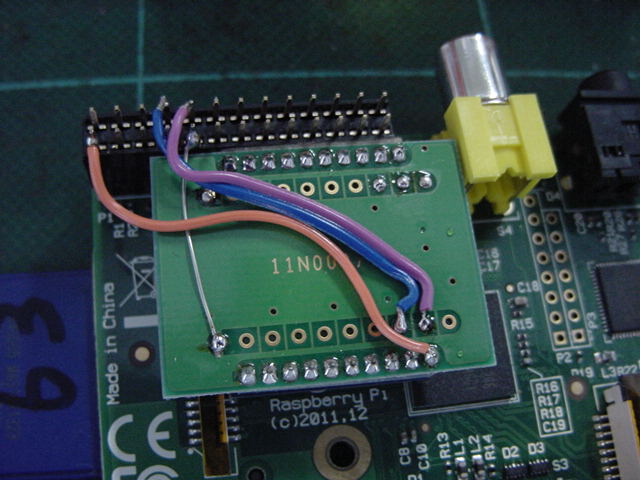
研究室に出て来てお仕事パソコンの前に置かれた、XBeeを取り付けたRaspberry Piと、ホストMacのUSBシリアルに繋ぐXBeeボックスが並んでいるのをフト見た瞬間、またまたの初歩的バグに気付いたのである。 以下のように、2つのXBeeで裏表が反対なのに、同じ側から配線が出ている。(^_^;)
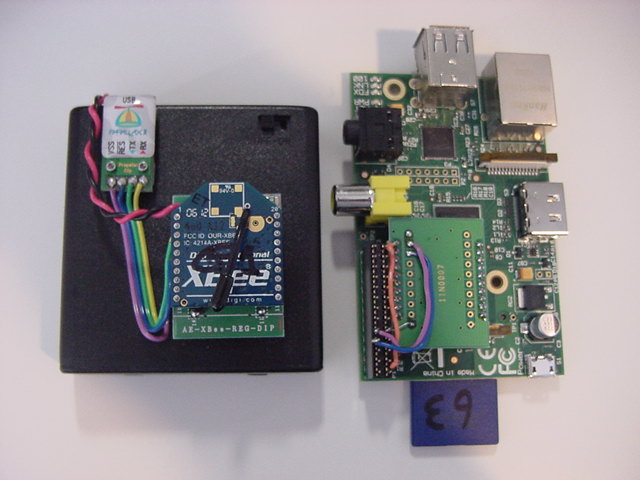
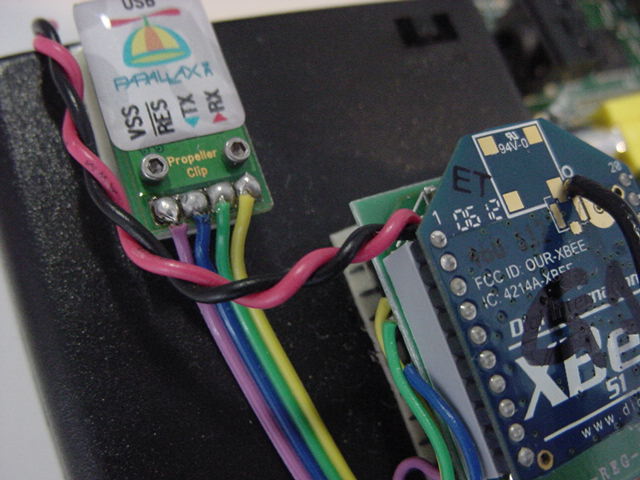
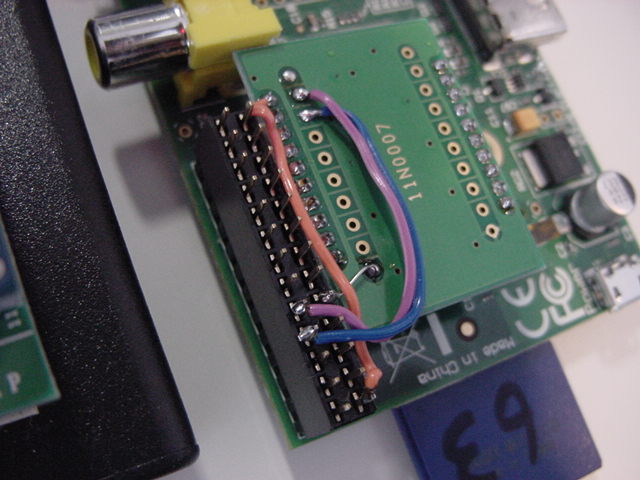
つまりこれは、Raspberry Piに取り付けたXBeeは、裏表を間違えていて、反対側のラインから配線しているので、TX/RXの信号だけでなく、+3.3Vの電源もGNDも、全て接続されていない、浮いている(なので壊れてもいない)状態なのであった。 配線した一昨日も、実験した昨日も、まったく気付かなかったが、そういえばSUACboardのバグの一つは、XBeeのTX/RXの取り違えであった。 XBeeというのは、なかなか鬼門である(^_^;)。 そこでまずは朝イチで、以下のように配線を正しく修正した。
そしてここから、昨日インストールした「pyserial」の中のサンプルのうち、テストできそうなものは無いか・・・とあれこれ試行錯誤的に、Raspberry Piにrcpしては実行する、と繰り返した。 そして2限を挟んで昼休みに再開したところで、改めて昨日チェックした関連ページの記述をザッと読み流してみると、次第に以下のような事が判ってきた。
このページ では、Raspberry Piのシリアルポートをコンソール端末として使うトピックが書かれていた。 これについては後述する別のWebページの詳しい解説に従って対応することとなった。
このページ では、以下のように「dialout」という謎のグループについて書かれていたが、他のページでこういう話題がまったく出て来ないので、とりあえず無視することにした。(^_^;)
The Serial Port is generally usable by the users in the group dialout.
To add oneself to the group dialout the the following command
needs to be executed with root privileges:

$useradd -G {dialout} your_name
このページ は新しく到達したページだったが、Raspberry Piのシリアルポートをコンソールに使う、という全体を解説したページであり、上で謎だった「dialout」についても書かれていた。 しかしこれはパスの話題なのでパスした。
このページ には、Raspberry PiのGPIOのこのポートは「Raspberry Pi’s Mini-UART」という名前であること、さらに以下のように、Raspberry Piのシリアルポートは、defaultではコンソール端末とやりとりするポートとして設定されているので、自分のプログラムにRaspberry Piのシリアルポートを使うためには、このdefault定義をdisableしなければならないとあった。 どこかで見かけて謎だった「/dev/ttyAMA0」も書かれていた(^_^)。 これについては後述する別のWebページの詳しい解説に従って対応することとなった。
Since the GPIO pins give access to the Mini UART, you can establish a serial
console, which can be used to log in to the Pi, and many other things.
You can reconfigure the RPi so that the Mini UART isn’t acting as a serial
console and use it for outer purposes (e.g. communicate with an attached
Arduino or Xbee).  Using the Raspberry Pi’s serial port requires some Linux
reconfiguration and the abandonment of the serial console, and potentially
some level conversion, but it could be useful. The Mini-UART pins to provide
access to Linux’s /dev/ttyAMA0 serial port.  To be able to use the serial
port to connect and talk to other devices, the serial port console login needs
to be disabled and the post “Raspberry Pi and the Serial Port” shows you how.
このページ にも同様に、以下が書かれていた。 そしてステップバイステップで、その作業手順が書かれていたが、次に紹介するページの方が、ほぼ同様の内容をよりスッキリと並べていたので、そちらに従うことにした。もし問題があったら、ここに戻ってくればいい。
If you intend to use the serial port for a software application running on
the Raspberry Pi, there is a bit of configuration required to disable the
console from using this port.   By default, the serial port is configured
as a console port for interacting with the Linux OS shell.  The following
steps will guide you through disabling the port from console access.
このページ にも同様に以下のように書かれていて、まさに僕は推奨されているようにネットワーク越しにSSHしている、という事で安心した(^_^)。 そしてこのページの「手順」が、もっとも同類のページの中で整理されているように思えたので、これを進めてみることにした。
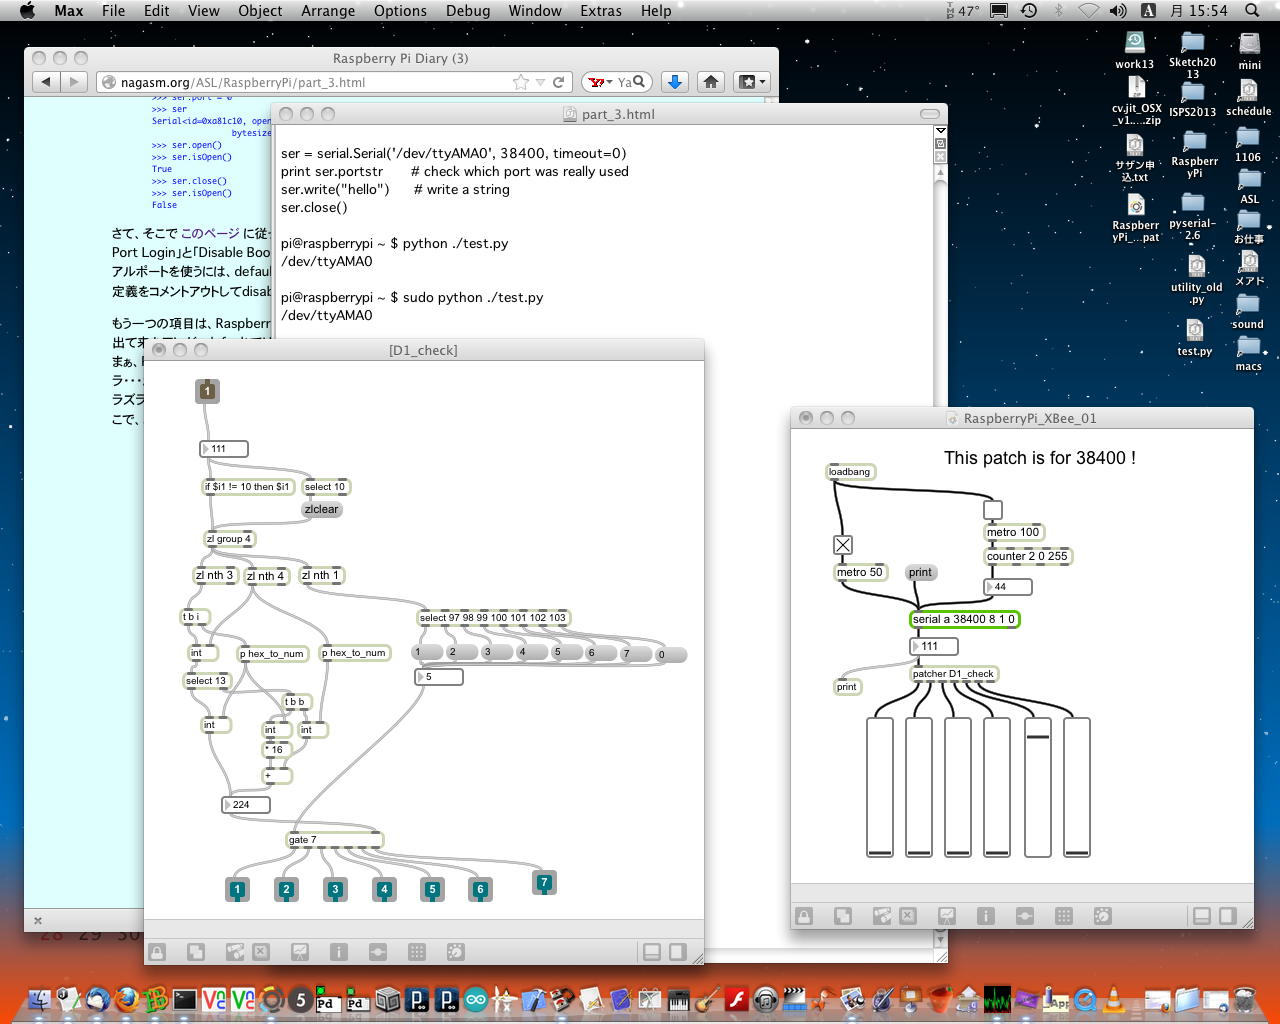
ただし気になったのは、あと1カ所 このページ である。 以下のように脳天気にPythonコマンドが並んでいて、他ページとまるで雰囲気が違う(^_^;)。 そこでとりあえず、「test.py」にこれらを入れて走らせてみて、何も起きない、つまり環境設定が先である、とまず確認しておいた。By default the Raspberry Pi’s serial port is configured to be used for console input/output. Whilst this is useful if you want to login using the serial port, it means you can't use the Serial Port in your programs. To be able to use the serial port to connect and talk to other devices (e.g. Arduino), the serial port console login needs to be disabled. Needless to say you will need some other way to login to the Raspberry Pi, and we suggest doing this over the network using an SSH connection.さて、そこで このページ に従っての環境設定である。 環境の変更は大きく2項目あり、「Disable Serial Port Login」と「Disable Bootup Info」であり、前者は必須、後者はoptionalである。 自分の用途にシリアルポートを使うには、defaultではコンソールとしてログインに使えるようになっているシリアルポートの定義をコメントアウトしてdisableすればいい。Short introduction Opening serial ports Open port 0 at “9600,8,N,1”, no timeout: >>> import serial >>> ser = serial.Serial(0) # open first serial port >>> print ser.portstr # check which port was really used >>> ser.write("hello") # write a string >>> ser.close() # close port Open named port at “19200,8,N,1”, 1s timeout: >>> ser = serial.Serial('/dev/ttyS1', 19200, timeout=1) >>> x = ser.read() # read one byte >>> s = ser.read(10) # read up to ten bytes (timeout) >>> line = ser.readline() # read a '\n' terminated line >>> ser.close() Open second port at “38400,8,E,1”, non blocking HW handshaking: >>> ser = serial.Serial(1, 38400, timeout=0, ... parity=serial.PARITY_EVEN, rtscts=1) >>> s = ser.read(100) # read up to one hundred bytes ... # or as much is in the buffer Configuring ports later Get a Serial instance and configure/open it later: >>> ser = serial.Serial() >>> ser.baudrate = 19200 >>> ser.port = 0 >>> ser Serial<id=0xa81c10, open=False>(port='COM1', baudrate=19200, bytesize=8, parity='N', stopbits=1, timeout=None, xonxoff=0, rtscts=0) >>> ser.open() >>> ser.isOpen() True >>> ser.close() >>> ser.isOpen() Falseもう一つの項目は、Raspberry Piに外部モニタを接続して起動した時にズラズラズラズラズラズラ・・・と出て来たアレが、defaultではこのシリアルポートにも出てしまう、というのを止めるかどうか、である。 まぁ、Raspberry Piを起動した後でホストのMaxと繋ぐ、というような場合には、別にズラズラズラズラ・・・が出た後でMaxのパッチを開けば関係ないし、今回のようにまだ稼働していない場合には、このズラズラズラズラ・・・の出力をMaxでモニタすると、ハードウェア的に動作していることの確認も出来る。 そこで、以下にこの部分の手順を転載しておいて、この後者の作業は「行わない」という事にした。
そこでいよいよ、「Disable Serial Port Login」である。 作業内容は以下のようにシンプルである。Disable Bootup Info When the Raspberry Pi boots up, all the bootup information is sent to the serial port. Disabling this bootup information is optional and you may want to leave this enabled as it is sometimes useful to see what is happening at bootup. If you have a device connected (i.e. Arduino) at bootup, it will receive this information over the serial port, so it is up to you to decide whether this is a problem or not. You can disable it by editing the file /boot/cmdline.txt The contents of the file look like this dwc_otg.lpm_enable=0 console=ttyAMA0,115200 kgdboc=ttyAMA0, 115200 console=tty1 root=/dev/mmcblk0p2 rootfstype=ext4 elevator=deadline rootwait Remove all references to ttyAMA0 (which is the name of the serial port). The file will now look like this dwc_otg.lpm_enable=0 console=tty1 root=/dev/mmcblk0p2 rootfstype=ext4 elevator=deadline rootwaitということでリブートしたが、defaultのRaspberry Piのボーレートは115200bpsなので、38400でモニタしているMaxには何も出て来なかった(^_^;)。 とりあえず、以下のように「sudo nano /etc/inittab」は改訂されている事をまず確認した。
- 「sudo nano /etc/inittab」とする
- いちばん下にあった以下の部分に「#」を付けてコメントアウトする
#Spawn a getty on Raspberry Pi serial line
T0:23:respawn:/sbin/getty -L ttyAMA0 115200 vt100
↓
#Spawn a getty on Raspberry Pi serial line
#T0:23:respawn:/sbin/getty -L ttyAMA0 115200 vt100- ctrl+Oで上書きする
- ctrl+Xで終了する
- 「sudo shutdown -r now」でリブートする
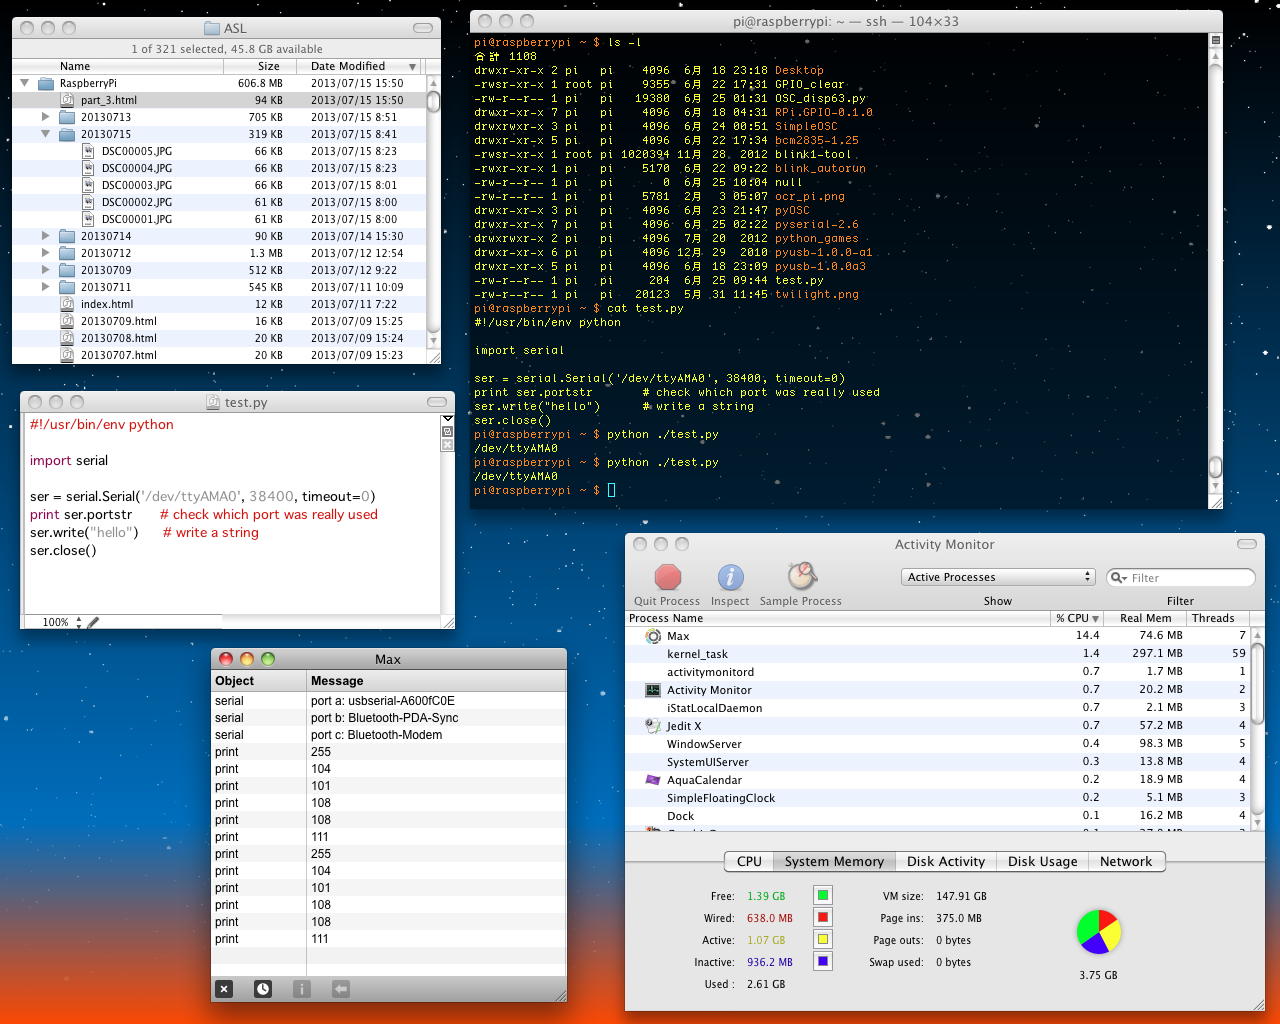
これが済んだら、「sudo apt-get install minicom」とminicomという簡易コンソールツールをRaspberry Piにインストールして、「minicom -b 9600 -o -D /dev/ttyAMA0」でホストPCと通信してみろ、とある。 しかし1日分600円を惜しむ貧乏人根性から、稼働してしまえば使わないので出来ればこれを避けたい(^_^;)という理由で、悪あがきをしてみる事にした。nagasm-Mac-mini:~ nagasm$ ssh pi@172.16.65.63 pi@172.16.65.63's password: Linux raspberrypi 3.6.11+ #456 PREEMPT Mon May 20 17:42:15 BST 2013 armv6l The programs included with the Debian GNU/Linux system are free software; the exact distribution terms for each program are described in the individual files in /usr/share/doc/*/copyright. Debian GNU/Linux comes with ABSOLUTELY NO WARRANTY, to the extent permitted by applicable law. Last login: Tue Jun 25 07:51:47 2013 pi@raspberrypi ~ $ ls Desktop RPi.GPIO-0.1.0 blink1-tool ocr_pi.png python_games test.py GPIO_clear SimpleOSC blink_autorun pyOSC pyusb-1.0.0-a1 twilight.png OSC_disp63.py bcm2835-1.25 null pyserial-2.6 pyusb-1.0.0a3 pi@raspberrypi ~ $ cat /etc/inittab # /etc/inittab: init(8) configuration. # $Id: inittab,v 1.91 2002/01/25 13:35:21 miquels Exp $ # The default runlevel. id:2:initdefault: # Boot-time system configuration/initialization script. # This is run first except when booting in emergency (-b) mode. si::sysinit:/etc/init.d/rcS # What to do in single-user mode. ~~:S:wait:/sbin/sulogin # /etc/init.d executes the S and K scripts upon change # of runlevel. # Runlevel 0 is halt. # Runlevel 1 is single-user. # Runlevels 2-5 are multi-user. # Runlevel 6 is reboot. l0:0:wait:/etc/init.d/rc 0 l1:1:wait:/etc/init.d/rc 1 l2:2:wait:/etc/init.d/rc 2 l3:3:wait:/etc/init.d/rc 3 l4:4:wait:/etc/init.d/rc 4 l5:5:wait:/etc/init.d/rc 5 l6:6:wait:/etc/init.d/rc 6 # Normally not reached, but fallthrough in case of emergency. z6:6:respawn:/sbin/sulogin # What to do when CTRL-ALT-DEL is pressed. ca:12345:ctrlaltdel:/sbin/shutdown -t1 -a -r now # Action on special keypress (ALT-UpArrow). #kb::kbrequest:/bin/echo "Keyboard Request--edit /etc/inittab to let this work." # What to do when the power fails/returns. pf::powerwait:/etc/init.d/powerfail start pn::powerfailnow:/etc/init.d/powerfail now po::powerokwait:/etc/init.d/powerfail stop # /sbin/getty invocations for the runlevels. # # The "id" field MUST be the same as the last # characters of the device (after "tty"). # # Format: #: : : # # Note that on most Debian systems tty7 is used by the X Window System, # so if you want to add more getty's go ahead but skip tty7 if you run X. # ##1:2345:respawn:/sbin/getty --noclear 38400 tty1 1:2345:respawn:/bin/login -f pi tty1 /dev/tty1 2>&1 2:23:respawn:/sbin/getty 38400 tty2 3:23:respawn:/sbin/getty 38400 tty3 4:23:respawn:/sbin/getty 38400 tty4 5:23:respawn:/sbin/getty 38400 tty5 6:23:respawn:/sbin/getty 38400 tty6 # Example how to put a getty on a serial line (for a terminal) #T0:23:respawn:/sbin/getty -L ttyS0 9600 vt100 #T1:23:respawn:/sbin/getty -L ttyS1 9600 vt100 # Example how to put a getty on a modem line. #T3:23:respawn:/sbin/mgetty -x0 -s 57600 ttyS3 #Spawn a getty on Raspberry Pi serial line #T0:23:respawn:/sbin/getty -L ttyAMA0 115200 vt100 pi@raspberrypi ~ $ このページ から、「minicom-2.6.2.tar.gz」は簡単にダウンロード出来た。 しかしこれはPythonでなくCなので、ちょっと簡単ではない(^_^;)。 以下のように、「README」にインストールの手順が書かれているが、makeモノである。 これは悩ましい。
あくまでminicomは、Raspberry PiのGPIOポートにあるUARTを自分用に使うための環境設定が出来たことの確認に使うだけである。 この環境設定は、上記のように、まぁたぶん出来ている。 そして手元には、エラーなくインストール出来た模様の「pyserial-2.6」もある。 ということはやはり、今度は環境設定まで済んでいるのだ、という前提で、 このページ を攻めて行けばいい筈である。Quick instructions for installation: 1. Change to the minicom-$VERSION directory. 2. ./configure (see ./configure --help for options) 3. make 4. make install 5. minicom -s (for changing /etc/minicom you probably need to run it as root) Change what should be changed on your system, and choose 'Save setup as dfl' from the configuration menu to save the changed settings as system defaults. Now add every user which should be allowed to use minicom to the group of the corresponding character devices (e.g. /dev/ttyS0). On Debian this group already exists and is called 'dialout'. Now you should have minicom compiled, installed and ready to use. For more information, have a look at the other files.そこで、改めて このページ の簡単なサンプルをrcpして実行させてみると、以下のようにエラーは出ず、ポートも正しく表示され、XBeeをモニタしているMaxの画面にも、無事にデータの到着が表示された(^_^)。 ただし、"hello"という文字列の出力に対して、何故か先頭に「255」という値が付いてきた。
pi@raspberrypi ~ $ ls
Desktop        RPi.GPIO-0.1.0  blink1-tool    ocr_pi.png    python_games    test.py
GPIO_clear     SimpleOSC       blink_autorun  pyOSC         pyusb-1.0.0-a1  twilight.png
OSC_disp63.py  bcm2835-1.25    null           pyserial-2.6  pyusb-1.0.0a3

pi@raspberrypi ~ $ rcp nagasm@172.16.65.31:Desktop/test.py .
Password:
test.py                                                               100%  192     0.2KB/s   00:00

pi@raspberrypi ~ $ cat test.py
#! python

import serial

ser = serial.Serial('/dev/ttyAMA0', 38400, timeout=0)
print ser.portstr       # check which port was really used
ser.write("hello")      # write a string
ser.close()

pi@raspberrypi ~ $ python ./test.py
/dev/ttyAMA0

pi@raspberrypi ~ $ sudo python ./test.py
/dev/ttyAMA0

pi@raspberrypi ~ $

これでOK、ということで、実験用に使った単体のRaspberry PiからXBee付きのGPIOコネクタを外して、3台合体のRaspberry Piの63号機に繋いで動作確認・・・とテストしてみると、何故かMaxのモニタが沈黙してしまった(^_^;)。 さっきは動いていたのでハード障害ではなく、Maxのシリアルポートのご機嫌かもしれないが、ここで5限となったので今日はおしまいである。 明日は終日ギッシリの予定なので、だいたいここらあたりまで、という感じになってきた。

「Raspberry Pi日記」トップに戻る